2011 Outlander Installed with Katzkin Leather Interior, Pioneer AVIC Z14 & LED Lights
#1
 05-26-2012, 03:53 AM


Hi guys. I have a 2011 Outlander LS and these are a few mods that I've done to it so far:
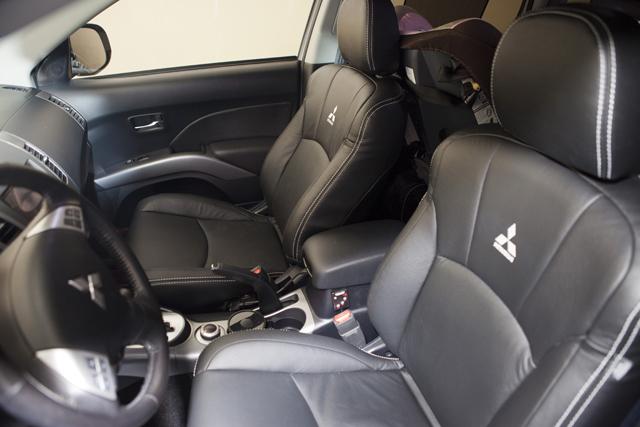
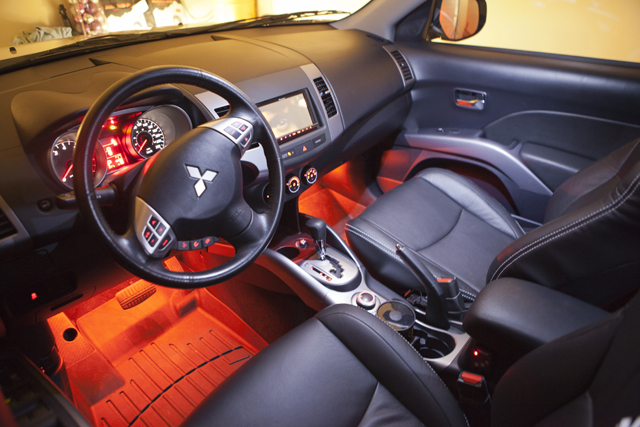
LEATHER SEATS
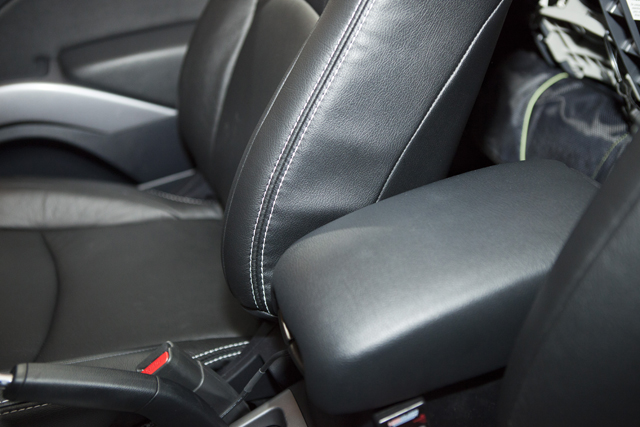
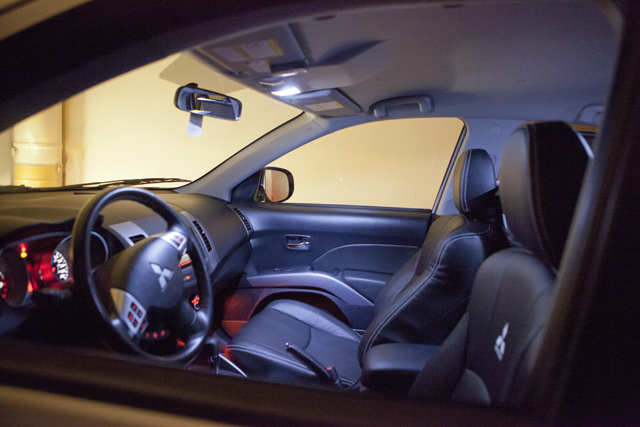
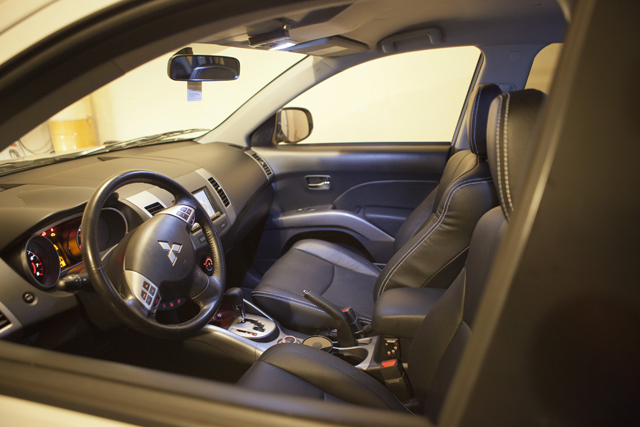
The Outlander came with the factory black cloth seats. First thing I did was purchase the Katzkin OEM Leather seats in black with double stitched thread in white to create a bit of contrast. They threw in the Mitsubishi diamond logo for free. Anything that was originally cloth was converted to leather including the door panels and centre console arm rest.
Firstly, the leather is much softer and more comfortable that the factory leather. This is my second vehicle that I've had done in Katzkin leather and I can definitely vouch for the durability and quality of it. My 6 year old Jeep only has a little bit of wear on the driver side where my wallet and jeans have worn away the leather a little bit. All the other less traffic seats are in perfect condition. They were able to integrate the factory heated leather seats. In the case of my Jeep, the factory seats didn't have heaters so I purchased that upgrade and they integrated the switch on the side of the seat which was very accessible.
For those of you thinking of doing the upgrade to leather I would highly recommend the Katzkin product. Not only is it a good quality, but you can customize it out the ying yang with different colours, piping, perforated leather etc. My Outlander LS has 3 rows of seats and I went through an authorized dealer in Vancouver, BC called ASC. The Mitsubishi dealer told me they were only able to do 2 rows so that's why I didn't use them. Plus the other company did the three rows for cheaper than the Mitsubishi dealer offering 2 rows. The installation was completed in 1 day, however, be ready to leave the car windows open for 2 days because the fumes are STRONG!
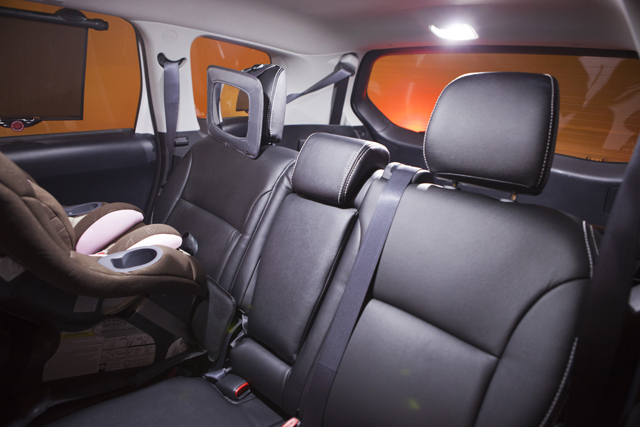
CABIN LIGHTING
Next thing I did was buy some 31mm Festoon LED lights in the driver, passenger and trunk overhead lights.They have 12 forward facing LED's in each bulb. It makes such a difference when compared to the conventional bulbs. The light is a cool white with the slightest tinge of blue and definitely makes the car interior look more high end like the Merc's and Audi's.
AMBIENT LIGHTING
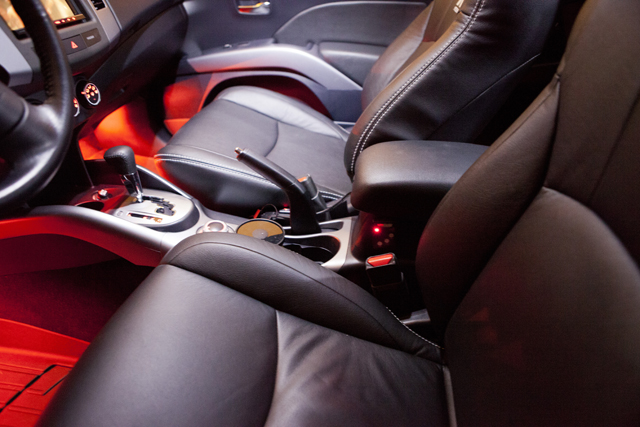
The next thing I did was get x4 12" orange LED strips to install under the driver seats and under the dash. I got orange ones to complement the colour of the lights in the dash. I ran the wires underneath the centre console and concealed the LED strips out of sight but pointed them at an angle to spread the ambient glow across the floor of the car. The control unit was hidden in the side panels of the centre console and the switch was attached on the driver side to be accesible. I just tapped the 12V power in the centre console and fused it for protection. The LED lights have all sorts of features like sound activation, strobe etc but I'm not into that. I just set them on a medium glow for the ambient light. Being LEDs no heat is generated compared to their neon conterparts.
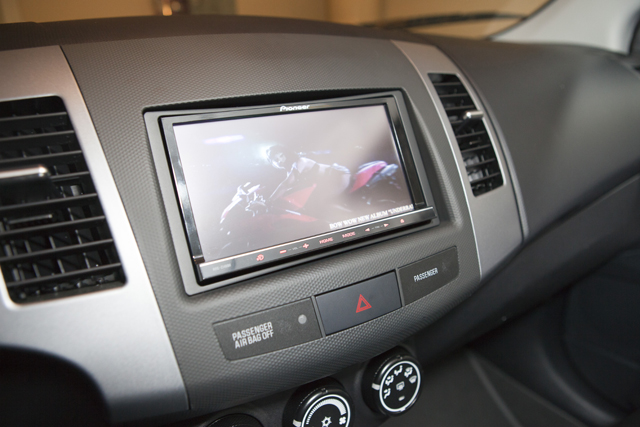
DOUBLE DIN STEREO
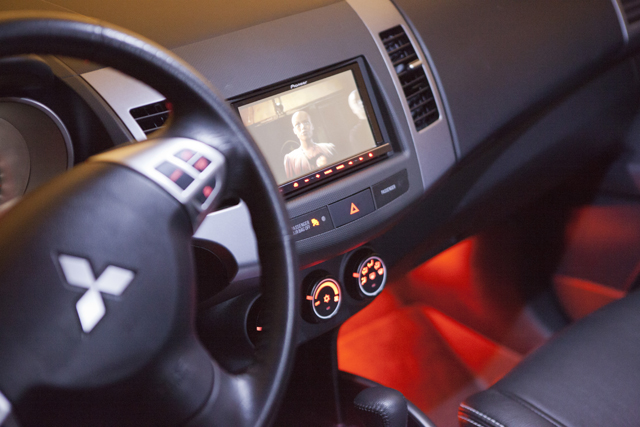
I bought the 2012 flagship head unit from Pioneer. It was the AVIC Z140BH. Without going into too much detail I bought it and installed the Pioneer ND-BC5 rear view camera. To keep the steering wheel controls I bought the Metra Axess controller and wiring harness. I also bought the Scosche and Metra dash kits. I ran AV, power and ground wires under the front passenger seat for a later installation when I get my headrest monitors for the rear passengers.
Initially I installed the Scosche dash kit because it matched the black colour of the dash better, but then I changed it to the Metra because that actually matched the texture of the factory dash whereas the Scosche was smooth plastic. The colour difference only shows up more because of my flash, but in normal lighting it it more seamless and fits much better than the Scosche dash kit. Just a note here that you have to peel off the factory stickers for the passenger seat belt and airbag warnings. Some sources say you need to pop it out from the back using a screw driver. THIS IS WRONG AND WILL RUIN THE STICKERS! You have to use a blade to carefully lift up a corner. It is glued all the way across and will peel off slowly. Make sure you take care not to peel it at too steep an angle or you will cause creases or stress marks in the plastic sticker. I will provide some feedback on the setup in a separate thread.
The last mod in this installation was the customized startup screen for the Pioneer Head Unit. I created a custom Mitsubishi boot screen in photoshop in the same orange tones that are in the cabin.

Finally, I just want to say thanks to those people that contribute to this forum. It is definitely a great source for inspiration and information. I look forward to my next project and please feel free to leave some feedback!
LEATHER SEATS
The Outlander came with the factory black cloth seats. First thing I did was purchase the Katzkin OEM Leather seats in black with double stitched thread in white to create a bit of contrast. They threw in the Mitsubishi diamond logo for free. Anything that was originally cloth was converted to leather including the door panels and centre console arm rest.
Firstly, the leather is much softer and more comfortable that the factory leather. This is my second vehicle that I've had done in Katzkin leather and I can definitely vouch for the durability and quality of it. My 6 year old Jeep only has a little bit of wear on the driver side where my wallet and jeans have worn away the leather a little bit. All the other less traffic seats are in perfect condition. They were able to integrate the factory heated leather seats. In the case of my Jeep, the factory seats didn't have heaters so I purchased that upgrade and they integrated the switch on the side of the seat which was very accessible.
For those of you thinking of doing the upgrade to leather I would highly recommend the Katzkin product. Not only is it a good quality, but you can customize it out the ying yang with different colours, piping, perforated leather etc. My Outlander LS has 3 rows of seats and I went through an authorized dealer in Vancouver, BC called ASC. The Mitsubishi dealer told me they were only able to do 2 rows so that's why I didn't use them. Plus the other company did the three rows for cheaper than the Mitsubishi dealer offering 2 rows. The installation was completed in 1 day, however, be ready to leave the car windows open for 2 days because the fumes are STRONG!
CABIN LIGHTING
Next thing I did was buy some 31mm Festoon LED lights in the driver, passenger and trunk overhead lights.They have 12 forward facing LED's in each bulb. It makes such a difference when compared to the conventional bulbs. The light is a cool white with the slightest tinge of blue and definitely makes the car interior look more high end like the Merc's and Audi's.
AMBIENT LIGHTING
The next thing I did was get x4 12" orange LED strips to install under the driver seats and under the dash. I got orange ones to complement the colour of the lights in the dash. I ran the wires underneath the centre console and concealed the LED strips out of sight but pointed them at an angle to spread the ambient glow across the floor of the car. The control unit was hidden in the side panels of the centre console and the switch was attached on the driver side to be accesible. I just tapped the 12V power in the centre console and fused it for protection. The LED lights have all sorts of features like sound activation, strobe etc but I'm not into that. I just set them on a medium glow for the ambient light. Being LEDs no heat is generated compared to their neon conterparts.
DOUBLE DIN STEREO
I bought the 2012 flagship head unit from Pioneer. It was the AVIC Z140BH. Without going into too much detail I bought it and installed the Pioneer ND-BC5 rear view camera. To keep the steering wheel controls I bought the Metra Axess controller and wiring harness. I also bought the Scosche and Metra dash kits. I ran AV, power and ground wires under the front passenger seat for a later installation when I get my headrest monitors for the rear passengers.
Initially I installed the Scosche dash kit because it matched the black colour of the dash better, but then I changed it to the Metra because that actually matched the texture of the factory dash whereas the Scosche was smooth plastic. The colour difference only shows up more because of my flash, but in normal lighting it it more seamless and fits much better than the Scosche dash kit. Just a note here that you have to peel off the factory stickers for the passenger seat belt and airbag warnings. Some sources say you need to pop it out from the back using a screw driver. THIS IS WRONG AND WILL RUIN THE STICKERS! You have to use a blade to carefully lift up a corner. It is glued all the way across and will peel off slowly. Make sure you take care not to peel it at too steep an angle or you will cause creases or stress marks in the plastic sticker. I will provide some feedback on the setup in a separate thread.
The last mod in this installation was the customized startup screen for the Pioneer Head Unit. I created a custom Mitsubishi boot screen in photoshop in the same orange tones that are in the cabin.
Finally, I just want to say thanks to those people that contribute to this forum. It is definitely a great source for inspiration and information. I look forward to my next project and please feel free to leave some feedback!
#2
05-26-2012, 12:54 PM

Sweet ride and mods dude, I just installed the pioneer avh-p8400bh with the avic-u220 attachment in my 2011 outlander sport, very pleased with it. I like the boot screen as well
#3
05-26-2012, 06:49 PM
In all honesty I was this close to getting the P8400BH but last minute I changed my mind. Its definitely more "flashy" than the Z140BH as far as eye candy is concerned. It has all the fancy visual backgrounds that allow animation whereas the Z140BH doesn't It very minimalist as far as the user interface is concerned. I have a jailbroken iPhone 4S so I use the garmin gps with displayout to show it on the HU. The stock navigation looks so crap and I dont know why most stock navigations look this bad. When I don't use Garmin I use Motion X GPS with the enhanced license to allow me to use the touch screen on the HU. This is by far the best integration because it will allow you to utilize both screens: the HU for the maps and the iphone for turn instructions etc. In hindsight I probably would prefer the P8400BH just because of the UI differences, but since I got the Z140BH so cheap I cant really complain. Plus using the stock Pioneer navigation allows for you to have the maps and the rear view camera showing at the same time. Nice addition to check on towing cargo or tailgaters!
#4
05-27-2012, 09:47 AM
You are very correct with the crappy stick look of the maps, I was disappointed because the p8400bh visually is eye candy then to switch over to the stock navi map  looks crappy LOL. But how is the motion x working for you, I still have not bought the iPhone interface cable yet, I should be getting it next week. Also how did you change your boot screen?
looks crappy LOL. But how is the motion x working for you, I still have not bought the iPhone interface cable yet, I should be getting it next week. Also how did you change your boot screen?
#5
05-27-2012, 02:42 PM
Motion X is not bad. It allows you to preload the maps and directions if you want to be "offline" and not use data which is handy. I personally prefer the look of Garmin maps, however Motion X has a great feature where you can split the screen so the maps are on the head unit and then you can either have the search controls, directions or mirror the maps on the iphone. I usually keeps the directions on the iphone so at a glance I know whats coming up. I think its a bit of a cheap shot that you have to pay the $24.99 for the "enhanced license" to be able to display it on the screen of the head unit, but I guess I've spent this much, why not a little more. lol
The boot screen can by changed by loading a 800x480 pixel image onto an SD card under a folder called "Pictures". I'm not too sure how you do it on the 8400BH but it should be very similar steps to the Z140BH.
Get to the system settings page, and touch splash screen. This shows the select splash screen option. the images on the SD card should show up. I think there's a restriction of how many photos you can import at once. I think its something stupid like a max of 2. See how you go. Otherwise you can download the PDF manual off pioneers site and do a search for text splash and it will take you to the page.

#7
05-27-2012, 03:38 PM
Motion X is not bad. It allows you to preload the maps and directions if you want to be "offline" and not use data which is handy. I personally prefer the look of Garmin maps, however Motion X has a great feature where you can split the screen so the maps are on the head unit and then you can either have the search controls, directions or mirror the maps on the iphone. I usually keeps the directions on the iphone so at a glance I know whats coming up. I think its a bit of a cheap shot that you have to pay the $24.99 for the "enhanced license" to be able to display it on the screen of the head unit, but I guess I've spent this much, why not a little more. lol
The boot screen can by changed by loading a 800x480 pixel image onto an SD card under a folder called "Pictures". I'm not too sure how you do it on the 8400BH but it should be very similar steps to the Z140BH.
Get to the system settings page, and touch splash screen. This shows the select splash screen option. the images on the SD card should show up. I think there's a restriction of how many photos you can import at once. I think its something stupid like a max of 2. See how you go. Otherwise you can download the PDF manual off pioneers site and do a search for text splash and it will take you to the page.
The boot screen can by changed by loading a 800x480 pixel image onto an SD card under a folder called "Pictures". I'm not too sure how you do it on the 8400BH but it should be very similar steps to the Z140BH.
Get to the system settings page, and touch splash screen. This shows the select splash screen option. the images on the SD card should show up. I think there's a restriction of how many photos you can import at once. I think its something stupid like a max of 2. See how you go. Otherwise you can download the PDF manual off pioneers site and do a search for text splash and it will take you to the page.

Thread
Thread Starter
Forum
Replies
Last Post
kopamann09
Audio/Visual Electronics
0
06-09-2014 03:47 PM
cposner
For Sale / Trade
0
07-15-2010 07:11 PM
cposner
For Sale / Trade
0
07-15-2010 06:39 PM
mitsu02
Mitsubishi Montero & Montero Sport
1
04-28-2006 11:42 PM