Done! 2000 Montero Sport bearings and Tie-rods.
#1
 08-24-2014, 01:06 PM


With some help from this forum (Thanks!),
and some other searching, this is how I did it...
2000 Montero Sport 3.5 2WD... Wheel bearings and 4 Tie-rod-ends replacement.
Before removing the tire, and while it's still on the ground, loosen the 6 bolts holding the Dust-Cap.
I hadn't done that before raising the vehicle... so I had to put the tire on, and keep it from moving with a brick.

You don't want to break or kink the brake-fluid hose, so when you remove the Brake-Caliper,
hang it onto something above it, with a piece o' wire.
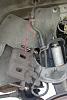
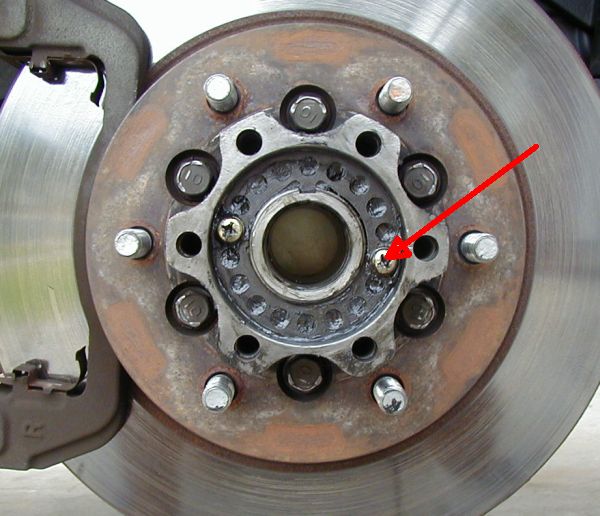
Remove that Dust-Cap, and after then wiping off some wheel-bearing grease,
this is what you'll see. Remove those two screws (red).

Then remove that locking washer (with the many holes),
and you'll see the outer bearing.
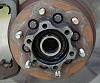
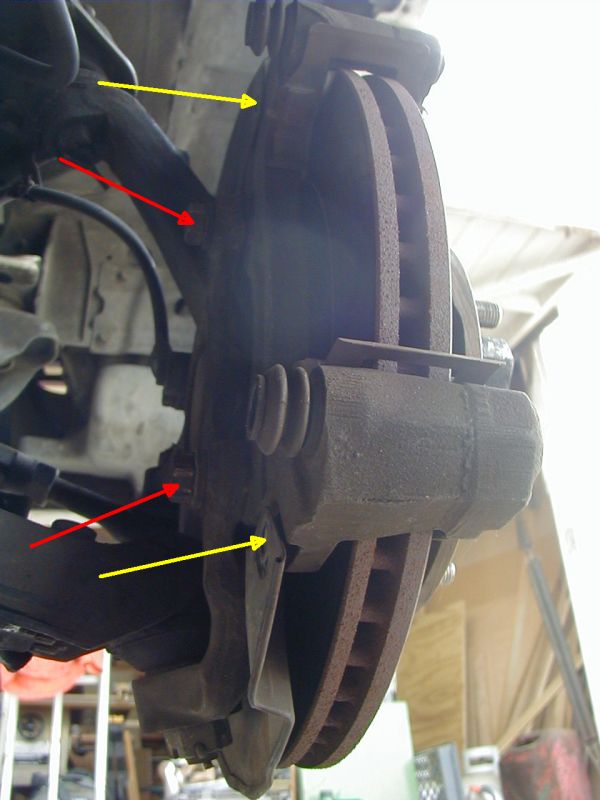
Remove the 2 screws (yellow) holding the
Brake-Dust-Shield and the 2 bolts (red) securing
the Brake-Caliper-Support. Remove that Brake-Caliper-Support.
You can then pull off the Brake-Disc, to see this...
Wow. The "Manage Attachments" window says I cannot upload any more than FIVE files.
That sucks out loud. Maybe it's just 'cause I'm relatively new to this board?
Hey, guys... I'm Trying to Help, here ! Ah, well... the other images are available at
https://www.dropbox.com/s/4scru79atx...rings.zip?dl=0
20
The outer bearing will fall out; the inner one won't.
Remove those 4 screws to then remove the Brake-Dust-Shield.
That part is probably not necessary if you are not also doing Tie-Rod-Ends.
Remove the Inner-Wheel-Bearing-Seal by prying it off
with a large screwdriver between it and the Inner-Bearing.
Then, the Inner-Bearing will fall out.
21
After you wipe out the old wheel-bearing-grease,
you'll see that there are 3 "concave indents"
so that you can remove the old Wheel-Bearing-Races.
Simply knock them out with a hammer and a punch.
However, do not just rest the punch in that indent
when hitting the bearing races with the hammer.
Change the angle, so that you are holding the end of
the punch a bit away from the inside surface of the
Brake-Disc, so as not to scratch that inner surface.
Knock out the inner and outer Bearing-Races.
23
Then install the new inner and outer Bearing-Races.
Sorry... I forgot to take a picture of that step.
First, put some bearing grease on the insides of
that Brake-Disc where the races will go.
I bought the bearings from Pep Boys, and they'll
let you "borrow" the "Bearing Race and Seal Driver Set",
part #27119, for free. It worked.
Use the tapered side for the Bearing-Races, and
the FLAT SIDE for the Inner-Wheel-Bearing-Seal.
Before installing the Bearings, you need to pack
them full of wheel-bearing-grease.
Put a big blob of grease in the palm of one hand, and
repeatedly press the outer edge of the Bearing against the
blob until the grease comes out the other side of the Bearing.
In that way, the bearing is then FULL of grease, as it must be.
Rotate, around the Bearing, until it's ALL full.
The arrow points to where you should see grease coming up.
39
Put a bunch of wheel-bearing-grease on the axle before you
re-install the Brake-Disk.
31
The old Lock-nut had apparently been rubbing against
the wheel-bearing-inner-race. Thus,... the worn groove.
Maybe the previous mechanic was even worse than I?
When re-installing, I simply reversed it, so there was
a new flat side up against the new wheel-bearing-inner-race.
32
So now... how to install that Nut...
34
They say... I've read... torque it to 130 foot/pounds,
then back it off to 0 foot/pounds, then torque it
to 18 foot/pounds, then back it off about 30 degrees.
I DO have a torque wrench, but I do Not have that
Special Tool that's needed to apply torque to the Nut.
And... I've installed Bearings before.
So, I simply put some bolts in the holes, then tightened
it as hard as I could with a crow bar. I bent the bolts.
Loosened it to 0. Tightened it again as much as possible.
Loosened it to 0 again. Tightened it just a bit, to touch.
Loosened it to where the Locking-Washer holes fit the screws.
I've now driven it for a few weeks. It still works.
44
And before you reinstall the dust-cap, apply some silicone
to where it will keep the grease in, but that's all.
45
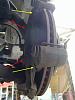
Now... for the Tie-rods-ends...
We'll replace both the Inner (red) and the Outer (yellow) ones.
12
To remove them from the vehicle, first remove the Cotter pin,
then remove the Castle-Nut. Then reinstall the Castle-Nuts,
backwards, sos you can hit 'em with a hammer.
Releasing the Outer is easy... just hit it. It will fall out.
Releasing the Inner is tougher to reach.
I used a solid two-foot-long hunk of metal to reach it.
Piece o' cake. It then came out easily.
35
After you remove EACH Tie-rod-assembly,
line up the tie-rod-end-bolts so that they are PARALLEL.
In this picture I think I did not do that exactly. Sorry.
MEASURE the distance between the Centers of the bolts,
like betewen the Red lines here.
Let's guess... here... it's about 12 1/4 ".
29
Using a vise to hold the Tie-rod-assembly,
you can then remove and install the Inner and Outer Ends.
28
Of course, one side has reversed threads.
Install the new Tie-rod-ends, with EQUAL disances
of the Outer and Inner Ends screwed into the shaft.
Thus, measure A and measure B should be about Equal.
And, make the final distance between the Centers of the
Bolts the same as before. In this case, it was 12 1/4".
In that way, your wheel alignment will be pretty close to
how it was before. It will be at least safe to drive.
Regardless, get the vehicle aligned after you do this.
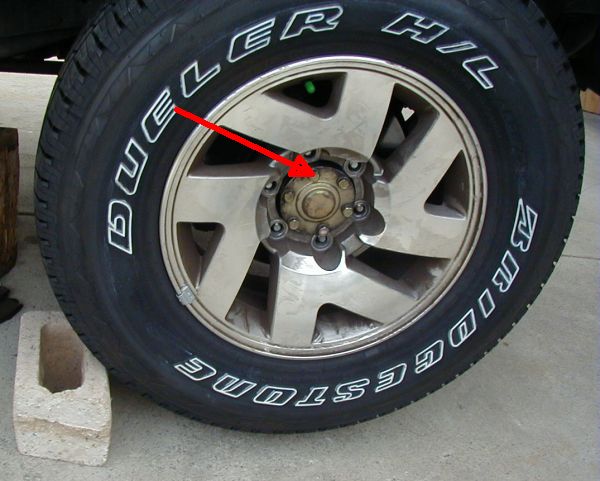
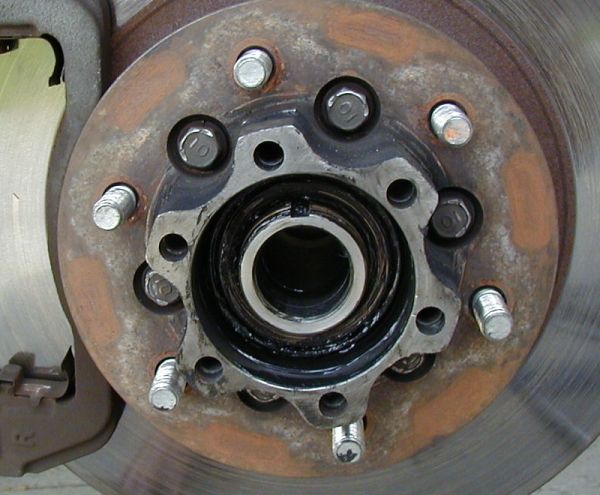
AND... Before I re-installed the Brake-Disc assembly,
I noticed that the Bolt-heads were Worn at the edges.
The bolt-heads (red) were ABOVE the surface level of
the wheel hub (yellow).
41
That is confirmed by the indented parts of the Wheel
that were apparently rubbing against those bolt-heads.
42
WHY? Because some moron that worked on this vehicle
before me had put SOME of the washers on the wrong side.
He put them on the Bolt-Head side, instead of the Nut side.
43
Ya' know... that just Might have been the cause of
the entire "shaking steering wheel" problem !
Ah, well. I put all of the washers on the correct side.
Re-install / Re-attach everything, and then go get the vehicle alignment corrected.
So now,... to you experts out there,... did I really screw anything up by not adhering to the
suggested method of tightening that round Nut holding the Bearings in?
Any other corrections / suggestions?
To the other amateurs out there,... I hope this helps a bit.
Good luck.
Mark
and some other searching, this is how I did it...
2000 Montero Sport 3.5 2WD... Wheel bearings and 4 Tie-rod-ends replacement.
Before removing the tire, and while it's still on the ground, loosen the 6 bolts holding the Dust-Cap.
I hadn't done that before raising the vehicle... so I had to put the tire on, and keep it from moving with a brick.
You don't want to break or kink the brake-fluid hose, so when you remove the Brake-Caliper,
hang it onto something above it, with a piece o' wire.

Remove that Dust-Cap, and after then wiping off some wheel-bearing grease,
this is what you'll see. Remove those two screws (red).
Then remove that locking washer (with the many holes),
and you'll see the outer bearing.
Remove the 2 screws (yellow) holding the
Brake-Dust-Shield and the 2 bolts (red) securing
the Brake-Caliper-Support. Remove that Brake-Caliper-Support.
You can then pull off the Brake-Disc, to see this...
Wow. The "Manage Attachments" window says I cannot upload any more than FIVE files.
That sucks out loud. Maybe it's just 'cause I'm relatively new to this board?
Hey, guys... I'm Trying to Help, here ! Ah, well... the other images are available at
https://www.dropbox.com/s/4scru79atx...rings.zip?dl=0
20
The outer bearing will fall out; the inner one won't.
Remove those 4 screws to then remove the Brake-Dust-Shield.
That part is probably not necessary if you are not also doing Tie-Rod-Ends.
Remove the Inner-Wheel-Bearing-Seal by prying it off
with a large screwdriver between it and the Inner-Bearing.
Then, the Inner-Bearing will fall out.
21
After you wipe out the old wheel-bearing-grease,
you'll see that there are 3 "concave indents"
so that you can remove the old Wheel-Bearing-Races.
Simply knock them out with a hammer and a punch.
However, do not just rest the punch in that indent
when hitting the bearing races with the hammer.
Change the angle, so that you are holding the end of
the punch a bit away from the inside surface of the
Brake-Disc, so as not to scratch that inner surface.
Knock out the inner and outer Bearing-Races.
23
Then install the new inner and outer Bearing-Races.
Sorry... I forgot to take a picture of that step.
First, put some bearing grease on the insides of
that Brake-Disc where the races will go.
I bought the bearings from Pep Boys, and they'll
let you "borrow" the "Bearing Race and Seal Driver Set",
part #27119, for free. It worked.
Use the tapered side for the Bearing-Races, and
the FLAT SIDE for the Inner-Wheel-Bearing-Seal.
Before installing the Bearings, you need to pack
them full of wheel-bearing-grease.
Put a big blob of grease in the palm of one hand, and
repeatedly press the outer edge of the Bearing against the
blob until the grease comes out the other side of the Bearing.
In that way, the bearing is then FULL of grease, as it must be.
Rotate, around the Bearing, until it's ALL full.
The arrow points to where you should see grease coming up.
39
Put a bunch of wheel-bearing-grease on the axle before you
re-install the Brake-Disk.
31
The old Lock-nut had apparently been rubbing against
the wheel-bearing-inner-race. Thus,... the worn groove.
Maybe the previous mechanic was even worse than I?
When re-installing, I simply reversed it, so there was
a new flat side up against the new wheel-bearing-inner-race.
32
So now... how to install that Nut...
34
They say... I've read... torque it to 130 foot/pounds,
then back it off to 0 foot/pounds, then torque it
to 18 foot/pounds, then back it off about 30 degrees.
I DO have a torque wrench, but I do Not have that
Special Tool that's needed to apply torque to the Nut.
And... I've installed Bearings before.
So, I simply put some bolts in the holes, then tightened
it as hard as I could with a crow bar. I bent the bolts.
Loosened it to 0. Tightened it again as much as possible.
Loosened it to 0 again. Tightened it just a bit, to touch.
Loosened it to where the Locking-Washer holes fit the screws.
I've now driven it for a few weeks. It still works.
44
And before you reinstall the dust-cap, apply some silicone
to where it will keep the grease in, but that's all.
45
Now... for the Tie-rods-ends...
We'll replace both the Inner (red) and the Outer (yellow) ones.
12
To remove them from the vehicle, first remove the Cotter pin,
then remove the Castle-Nut. Then reinstall the Castle-Nuts,
backwards, sos you can hit 'em with a hammer.
Releasing the Outer is easy... just hit it. It will fall out.
Releasing the Inner is tougher to reach.
I used a solid two-foot-long hunk of metal to reach it.
Piece o' cake. It then came out easily.
35
After you remove EACH Tie-rod-assembly,
line up the tie-rod-end-bolts so that they are PARALLEL.
In this picture I think I did not do that exactly. Sorry.
MEASURE the distance between the Centers of the bolts,
like betewen the Red lines here.
Let's guess... here... it's about 12 1/4 ".
29
Using a vise to hold the Tie-rod-assembly,
you can then remove and install the Inner and Outer Ends.
28
Of course, one side has reversed threads.
Install the new Tie-rod-ends, with EQUAL disances
of the Outer and Inner Ends screwed into the shaft.
Thus, measure A and measure B should be about Equal.
And, make the final distance between the Centers of the
Bolts the same as before. In this case, it was 12 1/4".
In that way, your wheel alignment will be pretty close to
how it was before. It will be at least safe to drive.
Regardless, get the vehicle aligned after you do this.
AND... Before I re-installed the Brake-Disc assembly,
I noticed that the Bolt-heads were Worn at the edges.
The bolt-heads (red) were ABOVE the surface level of
the wheel hub (yellow).
41
That is confirmed by the indented parts of the Wheel
that were apparently rubbing against those bolt-heads.
42
WHY? Because some moron that worked on this vehicle
before me had put SOME of the washers on the wrong side.
He put them on the Bolt-Head side, instead of the Nut side.
43
Ya' know... that just Might have been the cause of
the entire "shaking steering wheel" problem !
Ah, well. I put all of the washers on the correct side.
Re-install / Re-attach everything, and then go get the vehicle alignment corrected.
So now,... to you experts out there,... did I really screw anything up by not adhering to the
suggested method of tightening that round Nut holding the Bearings in?
Any other corrections / suggestions?
To the other amateurs out there,... I hope this helps a bit.
Good luck.
Mark

Thread
Thread Starter
Forum
Replies
Last Post
mojaevans
Mitsubishi Montero & Montero Sport
0
06-04-2010 10:40 AM
nick_200321
Sights N Sounds
13
10-27-2007 10:20 PM