When you click on links to various merchants on this site and make a purchase, this can result in this site earning a commission. Affiliate programs and affiliations include, but are not limited to, the eBay Partner Network.
Great write up. Super helpful for someon like me who will likely be doing this in the coming weeks.
Question, hard hard is it to access the paper filter if I already have the transmission pan and oil strainer off? I don�t want to take apart the whole cvt, but I am not sure what else is involved to change that filter from the bottom.
Please see post #9 and the video within here for a 52 min video. It is for a Lancer but the engine and transmission are the same as in the 2nd gen Outlander. The Latest Outlander (with the 4 cylinder with CVT) should be very similar. Great resource in my opinion.
Please see post #9 and the video within here for a 52 min video. It is for a Lancer but the engine and transmission are the same as in the 2nd gen Outlander. The Latest Outlander (with the 4 cylinder with CVT) should be very similar. Great resource in my opinion.
thanks for the video. It definitely gave me a better idea of what to expect. It left me with a few questions.
1. How hard is it to remove the transmission pan? One video I watched said they needed to pry it off. In this video, it came off easily.
2. They accessed the cooler filter from the topside. How would you do it from underneath?
3. I think they used gasket maker/sealer. Is the necessary/recommended for the transmission pan gasket?
I have not done this service yet. My car only has 38 Kmiles, so I cannot answer your questions.
I can't get CVTZ50 to work on my car. At least the deterioration. Does my car have anything different? I have a 2016 Outlander SEL AWD. I know there were 2 different pan gaskets( dealer gave me the wrong one) so I would imagine there are 2 different transmissions, or revisions. Attaching a picture of the location for my CVT oil filter. It's not under the battery... At least not directly. It's accessible from under the car between the engine and radiator fan. Any idea what am I doing wrong?
I had to tinker with mine quite a bit to make CVTz50 work. My first recommendation would be to contact the person who made it. He offered a few suggestions that helped me figure why it wasn't working. I had to change quite a few settings, but after a lot of trial and error I was able to make it work.
Mine is a 2014 Outlander SE, so I cannot say 100% that it will work, but with all of the things I had to go through, I'm not surprised you're having trouble.
Posting the response I got. It seems strange that Mitsubishi would no longer use adaptations on it's CVT auto transmissions. After all the whole thing is to prevent damage to hardware after oil gets old and dirty. Or just disable and not allow reset of such adaptations. I did not buy the car new, so I have no idea if the car was working any differently, before piling up the miles, but still it was worth the shot. I will not bother with this any longer. Car runs fine and oil has been changed properly, it's just some roughness that I have problems with. Now keep telling me that progress is a good thing. So the car has been serviced and I know that it's just no way of telling the stupid computer that it has been serviced. Or it's next to impossible to do so. Screw all electronics and give me a standard, simple manual transmission. Anyway... Just wanted to offer a bit more info on the subject for people who want to do this in the future.
----------------------------------------------------------------------------------------------------------------------------------------------------------------------- Hello,
Deterioration counter on Outlanders 2016+ is usually 0. Official Mitsubishi scantool MUT3 gives the same 0 reading on such cars, and recent Factory Service Manuals do not mention deterioration counter at all. Probably Mitsubishi decided to cease the calculation of deterioration on new models. However there was no any official communication on that so this is not 100% clear and for now this parameter is formally marked as not supported by cvtz50 on such cars (though there is still possibility to read the value. Maybe the counter can start ticking after extreme load/temperatures).
Just performed this on my 2011 Outlander Sport that's 140,000 miles. Previously did a transmission fluid change at 70,000 miles but did not realize that there was a transmission filter in there. This guide was spot on and everything works well even with the reset with CVTz50 app. Some lesson that i learned from this. There is no need to remove the bottom plastic piece if you're taking off the battery brackets. I had a hard time with clearance with the battery brackets and thought maybe it'll be easier to access from the bottom. It is NOT easier to access from the bottom, even less clearance in my opinion. Having a wobble socket nearby is a lifesaver for me because my socket was not able to reach one/two of the bolt. If i try to wing it i might've rounded the bolt, so a wobble socket was helpful. Only other thing was that i was not able to see the firewall/bottom side of the bolt for the filter housing. Ended up just feeling the bolt and guiding my socket to it, but because there wasn't a lot of torque to the bolt, it came off real easy. Hope this helps!
I just did this on my 2019 Outlander SE. This thread came up multiple times while I did my research, so I wanted to reply here so others would find the information.
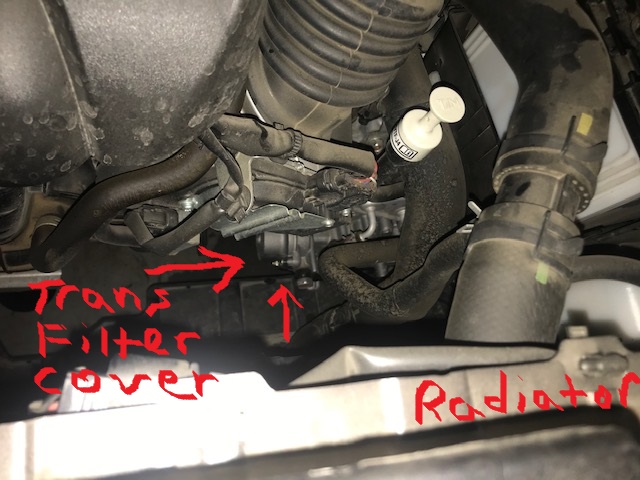
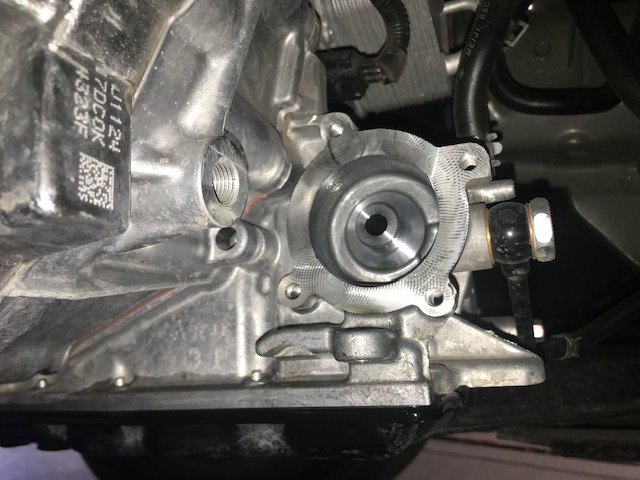
The process is pretty similar, but luckily, the transmission filter is much easier to access on the 2019 (and possibly the '17 and '18 though I can't confirm). Here is the filter cover location looking down from the front of the vehicle (yes, my MS Paint skillz are formidable):
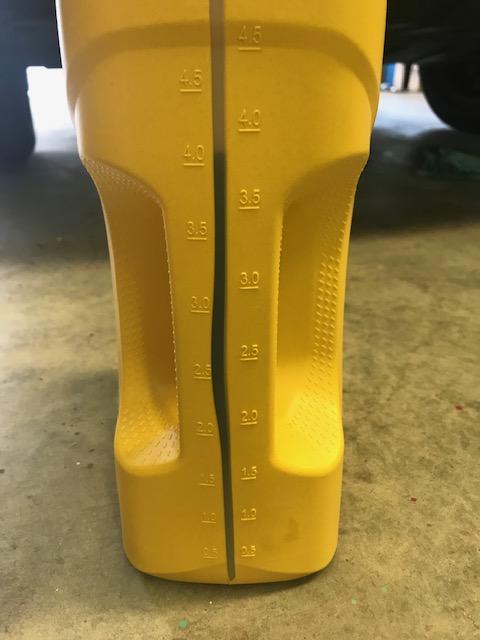
The cover can be easily accessed from under the vehicle by removing the smaller splash shield that's attached with two plastic clips and two bolts with 10mm heads. I was also doing an engine oil/filter change so I drained the trans while on my ramps. The drain plug is right on the bottom of the transmission oil pan and is 19mm. The 4 bolts holding on the filter cover are 10mm (be careful not to overtighten them when reinstalling). After draining the trans and trying to capture the small amount of fluid from the filter/cover, I had just over 4 quarts:
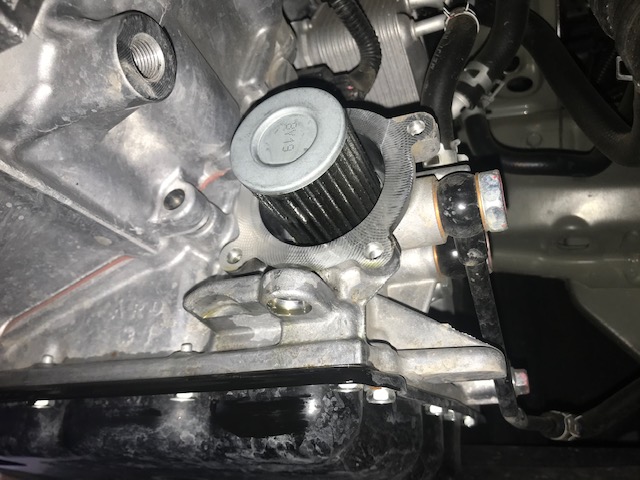
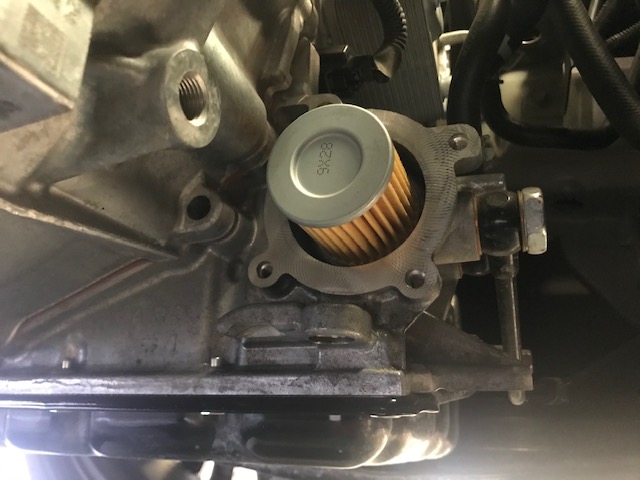
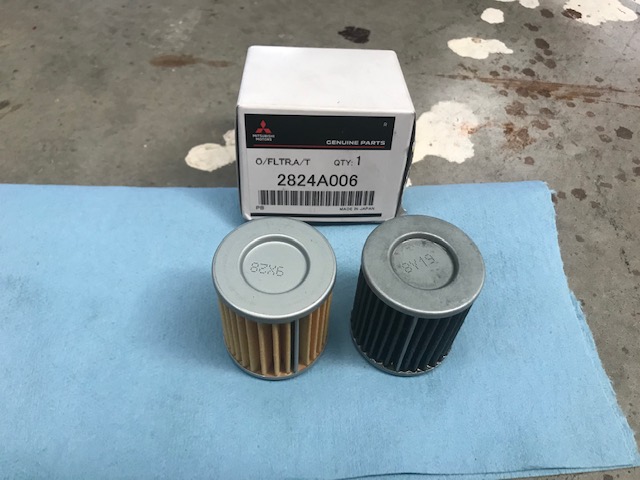
Here are a few pics of the filter and cover, as well as the replacement filter. I confirmed with several Mitsubishi sources that this is the correct filter, but I double-checked and mic'd the dimensions to be sure:
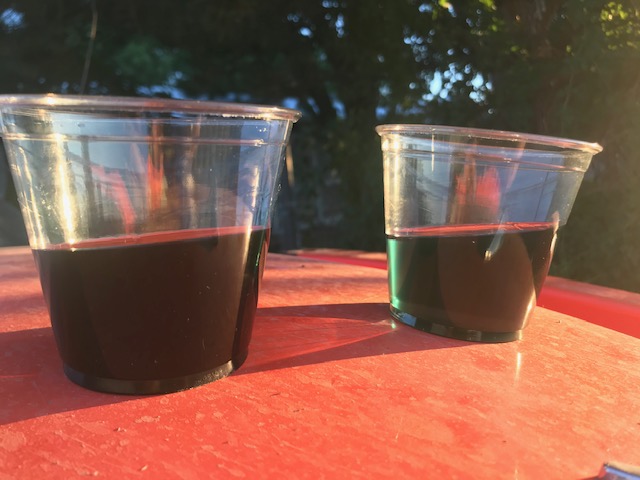
My Outlander has 30K miles and this is the best picture I could capture of the difference in the appearance of the trans fluid: https://imgur.com/4sGqdZL
Overall, it's an easy, straight-forward affair. I bought 5 quarts of Mitsubishi CVT Fluid J4 for $107 shipped, and I think the filter was around $25. At 60K I'll probably drop the pan as well.
Last edited by sock puppet; Aug 1, 2020 at 07:50 AM.