Question: 2009 silver shift panel
#21
 12-11-2008, 01:16 PM


Nice Job!!.. Please post instructions. I guess no modifications to the Letters.. straight pop in.
Thanks!
Thanks!
#22
12-13-2008, 12:53 PM

look great! i see you installed the 4wd switch too. nice...
#23
12-18-2008, 12:30 AM
Any luck with some snap shots and instructions on how to take out the panels? 
Great mod.. looks great!
Great mod.. looks great!
#24
12-18-2008, 02:31 AM

START
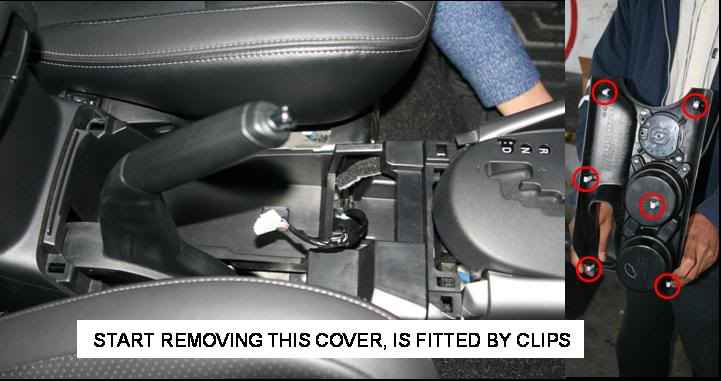
1. Remove, pulling upwards, the cover in where is the 4WD selector, is fitted by clips, and unplug 4WD conector
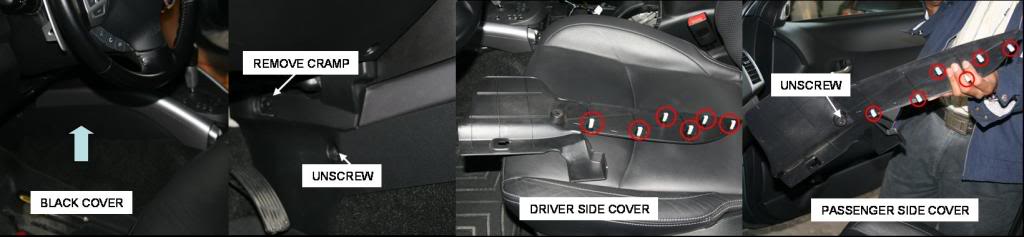
2. Remove black cover indicated, driver and passeger side: first, unscrew and uncramp; second, pulling gently for release it of clips
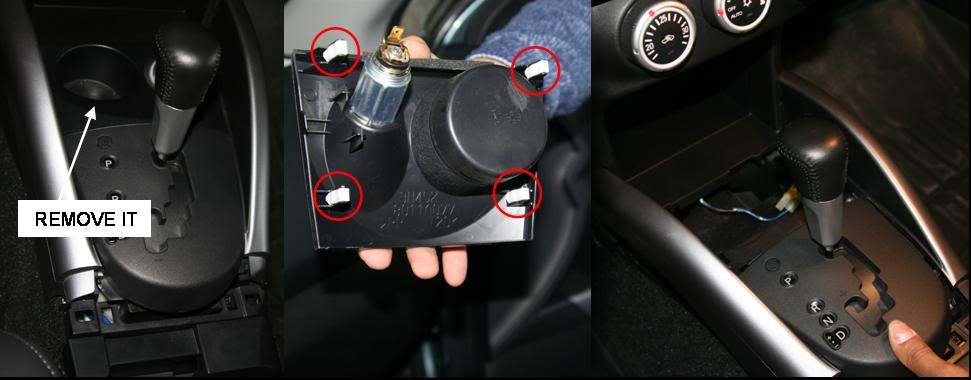
3. Remove the power outlet cover; pulling upwarsds, is fitted by 4 clips; after, unplug the power outlet conector
4. Remove lateral plastic, driver and passenger side, unscrew in the indicated points. Be carefull, holds the piece held with a hand because it falls

5. The complicated part comes. Put shiftgear in N position, holds firmly the upper **** (black) with the two hands, and pulling strongly upwards to release it of its locks, and removed out the lever; if the lock is remains in the lever, removed it; next, it removes the bottom ****, it will leave without problem
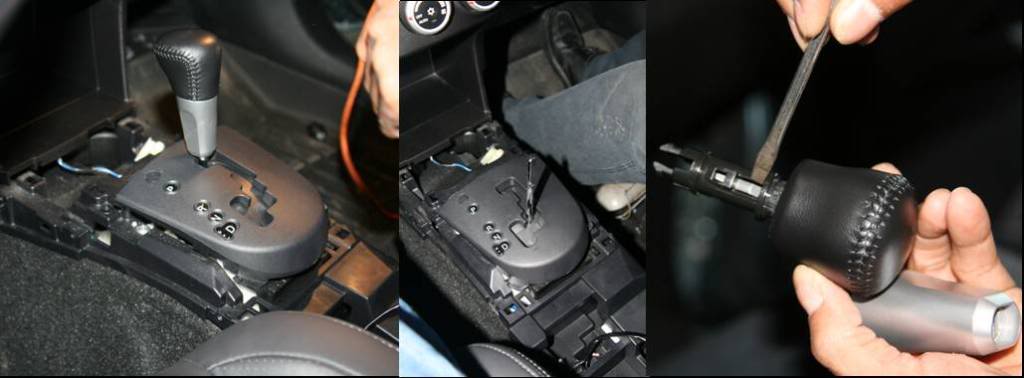
6. Next, remove the shiftgear cover inserting a screwdriver in the indicated places to release the plastic lock; after, move the cover in the direction of the arrow, and ready, the cover is released
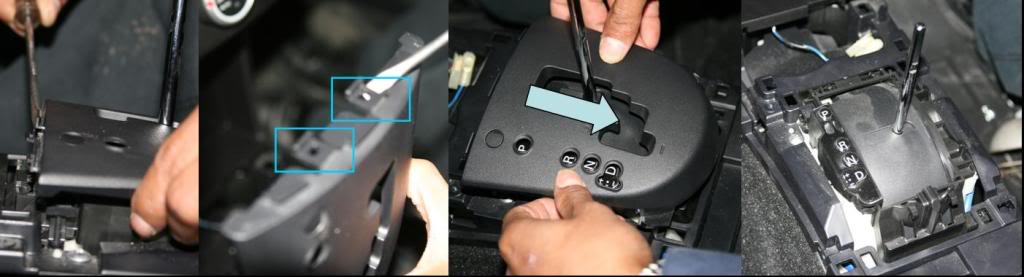
7. Finally, to install the chromed cover shiftgear following the steps in sequence inverse [sm=smiley2.gif]
END
1. Remove, pulling upwards, the cover in where is the 4WD selector, is fitted by clips, and unplug 4WD conector
2. Remove black cover indicated, driver and passeger side: first, unscrew and uncramp; second, pulling gently for release it of clips
3. Remove the power outlet cover; pulling upwarsds, is fitted by 4 clips; after, unplug the power outlet conector
4. Remove lateral plastic, driver and passenger side, unscrew in the indicated points. Be carefull, holds the piece held with a hand because it falls
5. The complicated part comes. Put shiftgear in N position, holds firmly the upper **** (black) with the two hands, and pulling strongly upwards to release it of its locks, and removed out the lever; if the lock is remains in the lever, removed it; next, it removes the bottom ****, it will leave without problem
6. Next, remove the shiftgear cover inserting a screwdriver in the indicated places to release the plastic lock; after, move the cover in the direction of the arrow, and ready, the cover is released
7. Finally, to install the chromed cover shiftgear following the steps in sequence inverse [sm=smiley2.gif]
END
#25
12-18-2008, 07:10 AM
Awsome job on the how to jsrd [sm=smiley20.gif]
what software do you use toadd comments on your pictures?
what software do you use toadd comments on your pictures?

#30
06-14-2010, 08:40 PM

Speaking of which, actually I work for one of the aftermarket accessories companies which specializes in dash trim enhancements. Anyway, if anyone is interested I can sell one of the two attached kits, I can make it in a variety of wood patterns, real carbon fiber colors, brushed aluminum, modern colors, and for the transmission piece, I can try to manufacture out of real stainless steel (only the top part). I also have access to door pillars and such. Basically those are flat pieces with 3M tape backing, actual layer of wood/carbon fiber material, and coated with polyurethane coating for nice 3D effect plus it acts as UV protection, thickness shouldn't be more than 1/8 of inch.
EDIT: Currently I don't have a picture of the actual Outlander pieces installed but I do have a picture of one of Mercedes kits in real barbon fiber pattern just to give an idea how the product looks like (mercedessample.jpg). Since Outlanders dash is fairly flat, it should look good. Best part about all of it is that it doesn't require any tools or removal of the dash, you just remove the tape and stick it on the corresponding area, it doesn't replace but goes over the piece.
EDIT: Currently I don't have a picture of the actual Outlander pieces installed but I do have a picture of one of Mercedes kits in real barbon fiber pattern just to give an idea how the product looks like (mercedessample.jpg). Since Outlanders dash is fairly flat, it should look good. Best part about all of it is that it doesn't require any tools or removal of the dash, you just remove the tape and stick it on the corresponding area, it doesn't replace but goes over the piece.
Last edited by blitzkrieg79; 06-14-2010 at 09:01 PM.