
Replace your OE Rearview Mirror - Install pics here


Thread Starter
|
Senior Member
Joined: Mar 2007
Posts: 454
From: Canada - you know, God's country
I decided to junk the factory rear view mirror and install a nice Gentek Auto Dim w/Homelink rearview mirror kit. I was sick of fumbling around with my garage door openers(one for home, one for the office) which I kept in the centre dash top storage box. This mirror also autodims electronically which isn't really necessary given we have tinted rear glass, but its still cool! I managed to find an OEM kit on e-bay for $139 so I ordered it.
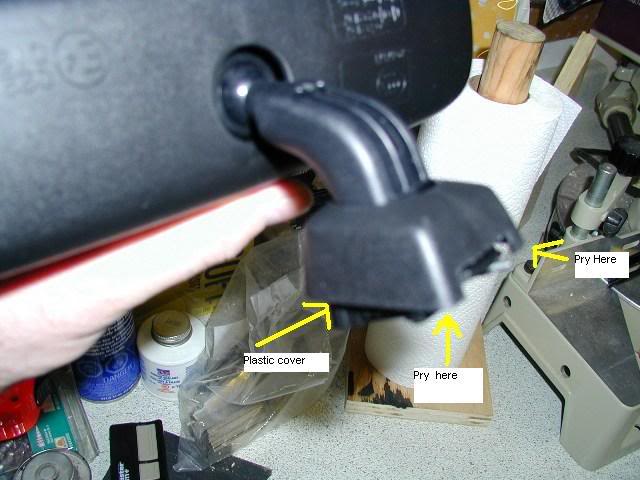
First step was removing the old mirror. There is a plastic "dressup" cover which needs to be popped off first. It has two claws on either side but you can pry the sides up and over the catch with a small flat tool/scredriver to release. Once released, slide the cover down the arm and out of your way. Here is the plastic cover I am talking about:
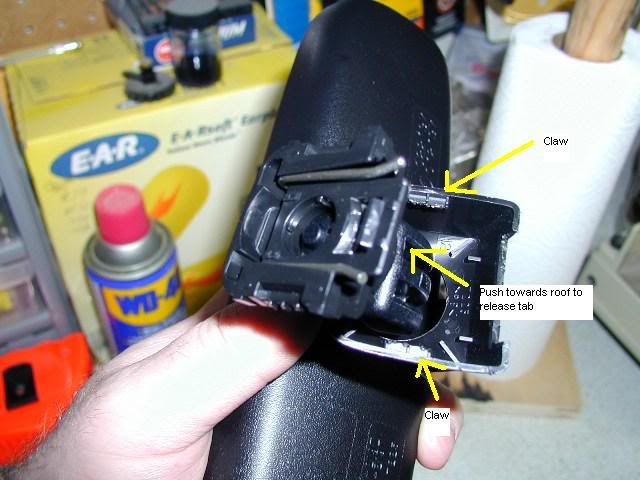
Once you have the plastic cover out of the way, hold your screwdriver perpendicular to the fron windshield and push the tab on the bottom of the locking mechanism towards the front windhield to release the locking mechanism. While pushing the tab, slide the mirror assembly towards the roof headliner to remove.
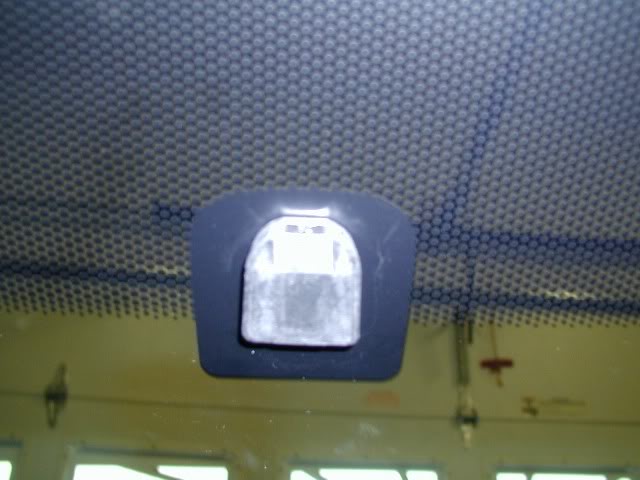
Here is the glass mount wedge button on our Outies - note when buying rear view mirrors there are wedge and cam lock versions of the connectors. You want a wedge compatible mirror.
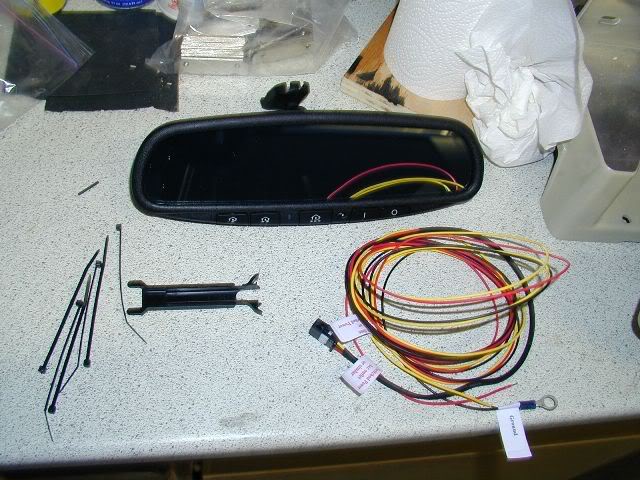
Here is the kit I bought. It allows up to three remote controllers to be programmed in.
Next step was to locate a suitable connection point. This partciluar mirror has two 12volt inputs (one for the AutoDim and one for the Homlink system). The Homelink system I wanted on constant power although some may prefer switched power for increased security. Last I need a suitable grounding point.
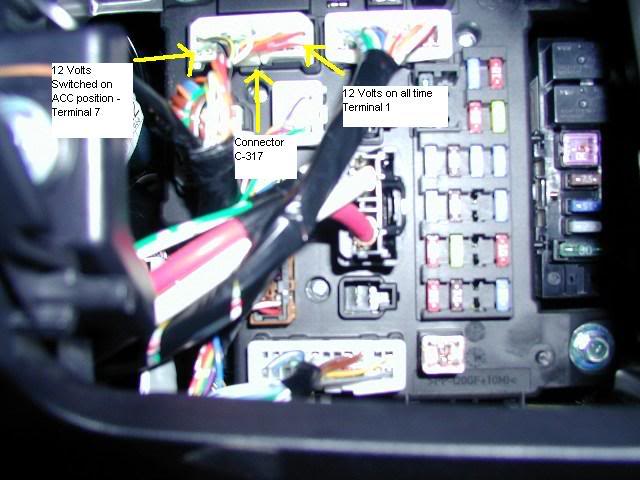
Looking at the fuse box I find on the ETACS connectors, connector C-317 has constant 12 volts and terminal 1 and swithed 12 volts at terminal 7. There is also a ground wire at terminal 15 but I prefer a hard ground point. Here is the connector and wires I tapped for power:
Now its time to pull some plastic. I removed the leftside vent cover, popped open the front pillar cover (full removal is not necessary), removed the trim piece below the front pillar and that is it. There are no screws, only pop fasteners, with the exception of the bottom trim piece which extends all the way forward to the dead pedal foot rest. There is a bolt coming through the floor which secures this trim piece with a plstic slide nut - you can just pop it off. I don't have a pictur of it but you will see it and can easily remove it. Here is the front pillar cover popped off you can pop it off by squeezing with you rhands at the edges, no tools required):
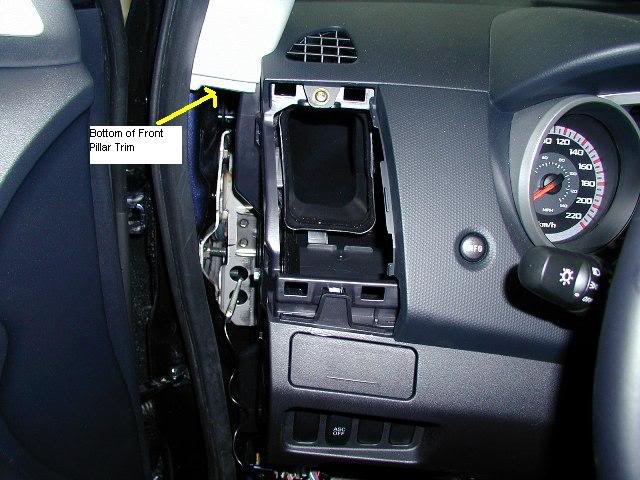
Here is where the lower trim was removed:
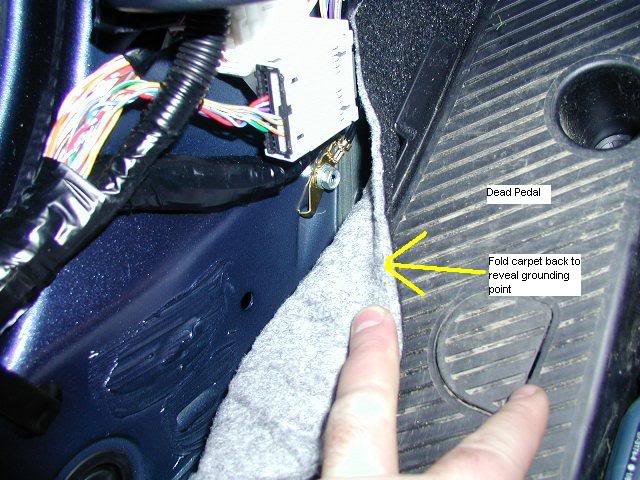
Once the lower trim is out of the way, you can find the grounding spot by pulling back the carpet next to the dead pedal. Its a 10mm bolt.
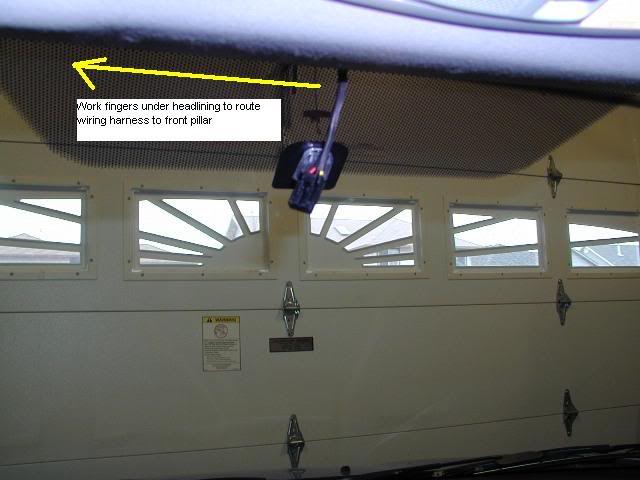
Okay time to route the wiring and make this look like a professional installation. The wiring harness has a connector which plugs into the back of the mirror. Starting near the mirror location, you can tuck the wire up and under the headliner using your fingers. Work your way towards the front pillar cover.
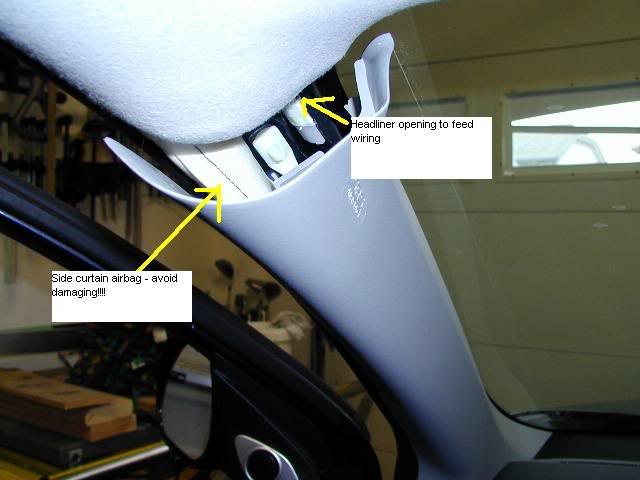
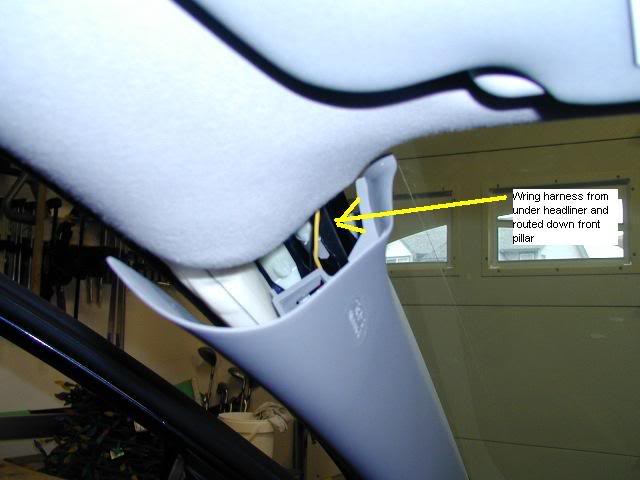
Once you get to the front pillar trim, bring the wire out from the headliner (there is a huge opening here), and work the wire behing the front pillar trim.
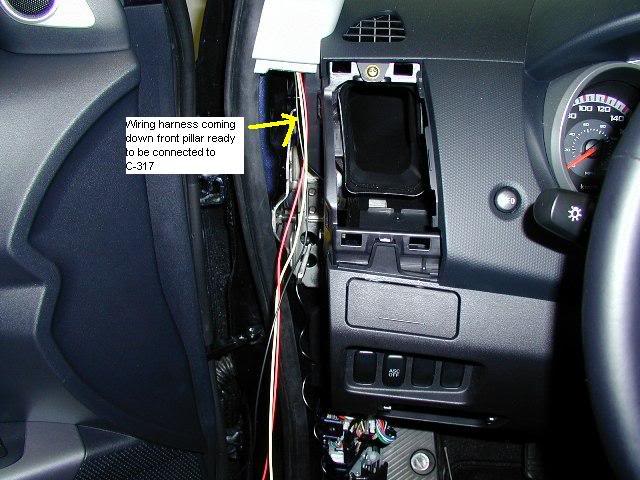
Okay so now all your wiring can come out at the bottom fo the front pillar where the bottom trim has been removed:
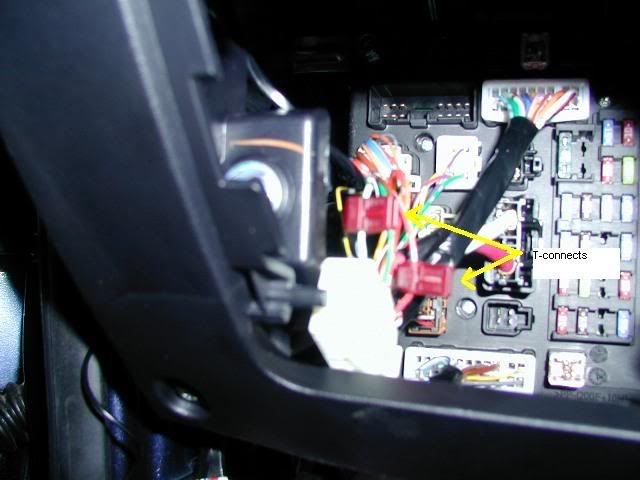
I tapped T-Connects into the wiring harness C-317 (as noted in the picture above) for the constant and switched power and connected the yellow wire from the harness to the constant power (teminal 1)(for Homelink ops) and the red harness wire to switched power at terminal 7. It is easier to tap if you unplug C-317 first:
That's it, that's all there is to it. Now just dress up the wiring on the window glass at the mirror location with the included wire cover and test it out:
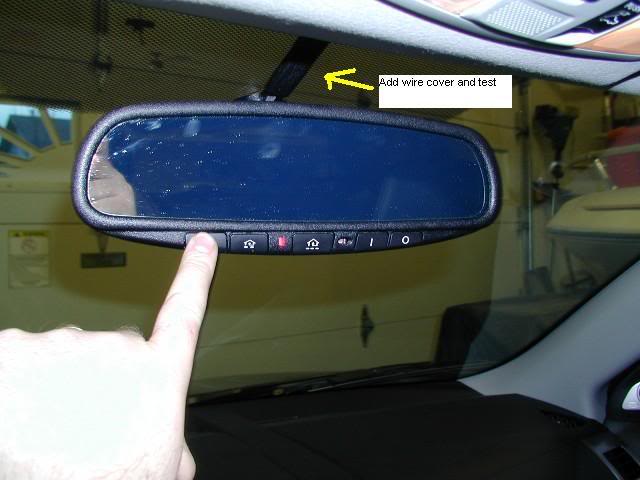
Good luck, it works great and now I have no remotes in my car anymore!
First step was removing the old mirror. There is a plastic "dressup" cover which needs to be popped off first. It has two claws on either side but you can pry the sides up and over the catch with a small flat tool/scredriver to release. Once released, slide the cover down the arm and out of your way. Here is the plastic cover I am talking about:
Once you have the plastic cover out of the way, hold your screwdriver perpendicular to the fron windshield and push the tab on the bottom of the locking mechanism towards the front windhield to release the locking mechanism. While pushing the tab, slide the mirror assembly towards the roof headliner to remove.
Here is the glass mount wedge button on our Outies - note when buying rear view mirrors there are wedge and cam lock versions of the connectors. You want a wedge compatible mirror.
Here is the kit I bought. It allows up to three remote controllers to be programmed in.
Next step was to locate a suitable connection point. This partciluar mirror has two 12volt inputs (one for the AutoDim and one for the Homlink system). The Homelink system I wanted on constant power although some may prefer switched power for increased security. Last I need a suitable grounding point.
Looking at the fuse box I find on the ETACS connectors, connector C-317 has constant 12 volts and terminal 1 and swithed 12 volts at terminal 7. There is also a ground wire at terminal 15 but I prefer a hard ground point. Here is the connector and wires I tapped for power:
Now its time to pull some plastic. I removed the leftside vent cover, popped open the front pillar cover (full removal is not necessary), removed the trim piece below the front pillar and that is it. There are no screws, only pop fasteners, with the exception of the bottom trim piece which extends all the way forward to the dead pedal foot rest. There is a bolt coming through the floor which secures this trim piece with a plstic slide nut - you can just pop it off. I don't have a pictur of it but you will see it and can easily remove it. Here is the front pillar cover popped off you can pop it off by squeezing with you rhands at the edges, no tools required):
Here is where the lower trim was removed:
Once the lower trim is out of the way, you can find the grounding spot by pulling back the carpet next to the dead pedal. Its a 10mm bolt.
Okay time to route the wiring and make this look like a professional installation. The wiring harness has a connector which plugs into the back of the mirror. Starting near the mirror location, you can tuck the wire up and under the headliner using your fingers. Work your way towards the front pillar cover.
Once you get to the front pillar trim, bring the wire out from the headliner (there is a huge opening here), and work the wire behing the front pillar trim.
Okay so now all your wiring can come out at the bottom fo the front pillar where the bottom trim has been removed:
I tapped T-Connects into the wiring harness C-317 (as noted in the picture above) for the constant and switched power and connected the yellow wire from the harness to the constant power (teminal 1)(for Homelink ops) and the red harness wire to switched power at terminal 7. It is easier to tap if you unplug C-317 first:
That's it, that's all there is to it. Now just dress up the wiring on the window glass at the mirror location with the included wire cover and test it out:
Good luck, it works great and now I have no remotes in my car anymore!


Member
Joined: Apr 2007
Posts: 42
From: Sacramento, CA - USA
Wow I did the same with mine... except I just taped into the dome light circuit... it was only inches away.. works perfectly... saved me a ton of time and work.
Scott
Scott
Thread Starter
|
Senior Member
Joined: Mar 2007
Posts: 454
From: Canada - you know, God's country
Thought about using the dome light for the reasons you stated but I've got other plans for that puppy down the road!


Senior Member
Joined: Feb 2007
Posts: 272
From:
I thought about getting a homelink mirror, but I read some comments about the homelink losing its memory. Keep us posted on how it works in the long run.
I ended up buying a smallkeychain size remote for $10 and velcro'd it to the underside of the center console bin.
I ended up buying a smallkeychain size remote for $10 and velcro'd it to the underside of the center console bin.


Member
Joined: Nov 2006
Posts: 51
From:
Excellent DIY. Clear instructions with lots of accompanying pictures..
How do you embed the big pictures on your post? Does it need to be hosted at a site like photobucket??
How do you embed the big pictures on your post? Does it need to be hosted at a site like photobucket??