
Boost leak testers


Thread Starter
|
Senior Member
Joined: Nov 2006
Posts: 3,430
From: Colorado Springs, CO.
I've been wanting to make a quality DIY boost leak tester for sometime now. The one I've made is, obviously IMO, is a quality boost leak tester. Though in fact, it's just a run of the mill BLT with a gauge on it, lol.
I've been curious of other makes of cars and how their owners go about making their boost leak testers and there's not much different. Some are very creative and some are...uh...well...they are either really cheap or just stupid.
This will have to be in more than one post so give me a few to compile it. Enjoy how the different boosted owners create this much needed tester.
This next one is a good one. Mine is similar to this one in many ways.
[quote] DIY Boost Leak Tester [/align] [hr]
Boost Leak Theory
Boost Leaks, while easy to diagnose and fix, are often over-looked by turbo car owners for one reason or another. Whether they are overlooked because of laziness or ignorance, they rob power from your turbo car and cause it to perform at much less than its potential. In this article we will discuss not only why and how boost leaks could be holding your car back but also how to make and use your own boost leak tester.
Any air leaking out of the plumbing system from the compressor side of the turbo to where the intake manifold meets the head is considered a boost leak. In a vaccume condition like at idle, air would be being sucked in through a boost leak, and in a boosted condition like full throttle air would be blowing out of a boost leak.
Most turbo cars use an air flow sensor to meter air as it is brought into the turbo. As air passes through the air flow meter, it is counted and the ecu assigns a certain amount of fuel for that amount of air. Lets consider a hypothetical situation of a particular boost leak. Air passes through the air flow sensor, is measured and counted, and the ecu assigns a certain amount of fuel for that particular amount of air. As the air passes through the turbo and begins its path to the head, some of it escapes through a boost leak, (in this hypothetical situation we will use a bad throttle body gasket as an example of a boost leak). The air escaping through the leak was measured and considered in calculations when the ecu assigned the correct amount of fuel for the mixture, but the ecu does not know that some of the air is leaking out through the damaged gasket, and does not adjust for it. In this situation less air will actually be reaching the engine than was metered, and the fuel will remain unchanged, throwing off the tune and causing a rich condition. This rich condition will cause your car to run at less than its potential.
Not only will this rich condition cause your car to run at less than its potential, you may notice that your car has trouble holding boost through the gears at wide open throttle. Throwing off your tune, and not being able to hold boost is enough to make you lose a great deal of power that your car should be making.
Boost Leaks arent only harmfull to cars with airflow meters though. Any turbo car could potentially be harmed from boost leaks. Boost leaks make the turbo work harder to do the same amount of work, and could lead to a turbo failure because of it. To demonstrate this, imagine building pressure in a baloon by blowing air into it with your mouth. Then make a tiny hole in the baloon and try to blow it up again. You will notice you are doing more work than you did the first time to inflate the baloon to the same size. Hopefully this section has motivated you enough to check your car for boost leaks. Now on to how you can make a Boost Leak Tester with parts readily available at your local hardware store.
Parts Required
3" to 2" Coupler 2" PVC Cap Air Line Fitting Teflon Tape
Parts Required:
1 (3" to 2") Rubber Coupler w/ Clamps
1 (2") PVC Cap
1 (1/4") Air Hose Fitting
Teflon Tape
Boost Leak Tester Assembly
Assembly Notes: This boost leak tester was designed to fit over a 3inch turbo inlet. If your turbo inlet size is different than 3", you will have to purchase a different coupler that will fit over your turbo inlet, and possibly a different PVC Cap depending on what size the opposite side of the coupler is. The assembly process is the same though, as long as one side of the coupler can fit over your turbo inlet, and the other side ends up with the PVC Cap in it.
Step 1:
Drill a hole in the top of the 2" PVC Cap.
Step 2:
Wrap 1/4" Air Hose Fitting Threads in Teflon Tape.
Step 3:
Screw 1/4" Air Hose Fitting into 2" PVC Cap.
Step 4:
Place 2" PVC Cap in the 2" side of the coupler and tighten the clamp.
Pressure Regulation Note: This boost leak tester was designed to be used with an air compressor that has a built in pressure regulator. If your compressor is not able to control the amount of pressure it puts out. You can purchase an in-line pressure control regulator and gauge from the air compressor section at the hardware store, and set the target pressure right at the tester.
Boost Leak Test Procedure
This section will describe to you in detail, how to perform a boost leak test o
I've been curious of other makes of cars and how their owners go about making their boost leak testers and there's not much different. Some are very creative and some are...uh...well...they are either really cheap or just stupid.
This will have to be in more than one post so give me a few to compile it. Enjoy how the different boosted owners create this much needed tester.
I put this kit together some time ago more as a Saturday project. I'd say the hardest part was finding the right size parts, but Home Depot had more than enough PVC end caps to go through.
Bear in mind that the typical disclaimers apply. In using a kit like this, you're intentionally pressurizing the air intake system and I will not take responsibility for those of you who get bonked in the head when a pvc end cap flies off because you didn't tighten it right. Also, make sure you keep an eye on the pressure to which you are filling the intake system. I wouldn't go above 10psi, even though most of us are generating almost 2x that or more, simply because even at 7-10 psi, you can hear a leak if one exists. I'd hate to hear that you screwed something up by failing to regulate pressure appropriately. That said, here's my kit:
Starting on the left and going clockwise:
1. PVC endcap with an NPT fitting and tire valve stem. Outer diameter of cap = 2.72" verified with calipers.
2. PVC endcap, same size as 1, but unmodified
3. Air compressor (mine runs off 12v power plug)
4. Small PVC endcap, Outer diameter = 0.85"

One of the endcaps is modified using the following items
5. 1/8-27 NPT thread tap
6. 17/64" drill
7. tire valve stem
8. 1/8-27 NPT to 1/4" hose barb fitting
9. hose clamp (not shown)
10. thread sealer (not shown)

Drill a hole in the top center of one of the caps and tap the threads. Insert fitting in the cap with thread sealer. Once this cures, then insert the tire valve stem onto the hose barb and clamp with hose clamp(This part isn't even necessary since the rubber valve seals up real well..as long as you don't drill a hole too big...silver). I put some thread sealer in here as well to make sure I had a good seal.
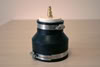
The finished product looks like this:

(That rubber valve on top of this hose barb is a leak in the boost leak tester waiting to happen...silver)
This modified cap goes in the turbo intake hose, item 4 below, at the opening where it is usually connected to the air cleaner box (where the hose clamp is shown next to the number 5).
Bear in mind that the typical disclaimers apply. In using a kit like this, you're intentionally pressurizing the air intake system and I will not take responsibility for those of you who get bonked in the head when a pvc end cap flies off because you didn't tighten it right. Also, make sure you keep an eye on the pressure to which you are filling the intake system. I wouldn't go above 10psi, even though most of us are generating almost 2x that or more, simply because even at 7-10 psi, you can hear a leak if one exists. I'd hate to hear that you screwed something up by failing to regulate pressure appropriately. That said, here's my kit:
Starting on the left and going clockwise:
1. PVC endcap with an NPT fitting and tire valve stem. Outer diameter of cap = 2.72" verified with calipers.
2. PVC endcap, same size as 1, but unmodified
3. Air compressor (mine runs off 12v power plug)
4. Small PVC endcap, Outer diameter = 0.85"
One of the endcaps is modified using the following items
5. 1/8-27 NPT thread tap
6. 17/64" drill
7. tire valve stem
8. 1/8-27 NPT to 1/4" hose barb fitting
9. hose clamp (not shown)
10. thread sealer (not shown)
Drill a hole in the top center of one of the caps and tap the threads. Insert fitting in the cap with thread sealer. Once this cures, then insert the tire valve stem onto the hose barb and clamp with hose clamp(This part isn't even necessary since the rubber valve seals up real well..as long as you don't drill a hole too big...silver). I put some thread sealer in here as well to make sure I had a good seal.
The finished product looks like this:
(That rubber valve on top of this hose barb is a leak in the boost leak tester waiting to happen...silver)
This modified cap goes in the turbo intake hose, item 4 below, at the opening where it is usually connected to the air cleaner box (where the hose clamp is shown next to the number 5).
[quote]
Boost Leak Theory
Boost Leaks, while easy to diagnose and fix, are often over-looked by turbo car owners for one reason or another. Whether they are overlooked because of laziness or ignorance, they rob power from your turbo car and cause it to perform at much less than its potential. In this article we will discuss not only why and how boost leaks could be holding your car back but also how to make and use your own boost leak tester.
Any air leaking out of the plumbing system from the compressor side of the turbo to where the intake manifold meets the head is considered a boost leak. In a vaccume condition like at idle, air would be being sucked in through a boost leak, and in a boosted condition like full throttle air would be blowing out of a boost leak.
Most turbo cars use an air flow sensor to meter air as it is brought into the turbo. As air passes through the air flow meter, it is counted and the ecu assigns a certain amount of fuel for that amount of air. Lets consider a hypothetical situation of a particular boost leak. Air passes through the air flow sensor, is measured and counted, and the ecu assigns a certain amount of fuel for that particular amount of air. As the air passes through the turbo and begins its path to the head, some of it escapes through a boost leak, (in this hypothetical situation we will use a bad throttle body gasket as an example of a boost leak). The air escaping through the leak was measured and considered in calculations when the ecu assigned the correct amount of fuel for the mixture, but the ecu does not know that some of the air is leaking out through the damaged gasket, and does not adjust for it. In this situation less air will actually be reaching the engine than was metered, and the fuel will remain unchanged, throwing off the tune and causing a rich condition. This rich condition will cause your car to run at less than its potential.
Not only will this rich condition cause your car to run at less than its potential, you may notice that your car has trouble holding boost through the gears at wide open throttle. Throwing off your tune, and not being able to hold boost is enough to make you lose a great deal of power that your car should be making.
Boost Leaks arent only harmfull to cars with airflow meters though. Any turbo car could potentially be harmed from boost leaks. Boost leaks make the turbo work harder to do the same amount of work, and could lead to a turbo failure because of it. To demonstrate this, imagine building pressure in a baloon by blowing air into it with your mouth. Then make a tiny hole in the baloon and try to blow it up again. You will notice you are doing more work than you did the first time to inflate the baloon to the same size. Hopefully this section has motivated you enough to check your car for boost leaks. Now on to how you can make a Boost Leak Tester with parts readily available at your local hardware store.
Parts Required
3" to 2" Coupler 2" PVC Cap Air Line Fitting Teflon Tape
Parts Required:
1 (3" to 2") Rubber Coupler w/ Clamps
1 (2") PVC Cap
1 (1/4") Air Hose Fitting
Teflon Tape
Boost Leak Tester Assembly
Assembly Notes: This boost leak tester was designed to fit over a 3inch turbo inlet. If your turbo inlet size is different than 3", you will have to purchase a different coupler that will fit over your turbo inlet, and possibly a different PVC Cap depending on what size the opposite side of the coupler is. The assembly process is the same though, as long as one side of the coupler can fit over your turbo inlet, and the other side ends up with the PVC Cap in it.
Step 1:
Drill a hole in the top of the 2" PVC Cap.
Step 2:
Wrap 1/4" Air Hose Fitting Threads in Teflon Tape.
Step 3:
Screw 1/4" Air Hose Fitting into 2" PVC Cap.
Step 4:
Place 2" PVC Cap in the 2" side of the coupler and tighten the clamp.
Pressure Regulation Note: This boost leak tester was designed to be used with an air compressor that has a built in pressure regulator. If your compressor is not able to control the amount of pressure it puts out. You can purchase an in-line pressure control regulator and gauge from the air compressor section at the hardware store, and set the target pressure right at the tester.
Boost Leak Test Procedure
This section will describe to you in detail, how to perform a boost leak test o
Thread Starter
|
Senior Member
Joined: Nov 2006
Posts: 3,430
From: Colorado Springs, CO.
From the Nissan guys
This was one of my favorite ones. It's from the VW guys.
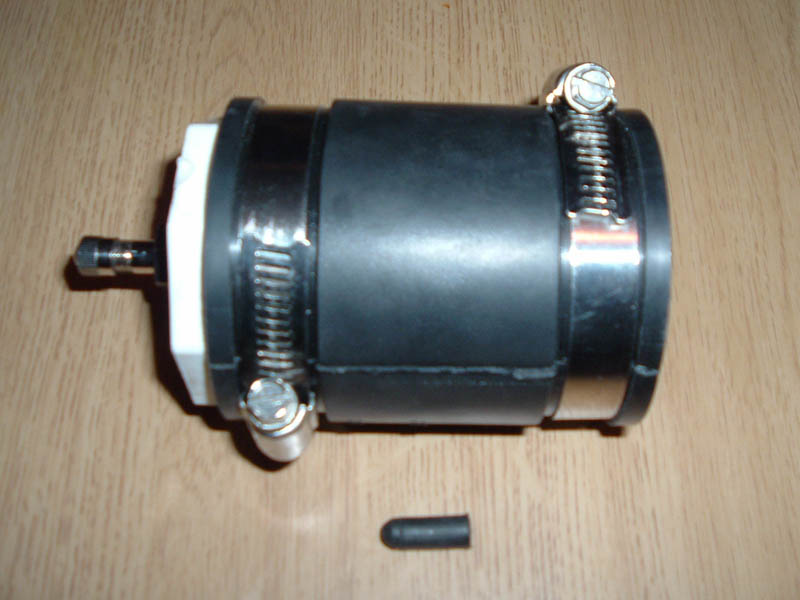
This is something that is pretty handy and costs a few bucks, eveyone should make one. Some people requested it on another thread so I'm posting here so others can see aswell. Here it goes.Yours will look different but will do the same thing.  Parts you need:-The coupler you use to connect your intake pipe/mafs to your compressor intake.
-a pvc end cap from home depot that fits snugly into your coupler. (so its the same size as your compressor inlet on your turbo)
-simple hose clamps to hold things together.
-some form of air compressor (personal, shop compressor, foot pump, etc...) Further testing showed you need a pretty decent pump to make this effective, shop pump or home air compressor would be best
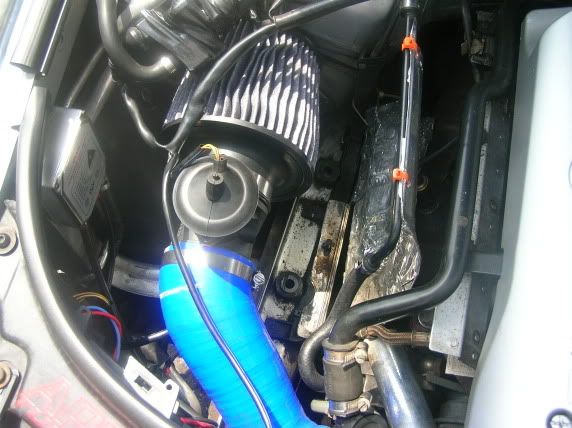
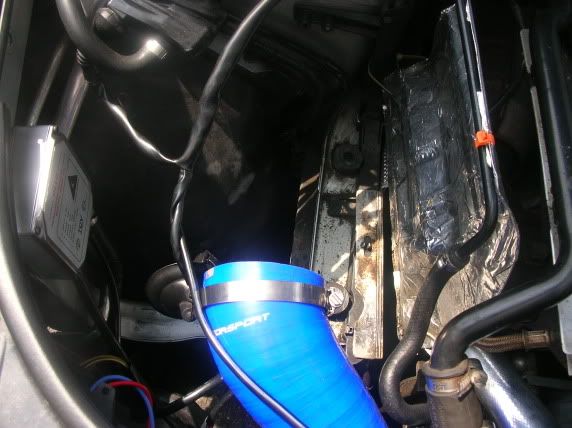
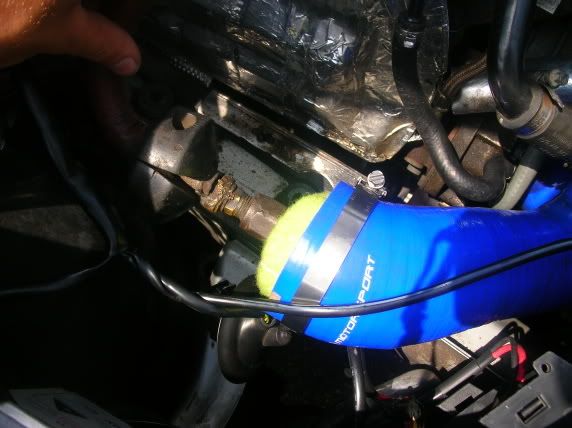
-a fitting to attach your air compressor of choice to pvc endcap (refer to pictures)Here are the pics:The end cap needs to have a hold drilled in it so your fitting can attach to it. This is where you will presurize the system from. you insert the end cap into your silicon/rubber coupler and clamp it down (I had that extra silicone bend for my new maf piping I was gonna make so im using that for the time being)The other side of the contraption gets attached to your turbos compressor intake (where the air filter/mafs coupler would normally go). if you have a bottom mount setup and its difficult to get to the turbos intake you can also pressurize the system from after the mafs and use your cars intake piping as an extension to the turbos intake. However when doing this make sure the any line going to the intake are plugged. For instance if you have a valve cover breather line/ PCV / catch tank going to the intake pipe it needs to be plugged or else you are going to pressurize your valvecover, crankcase, etc and it wont work. Although I did find a valve cover gasket leak like this

Then you attach your choice of air compressor to the fitting on the end cap side and you pressurize the system. Check your boost guage and presurize the system up to like 15 psi or whatever you would run to see if anything pops off. Final product Thats pretty much it. Obviously the motor is off while you do this so If you have the slightest leak it will make a loud noise and you will find it, also if your intercooler connections are leaking it will leak and you will find those aswell. Depending on the size of your leaks you might not be even to pressurize over a few psi, so just keep fixing leaks till you hear no noise. Let me know if I left something out or if you have any questions.
Parts you need:-The coupler you use to connect your intake pipe/mafs to your compressor intake. -a pvc end cap from home depot that fits snugly into your coupler. (so its the same size as your compressor inlet on your turbo)
-simple hose clamps to hold things together.
-some form of air compressor (personal, shop compressor, foot pump, etc...) Further testing showed you need a pretty decent pump to make this effective, shop pump or home air compressor would be best
-a fitting to attach your air compressor of choice to pvc endcap (refer to pictures)Here are the pics:The end cap needs to have a hold drilled in it so your fitting can attach to it. This is where you will presurize the system from.
you insert the end cap into your silicon/rubber coupler and clamp it down (I had that extra silicone bend for my new maf piping I was gonna make so im using that for the time being)The other side of the contraption gets attached to your turbos compressor intake (where the air filter/mafs coupler would normally go). if you have a bottom mount setup and its difficult to get to the turbos intake you can also pressurize the system from after the mafs and use your cars intake piping as an extension to the turbos intake. However when doing this make sure the any line going to the intake are plugged. For instance if you have a valve cover breather line/ PCV / catch tank going to the intake pipe it needs to be plugged or else you are going to pressurize your valvecover, crankcase, etc and it wont work. Although I did find a valve cover gasket leak like this Then you attach your choice of air compressor to the fitting on the end cap side and you pressurize the system. Check your boost guage and presurize the system up to like 15 psi or whatever you would run to see if anything pops off. Final product
Thats pretty much it. Obviously the motor is off while you do this so If you have the slightest leak it will make a loud noise and you will find it, also if your intercooler connections are leaking it will leak and you will find those aswell. Depending on the size of your leaks you might not be even to pressurize over a few psi, so just keep fixing leaks till you hear no noise. Let me know if I left something out or if you have any questions.
So my car recently had a boost leak in my car and decided to use the tennis ball method and took some pics of how it works. Its quite simple to do and takes all of about 15 min.Tools Needed:
1. Tennis Ball
2. Flat Head Screw Driver
3. Knife (to cut the tennis ball)
4. Compressor or Air Pump
Step 1: Get a tennis ball.
 Step 2: Cut two holes in the tennis ball, one on each end.
 Step 3: Should look like this on each end of the tennis ball.
 Step 4: Go to your car an find the turbo inlet hose.
 Step 5: Remove MAF and inlet hose from airbox or air filter
 Step 6: Hook compressor or air pump to the tennis ball by sliding it in the holes you cut before.
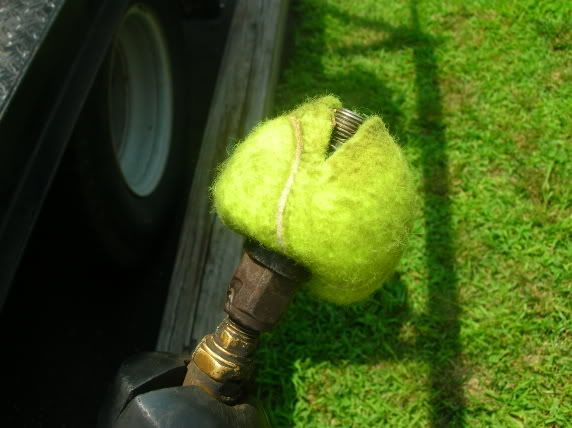 Step 7: Place the tennis ball in the inlet hose and clamp it in using the existing clamp.
Step 8: Turn on compressor and pump air into the inlet hose. CAUTION: DO NOT OVER PRESSURIZE!!! 10psi should be more than enough.
1. Tennis Ball
2. Flat Head Screw Driver
3. Knife (to cut the tennis ball)
4. Compressor or Air Pump
Step 1: Get a tennis ball.
Step 2: Cut two holes in the tennis ball, one on each end.Step 3: Should look like this on each end of the tennis ball.Step 4: Go to your car an find the turbo inlet hose.Step 5: Remove MAF and inlet hose from airbox or air filterStep 6: Hook compressor or air pump to the tennis ball by sliding it in the holes you cut before.Step 7: Place the tennis ball in the inlet hose and clamp it in using the existing clamp.Step 8: Turn on compressor and pump air into the inlet hose. CAUTION: DO NOT OVER PRESSURIZE!!! 10psi should be more than enough.
Thread Starter
|
Senior Member
Joined: Nov 2006
Posts: 3,430
From: Colorado Springs, CO.
This one is probably one of the best and most comprehensive boost leak test on a forum that I've seen yet. I like the fact that there are examples to see and follow.
This one is even more similar to mine, minus the extra tubing for the gauge as my gauge is mounted on the top of the end cap and next to the rubber valve.
Also, this is from a DSM'er that goes by Jafro on a Honduh board...I know, weird huh?! Regardless, if you're still around Jafro...GREAT WRITE UP!
[quote]One vital area of turbo performance that's frequently overlooked is BOOST LEAKS. So you've got all the bells and whistles installed on your engine that push higher-than-atmospheric pressure into the combustion chamber... How do you know that ALL the compressed air from the turbo is actually making it to where the fuel is? How do you know your turbo's not being overworked getting it there? Air is invisible. You can feel it escape from large leaks, you can hear it escape from most others, but you don't see it escape so discovering or pinpointing leaks can be difficult.
Your wastegate regulates boost pressure. Most turbos don't have a problem creating enough boost to open the wastegate even when air escapes the intake system, but what happens as a result of the escaping air... is that your turbo has to spin faster to create the pressure needed to force the wastegate spring open. This causes more heat which counteracts the efficiency of your intercooler, increasing the possibility of detonation, and causing your engine to produce less hp at any given pressure than it would if the turbo didn't have to work as hard. Another thing that it can do is wear out your turbo's bearing cartridge. If the air is escaping after the systems that meter air to determine how much fuel to inject... then your fuel tuning can be affected, too. All of this is bad.
If this all doesn't make sense, try crushing a soda bottle and poke a hole in it. Now put your lips on the bottle and try to blow the bottle back up. Tough isn't it? If you do manage to re-inflate that soda bottle, then have I got a job for you .
.
With issues like these looming over the turbo community... and with so many people concerned about 1 or 2 hp here and there... and the price and value of indexed plugs, synthetic oil, location of their intake temp sensors and all the other little tricks needed to get every drop of power out of your investment, why not spend the effort to get rid of all the boost leaks so that nothing is in question, and none of that other power-gaining effort and time you spent is wasted.
Lets start with the tools needed.
1. Air compressor
2. home-made Boost Leak Tester
3. Turbo car.
4. SoftSoap hand soap. The clear kind. Not the milky kind with lotion.
5. spray bottle
6. random bolts to fit vacuum lines.
7. light
Some other good things to have around are:
vacuum plugs, zip ties, teflon tape, RTV, make-a-gasket material that you can cut gaskets out of, and a friend.
Item #2 in the list above is something that you can't easily buy. Some people have tried to build and market boost leak testers, but it's a miserably stupid idea to try that. No matter how well it's engineered, DIY'ers will continue to make their own because it's cheaper, and the first part of this DIY will show you how to make a tester of your own. Turbos come in all shapes and sizes so the part needed to plug the compressor housing can vary drastically from 1.75" to 4", so you need to make one that fits your turbo. Here's one I made for my Big16g.

1. Get a ruler and measure your turbo inlet.
2. Buy a rubber coupler from the plumbing department of your local hardware store that fits over your turbo inlet.
3. Find a PVC end cap that fits snugly inside the coupler you selected.
4. Get a worm-gear clamp that fits around both parts that can clamp them FIRMLY in place. But don't do that yet.
5. Go to an auto-parts store. NAPA is everywhere, and they have everything needed as far as the remaining parts go.
6. Get two clamp-style valve stems. Get long ones if you can. These are used on 18 wheelers and some racing wheels. Un-screw and remove the guts out of one valve stem so that air passes freely through it.
7. Get a dial-type tire pressure gauge. I use the tire gauge for 2 reasons. One is the fact that you can't find a higher quality gauge that reads less than 180PSI for a decent price, and the other is that you need to have a fairly small range of pressure on the dial so that the needle moves farther under pressure. Gauges for air compressors might only move about 2mm if they display 200 or so PSI, so they're much harder to read at say... 10 PSI... and they're about $40. Tire gauges are usually around $2-3, and accuracy isn't really much of a problem. Before you make the purchase, make sure the fitting for the tire's valve stem unscrews from the bottom of the gauge. If it does, you'll probably find a standard NPT threaded male fitting.
8. Get a section of fuel line that fits snugly over the gutted valve stem.
9. Get a few brass fittings that fit the gauge's threads, and that will snugly fit inside the other end of the fuel hose. Teflon tape them before screwing them together. About 2 layers is fine. If you're lucky, you'll find one in the bin with a hose barb on one end.
10. get 2 small hose clamps that fit snugly over the fuel line.
Assembly:
1. Drill 2 holes in the PVC end cap that are just large enough for the clamp-style valve stems to fit through. Make sure they're far enough apart that the bottom flanges don't touch, but not so far that the flanges hit the sides of the cap. Either one of those problems can cause your tool to leak, and the cap will be basically ruined. Clamp the valve stems down tight with the lock nuts.

2. Squish the end cap down into the coupler, then use the big worm-gear clamp to honk it down tight. You don't want this thing blowing out under pressure.
3. Slip the fuel hose over the gutted valve stem, clamp it down tight.

4. Press the gauge/fitting assembly into the fuel hose, and clamp it down tight.

You're done building the tool, read on to learn about the test.
With this style of boost leak tester (with the gauge attached to it), you can easily perform boost leak tests without anyone's help. The gauge will give you instant feedback concerning your intake system's general health. If you choose not to install a gauge on your tester, it will cost you about $7-$10 less to make, but you'll need someone to help you test the car... to sit inside the car and watch your boost gauge and shout-out what it's doing. My advice: Spend the $7-$10 and add the gauge. It's not always easy to convince your average video-gaming buddies to leave the keyboard and spend a hot sweaty day in a garage.
Now for the testing procedure...
The reason my recipe only calls for one clamp is because your turbo intake pipe already has the right size clamp on it. Also, if you purchase a second clamp for the BLT you made, it usually falls off of it in your toolbox and gets lost, or your friend borrows it and loses it, so why bother. Save your dollar. Anyway. Remove your intake pipe and filter. Use the clamp from your intake...

...and clamp the boost leak tester tigh
This one is even more similar to mine, minus the extra tubing for the gauge as my gauge is mounted on the top of the end cap and next to the rubber valve.
Also, this is from a DSM'er that goes by Jafro on a Honduh board...I know, weird huh?! Regardless, if you're still around Jafro...GREAT WRITE UP!
[quote]One vital area of turbo performance that's frequently overlooked is BOOST LEAKS. So you've got all the bells and whistles installed on your engine that push higher-than-atmospheric pressure into the combustion chamber... How do you know that ALL the compressed air from the turbo is actually making it to where the fuel is? How do you know your turbo's not being overworked getting it there? Air is invisible. You can feel it escape from large leaks, you can hear it escape from most others, but you don't see it escape so discovering or pinpointing leaks can be difficult.
Your wastegate regulates boost pressure. Most turbos don't have a problem creating enough boost to open the wastegate even when air escapes the intake system, but what happens as a result of the escaping air... is that your turbo has to spin faster to create the pressure needed to force the wastegate spring open. This causes more heat which counteracts the efficiency of your intercooler, increasing the possibility of detonation, and causing your engine to produce less hp at any given pressure than it would if the turbo didn't have to work as hard. Another thing that it can do is wear out your turbo's bearing cartridge. If the air is escaping after the systems that meter air to determine how much fuel to inject... then your fuel tuning can be affected, too. All of this is bad.
If this all doesn't make sense, try crushing a soda bottle and poke a hole in it. Now put your lips on the bottle and try to blow the bottle back up. Tough isn't it? If you do manage to re-inflate that soda bottle, then have I got a job for you
.With issues like these looming over the turbo community... and with so many people concerned about 1 or 2 hp here and there... and the price and value of indexed plugs, synthetic oil, location of their intake temp sensors and all the other little tricks needed to get every drop of power out of your investment, why not spend the effort to get rid of all the boost leaks so that nothing is in question, and none of that other power-gaining effort and time you spent is wasted.
Lets start with the tools needed.
1. Air compressor
2. home-made Boost Leak Tester
3. Turbo car.
4. SoftSoap hand soap. The clear kind. Not the milky kind with lotion.
5. spray bottle
6. random bolts to fit vacuum lines.
7. light
Some other good things to have around are:
vacuum plugs, zip ties, teflon tape, RTV, make-a-gasket material that you can cut gaskets out of, and a friend.
Item #2 in the list above is something that you can't easily buy. Some people have tried to build and market boost leak testers, but it's a miserably stupid idea to try that. No matter how well it's engineered, DIY'ers will continue to make their own because it's cheaper, and the first part of this DIY will show you how to make a tester of your own. Turbos come in all shapes and sizes so the part needed to plug the compressor housing can vary drastically from 1.75" to 4", so you need to make one that fits your turbo. Here's one I made for my Big16g.
1. Get a ruler and measure your turbo inlet.
2. Buy a rubber coupler from the plumbing department of your local hardware store that fits over your turbo inlet.
3. Find a PVC end cap that fits snugly inside the coupler you selected.
4. Get a worm-gear clamp that fits around both parts that can clamp them FIRMLY in place. But don't do that yet.
5. Go to an auto-parts store. NAPA is everywhere, and they have everything needed as far as the remaining parts go.
6. Get two clamp-style valve stems. Get long ones if you can. These are used on 18 wheelers and some racing wheels. Un-screw and remove the guts out of one valve stem so that air passes freely through it.
7. Get a dial-type tire pressure gauge. I use the tire gauge for 2 reasons. One is the fact that you can't find a higher quality gauge that reads less than 180PSI for a decent price, and the other is that you need to have a fairly small range of pressure on the dial so that the needle moves farther under pressure. Gauges for air compressors might only move about 2mm if they display 200 or so PSI, so they're much harder to read at say... 10 PSI... and they're about $40. Tire gauges are usually around $2-3, and accuracy isn't really much of a problem. Before you make the purchase, make sure the fitting for the tire's valve stem unscrews from the bottom of the gauge. If it does, you'll probably find a standard NPT threaded male fitting.
8. Get a section of fuel line that fits snugly over the gutted valve stem.
9. Get a few brass fittings that fit the gauge's threads, and that will snugly fit inside the other end of the fuel hose. Teflon tape them before screwing them together. About 2 layers is fine. If you're lucky, you'll find one in the bin with a hose barb on one end.
10. get 2 small hose clamps that fit snugly over the fuel line.
Assembly:
1. Drill 2 holes in the PVC end cap that are just large enough for the clamp-style valve stems to fit through. Make sure they're far enough apart that the bottom flanges don't touch, but not so far that the flanges hit the sides of the cap. Either one of those problems can cause your tool to leak, and the cap will be basically ruined. Clamp the valve stems down tight with the lock nuts.
2. Squish the end cap down into the coupler, then use the big worm-gear clamp to honk it down tight. You don't want this thing blowing out under pressure.
3. Slip the fuel hose over the gutted valve stem, clamp it down tight.
4. Press the gauge/fitting assembly into the fuel hose, and clamp it down tight.
You're done building the tool, read on to learn about the test.
With this style of boost leak tester (with the gauge attached to it), you can easily perform boost leak tests without anyone's help. The gauge will give you instant feedback concerning your intake system's general health. If you choose not to install a gauge on your tester, it will cost you about $7-$10 less to make, but you'll need someone to help you test the car... to sit inside the car and watch your boost gauge and shout-out what it's doing. My advice: Spend the $7-$10 and add the gauge. It's not always easy to convince your average video-gaming buddies to leave the keyboard and spend a hot sweaty day in a garage.
Now for the testing procedure...
The reason my recipe only calls for one clamp is because your turbo intake pipe already has the right size clamp on it. Also, if you purchase a second clamp for the BLT you made, it usually falls off of it in your toolbox and gets lost, or your friend borrows it and loses it, so why bother. Save your dollar. Anyway. Remove your intake pipe and filter. Use the clamp from your intake...
...and clamp the boost leak tester tigh
Thread Starter
|
Senior Member
Joined: Nov 2006
Posts: 3,430
From: Colorado Springs, CO.
Oops, I forgot to show you how mine was made and what it looks like.
Here's my list of parts.
- Pressure gauge that goes up to 160psi...granted 30psi is fine for most, but it's tough to find a small gauge with that low of a pressure reading.
- Black PVC 2.5" elbow
- Black PVC end cap that will slip onto a 2.5" PVC elbow.
- Rubber air valve
I also used some miscellaneous parts like RTV to seal up the valve ends, PlastiWeld to seal off the elbow to cap seam and to "make" the hump at the end of the elbow to keep the coupler from popping off at higher psi levels (the proper word escapes me at the moment), I also used Teflon tape to seal the threads on the gauge. I let everything cure overnight and I also used some old stock I/C piping which fit right over the big28 just fine.
[IMG]local://upfiles/10268/F470155B165348DBBF3F3660293F5795.jpg[/IMG]
[IMG]local://upfiles/10268/8E8353503D124A938291AA2C2EB89D5C.jpg[/IMG]
[IMG]local://upfiles/10268/67DD1E8528ED4BC982A44D66B888DAD3.jpg[/IMG]
[IMG]local://upfiles/10268/2C93054650D64CDE8AB902300613CAA1.jpg[/IMG]
[IMG]local://upfiles/10268/7CE7E17061604E5DBBAA1215C8E457A0.jpg[/IMG]
Then I drilled the holes for the gauge and the valve. The valve hole was drilled to the size of the stem and not the base with a stepper bit, then I slid the stem through and pulled hard to get the base through the small opening. It's on there nice and tight with no leaks at all, even before I put RTV on it.The gauge hole was drilled just enough to start the threading. I didn't need to use a tap since I used the gauge to do that for me and the PVC is soft enough. Although, if you don't have a bit that will allow this, then you may need a tap with a pointed end to help start it. I dabbed a bit of RTV around the threads on the backside of the cap afterwards too. If either the valve or the gauge ever need replacing, RTV comes off easy enough.
The pics above don't depict it but it's there. I also have another end cap that I connect onto my I/C rubber pipe which is already connected to my elbow and I do this to test the psi on the gauge as it shows on my air tank and I do this every other month or so. I also make sure that the seams aren't leaking or the tube doesn't pop off on me. You should see the rubber I/C tubing swell up like a snake that just ate a rat...scary, lol.
Thread Starter
|
Senior Member
Joined: Nov 2006
Posts: 3,430
From: Colorado Springs, CO.
Here's an alternate way to make one.
http://www.mirage-performance.com/Ec...aks/index.html
Here's some more ideas from another SRT board.


 Ok, that's enough from me for now. There should be enough info in this thread to help make your own because there are many ideas on what they can look like. Just take your time and think ahead so that you don't have any leaks from your tester. I hope you enjoyed this compilation of boost leak testers.
http://www.mirage-performance.com/Ec...aks/index.html
DSM Boost Leaks/Turbo Intake Pressure Tester 
 Built a Boost Leak Tester for around $15. Boost Leak Tester The first one I built had a rubber coupler that attached to the turbo, but that blew off at 15psi. This was most likely because of the rubber "spacer" ring that the T25 turbo uses so the intake fits on the turbo. Any other turbo should be able to get a rubber coupler to hold up to at least 16psi. [ol][*]Pick up a rubber or silicone coupler ( 2" silicone coupler for the T25) in whatever size will fit your turbo inlet.[*]Get a plastic pipe cap from the hardware store to plug one end.[*] Buy a metal tire valve stem from the local auto store. Drill a hole in the top of you plastic plug and install the valve stem through it.[*] Put on two hose clamps and you are done. Preferably liner clamps or T-bolt clamps that will not cut up the silicone coupler.[*]Vacuum line cap. Used to block off the boost controller line since they bleed off air. Should cost around $20 or so if you get a silicone coupler and T-bolt clamps. [/ol] If you have an extra boost gauge, hook it up so you can monitor the test pressure in the engine bay. Otherwise, you will need a friend to tell you what pressure it is at and when to stop. Plug the line going to your boost controller and start pressurizing the intake.. Do you have access to an air compressor? A tire pump just didn't have enough flow to test mine. The first leak was too bad. When using an air compressor, be very careful to slowly fill the intake. It is easy to blow the boost leak tester 30+ feet away from the vehicle. Always keep an eye on the test pressure. Start with 15psi and then move up. If you run at 16psi, there isn't much reason to test past 20psi. Here is the original VFAQ page for building an intercooler pipe tester You have a couple different options. [ol][*]Test the whole intake by connecting the tester directly to the turboThis is not the best choice because turbo seals can leak when the car is not running. It can also be difficult to track down large leaks this way. It just tests too much at once. Once you have fixed most of the leaks, then it is not a bad way to quickly test for new leaks. Just keep in mind that a bubbling oil sound in the oil pan is usually just air slipping past the turbo seal. Bypass the turbo and re-test.[*]Connect the tester to the intercooler inlet (or the lower intercooler piping if you have hard piping.) Then put a plastic plumbing cap in the end of your upper intercooler piping coupler.This is the best way to test the first half of your intake. You can move the cap further downstream if you want to test your intake in even smaller portions.[*]Connect the tester to the throttle body. Pump it up and check for leaks at the throttle body shaft seals, throttle body gaskets, intake manifold gasket, fuel injector seals, and intake valves/valve seals.Most people will be suprised at the number of leaks this test will find. Have fun. Clamp off the PCV line if you suspect it is leaking and continue testing. Some people find that their boost gauge line and even the gauge itself is leaking. Don't forget to check inside the car during this test.[/ol] Leaks found so far:[*]BISS (Base Idle Set Screw) o-ring[*]Throttle Body gaskets[*]Throttle Body butterfly shaft seals[*]BOV (Blow Off Valve) gasket[*]Fuel Injector Seals (replaced with Python Injectors kit 200-400)
Built a Boost Leak Tester for around $15. Boost Leak Tester The first one I built had a rubber coupler that attached to the turbo, but that blew off at 15psi. This was most likely because of the rubber "spacer" ring that the T25 turbo uses so the intake fits on the turbo. Any other turbo should be able to get a rubber coupler to hold up to at least 16psi. [ol][*]Pick up a rubber or silicone coupler ( 2" silicone coupler for the T25) in whatever size will fit your turbo inlet.[*]Get a plastic pipe cap from the hardware store to plug one end.[*] Buy a metal tire valve stem from the local auto store. Drill a hole in the top of you plastic plug and install the valve stem through it.[*] Put on two hose clamps and you are done. Preferably liner clamps or T-bolt clamps that will not cut up the silicone coupler.[*]Vacuum line cap. Used to block off the boost controller line since they bleed off air. Should cost around $20 or so if you get a silicone coupler and T-bolt clamps. [/ol] If you have an extra boost gauge, hook it up so you can monitor the test pressure in the engine bay. Otherwise, you will need a friend to tell you what pressure it is at and when to stop. Plug the line going to your boost controller and start pressurizing the intake.. Do you have access to an air compressor? A tire pump just didn't have enough flow to test mine. The first leak was too bad. When using an air compressor, be very careful to slowly fill the intake. It is easy to blow the boost leak tester 30+ feet away from the vehicle. Always keep an eye on the test pressure. Start with 15psi and then move up. If you run at 16psi, there isn't much reason to test past 20psi. Here is the original VFAQ page for building an intercooler pipe tester You have a couple different options. [ol][*]Test the whole intake by connecting the tester directly to the turboThis is not the best choice because turbo seals can leak when the car is not running. It can also be difficult to track down large leaks this way. It just tests too much at once. Once you have fixed most of the leaks, then it is not a bad way to quickly test for new leaks. Just keep in mind that a bubbling oil sound in the oil pan is usually just air slipping past the turbo seal. Bypass the turbo and re-test.[*]Connect the tester to the intercooler inlet (or the lower intercooler piping if you have hard piping.) Then put a plastic plumbing cap in the end of your upper intercooler piping coupler.This is the best way to test the first half of your intake. You can move the cap further downstream if you want to test your intake in even smaller portions.[*]Connect the tester to the throttle body. Pump it up and check for leaks at the throttle body shaft seals, throttle body gaskets, intake manifold gasket, fuel injector seals, and intake valves/valve seals.Most people will be suprised at the number of leaks this test will find. Have fun. Clamp off the PCV line if you suspect it is leaking and continue testing. Some people find that their boost gauge line and even the gauge itself is leaking. Don't forget to check inside the car during this test.[/ol] Leaks found so far:[*]BISS (Base Idle Set Screw) o-ring[*]Throttle Body gaskets[*]Throttle Body butterfly shaft seals[*]BOV (Blow Off Valve) gasket[*]Fuel Injector Seals (replaced with Python Injectors kit 200-400)

Senior Member
Joined: Nov 2006
Posts: 552
From:
ORIGINAL: silvercoupe97
My favorite is the one from the VW guys, lol. I guess that would work in a pinch, but a tennis ball?!!
My favorite is the one from the VW guys, lol. I guess that would work in a pinch, but a tennis ball?!!

Thread
Thread Starter
Forum
Replies
Last Post
TheRock0720
2nd Generation
6
Nov 12, 2010 12:30 PM
silvercoupe97
Eclipse Frequently Asked Question Section
3
Sep 22, 2008 05:16 AM