
Aftermarket Navigation Install: Kenwood DNX-6960


Thread Starter
|
Member
Joined: Feb 2011
Posts: 72
Hi all! Kinda new here... but I thought I'd share my experience with my new navigation system installation on my 2009 Outlander SE with the Rockford Fosgate Package.
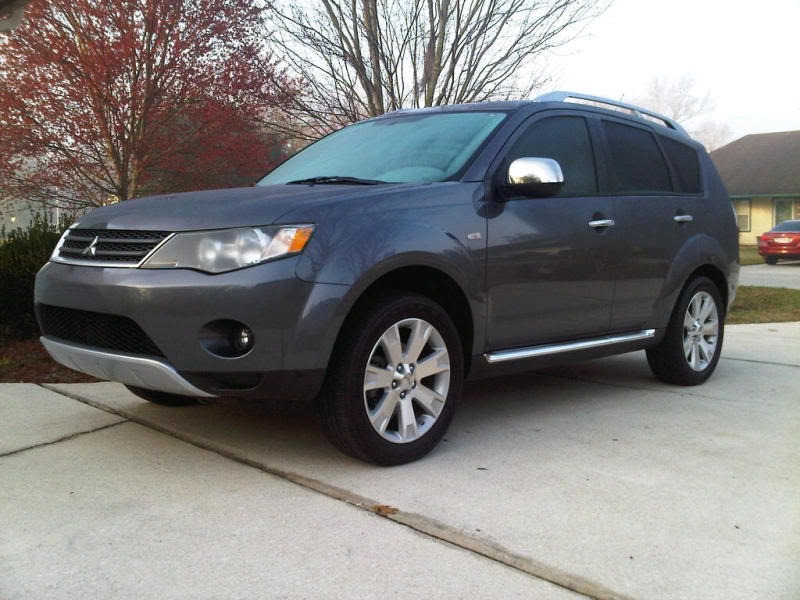
Note: The headlights look fogged up because it has morning dew on it.
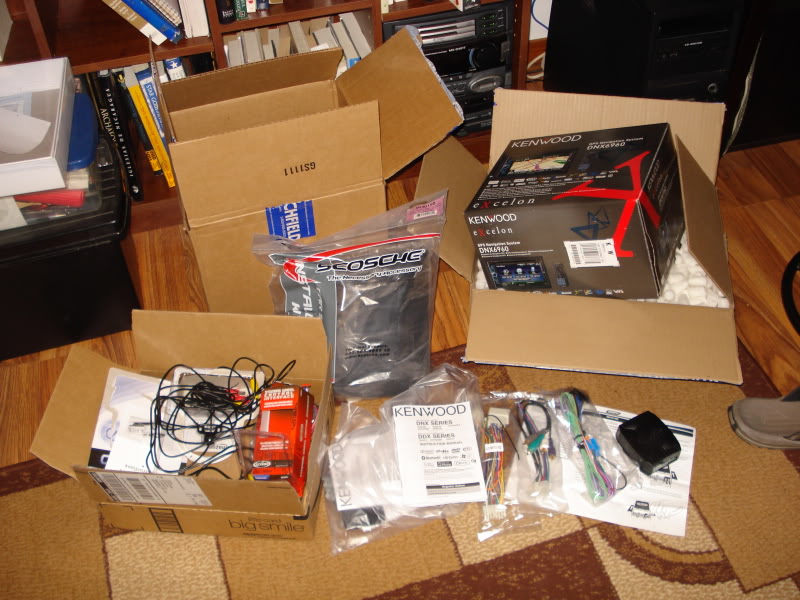
So far I've ordered all the bits and pieces that I think I will need for the install:
Kenwood DNX-6960 DVD/Navigation Receiver - $800 - Crutchfield
Metra Mitsubishi Mito-2 Amp Retention Adapter - $81 (after 50% off with order, and extra 10% off promo code) - Crutchfield
Scosche Double-DIN Dash Kit - FREE w/ order - Crutchfield
Metra Axxess ASWC Steering Wheel Control Adapter - $41 - Amazon
DP Audio Video DBC466 Rearview Camera - $23 - Amazon
AmazonBasics USB 2.0 A-Male to A-Female Extension Cable - $6 - Amazon
3 ft. Right Angle to Straight Plug 3.5mm Stereo Audio Cable - $9 - Amazon
------------------------------------
Total: $960
Everything should be here later this week or next week...
I'll use this thread to detail my installation, and hopefully answer any questions if possible.
Note: The headlights look fogged up because it has morning dew on it.
So far I've ordered all the bits and pieces that I think I will need for the install:
Kenwood DNX-6960 DVD/Navigation Receiver - $800 - Crutchfield
Metra Mitsubishi Mito-2 Amp Retention Adapter - $81 (after 50% off with order, and extra 10% off promo code) - Crutchfield
Scosche Double-DIN Dash Kit - FREE w/ order - Crutchfield
Metra Axxess ASWC Steering Wheel Control Adapter - $41 - Amazon
DP Audio Video DBC466 Rearview Camera - $23 - Amazon
AmazonBasics USB 2.0 A-Male to A-Female Extension Cable - $6 - Amazon
3 ft. Right Angle to Straight Plug 3.5mm Stereo Audio Cable - $9 - Amazon
------------------------------------
Total: $960
Everything should be here later this week or next week...
I'll use this thread to detail my installation, and hopefully answer any questions if possible.
Last edited by firstorbit84; Mar 22, 2011 at 11:01 PM. Reason: added vehicle info

Junior Member
Joined: Mar 2011
Posts: 4
From: Lethbridge, AB
Looking forward to your experience with this. We have just made a deal on a new 2011 XLS-S-AWC without the navi package as I just couldn't rationalize the extra $2500 for that. But I would like the nav package, of course. Curious as to which year and what model of Outti you have?
Thanks for sharing this all with us.
Pax
Thanks for sharing this all with us.
Pax
Thread Starter
|
Member
Joined: Feb 2011
Posts: 72
 I suppose that would have been good info to include: I've got a 2009 Outlander SE with the Rockford Fosgate Stereo Package. In my opinion, the Rockford Fosgate package is definitely worth it. It sounds just as good as a majority of aftermarket systems that I've installed or heard. Plus, the bass is just the right amount for my tastes, even on the lower settings. It sounds even better than the Bose system with subwoofer in my old Audi A6.
I just hope that I can make it sound as good with the aftermarket Kenwood stereo as it does with the stock head unit. Apparently the Metra MITO-2 Rockford Fosgate amp retention adapter has to be manually tuned, and I haven't found any guides out there on how to do it properly. I hope it comes with instructions.
Thread Starter
|
Member
Joined: Feb 2011
Posts: 72
Got the remainder of my parts in today!  I've read over most of the instruction manuals, and I'm going for the install this afternoon for as long as it takes me into the night... (Hopefully won't be too long)
I've already tested the rear camera on a home TV and the image quality with bright lighting is actually pretty darned good; I was quite surprised. The image quality in low light is not terrible either, but not superb. I don't think the camera that I bought has a true IR night vision. It just has a very sensitive sensor that can adjust for low lighting conditions. Oh well, it's better than nothing; it certainly was a good deal for $23, and I'll actually have to evaluate how well it works once its on the car.
I will try to take pictures and document as much as possible as I go along.
Wish me luck!
I've read over most of the instruction manuals, and I'm going for the install this afternoon for as long as it takes me into the night... (Hopefully won't be too long)I've already tested the rear camera on a home TV and the image quality with bright lighting is actually pretty darned good; I was quite surprised. The image quality in low light is not terrible either, but not superb. I don't think the camera that I bought has a true IR night vision. It just has a very sensitive sensor that can adjust for low lighting conditions. Oh well, it's better than nothing; it certainly was a good deal for $23, and I'll actually have to evaluate how well it works once its on the car.
I will try to take pictures and document as much as possible as I go along.
Wish me luck!

Thread Starter
|
Member
Joined: Feb 2011
Posts: 72
Okay folks... everything went well except that I could not get the steering wheel control module to work 
I was told by Metra tech support that their Axxess ASWC would DEFINITELY work with my Outlander... and it is clearly listed in the manual that came with the unit as well as on their on-line fitment guide.
I'll be placing a call to their tech support this morning, when they open at 10am, but I may not have a chance to open everything back up and do some trouble shooting until later this afternoon.
I'll try to post pics and some helpful pointers later today, as well.
Thread Starter
|
Member
Joined: Feb 2011
Posts: 72
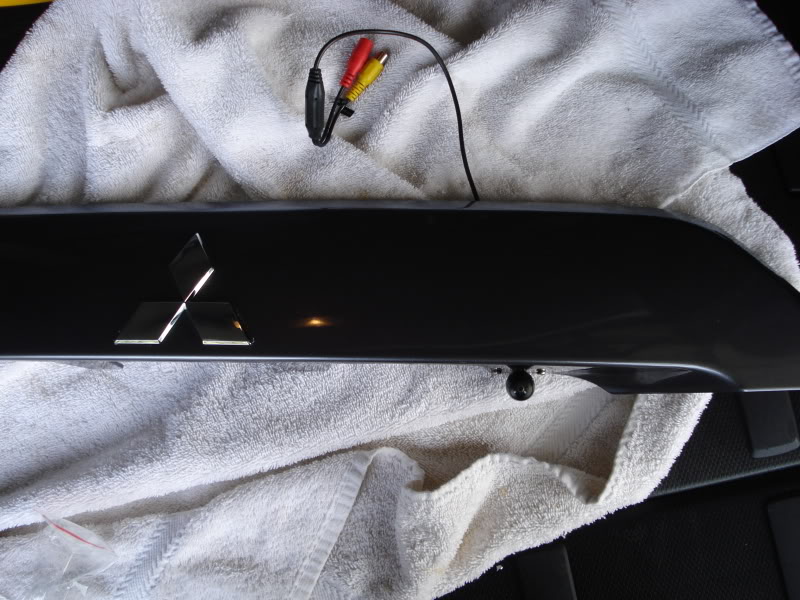
Pictures! (Volume 1)
All the gear:
For the camera installation alone, it took about 2.5 hours all said and done. I closely followed the directions in the sticky: https://mitsubishiforum.com/forum/sh...ad.php?t=18705
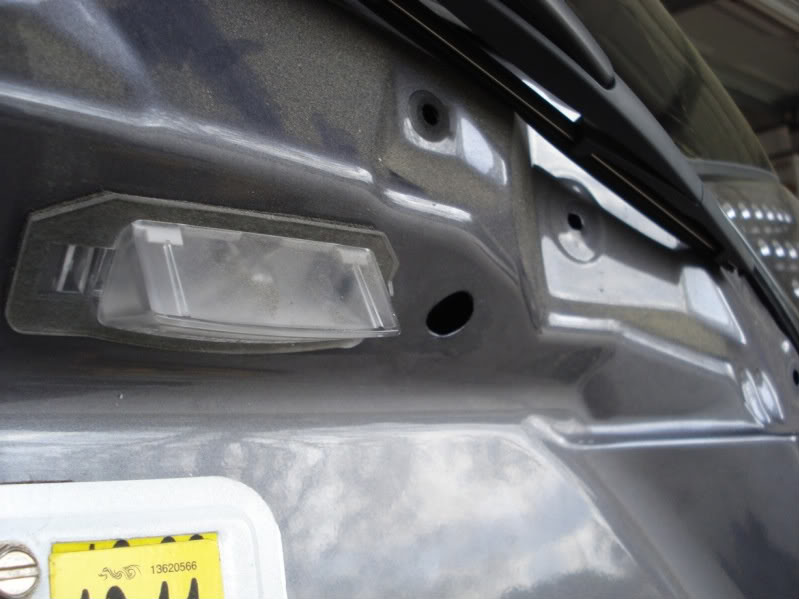
Cut for new slot for camera on right side of rear license plate trim:
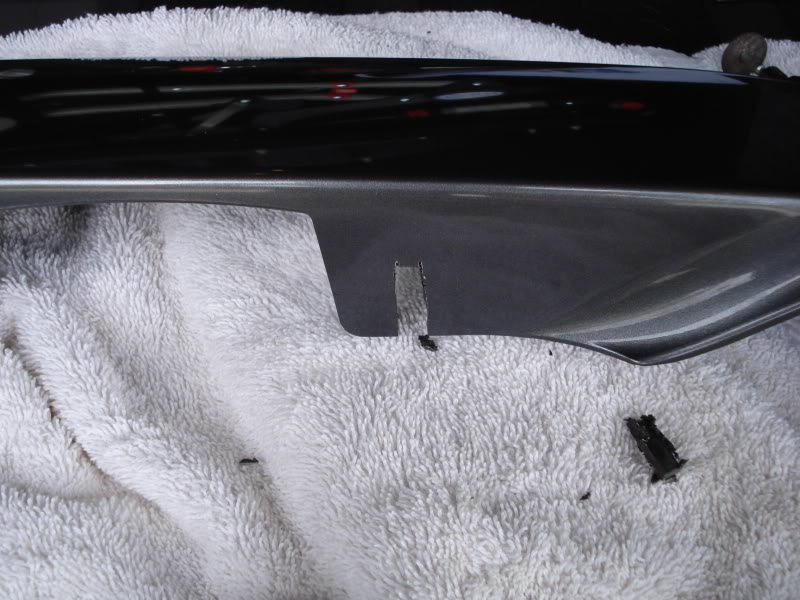
Notes: The precut mounting location for the OEM camera on the left side was already cut out at the factory on my car, and it was too large for the bracket that came with the camera I bought. So I made a new one on the right side. It's slightly angled to compensate for the curvature of the rear of the car.
Test fit of rear camera:
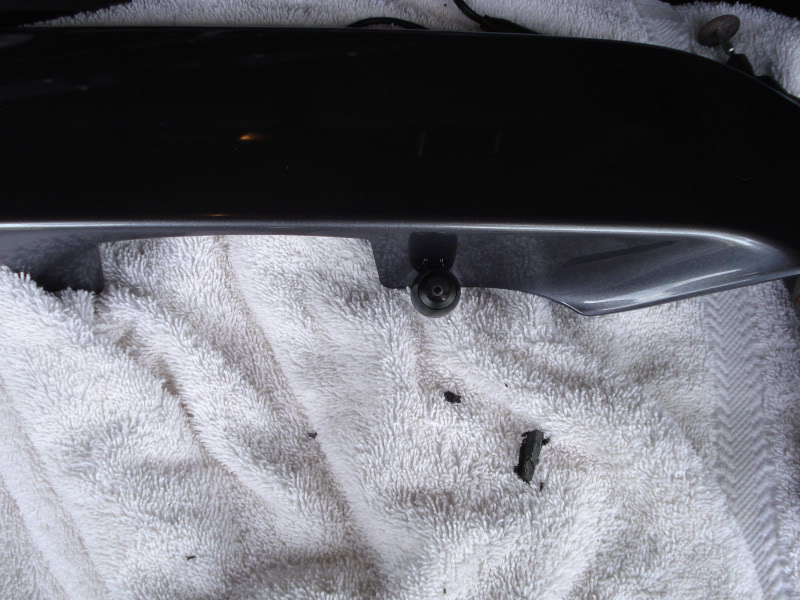
Camera fully mounted to trim panel:
Notes: The two small screws on either side of the camera are connected to nuts that go through the mounting bracket, which is hidden underneath the trim panel.
1/2" Hole Drilled in rear hatch to pass camera wires through (will be hidden underneath trim)
Notes: I sanded a bit around the edge so that it wasn't sharp enough to cut through the camera wires. I then painted the edge with touch-up paint to prevent rust.
Power for camera tapped into passenger reverse light wires:
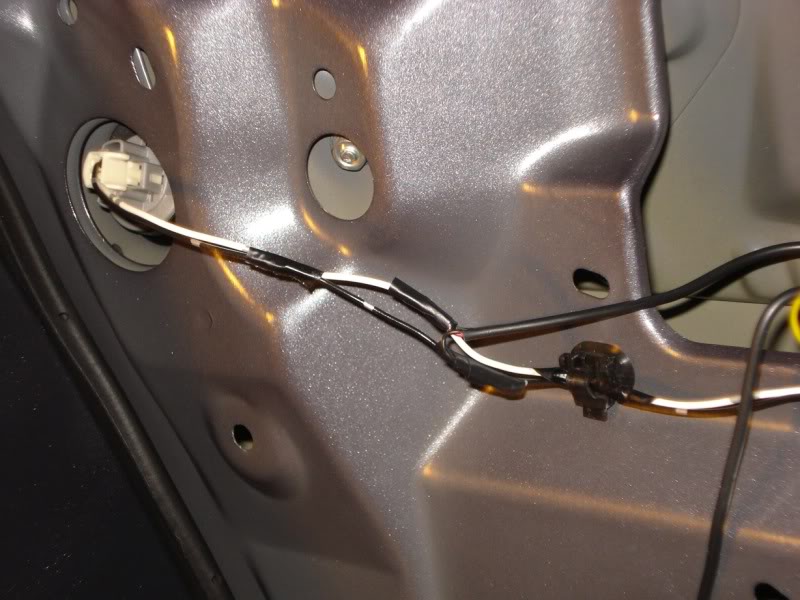
Notes: I actually soldered these connections in the rear of the car. I then taped up the entire thing together to prevent any stress on the wires. You can barely tell that it isn't a stock connection.
Final product for aftermarket rear camera mount:

You can barely tell its there when standing more than 5 feet from the vehicle. It looks almost completely stock or better IMO.
Wiring done on the bench, using soldered connections.
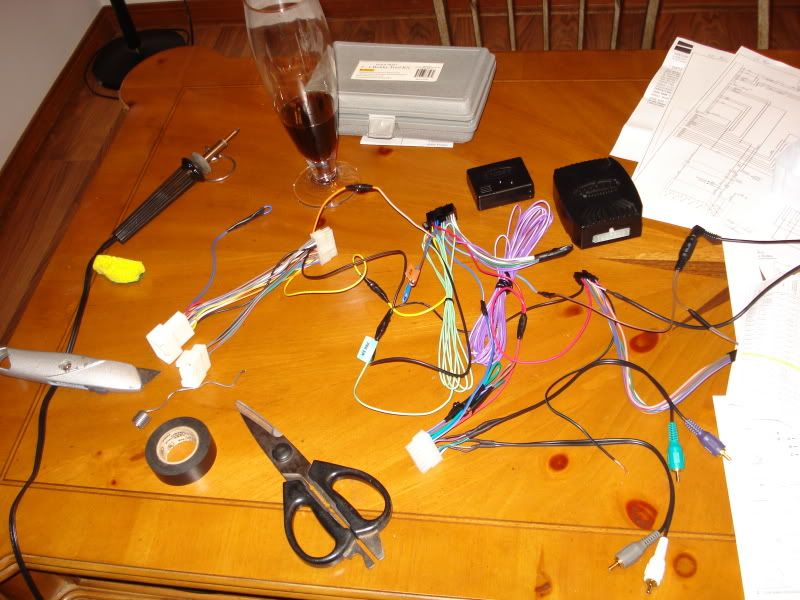
Here you can see all of the harnesses laid out. There were four in all: the Kenwood radio harness which attached to the harnesses for the Metra Mito-2 harness in two parts and the steering wheel control harness. I basically just read through each product's installation guide and connected all of the wires that were mentioned.
The one connection that I had to make on the car was to the reverse wire to activate the back up camera. Basically, when I opened up the dash, there were two harnesses going to the factory CD changer head unit, and a third harness that was just taped up. That third harness is for a factory navigation and it contains the reverse wire which is WHITE. You can see my connection to it in the pic below:

I juist piggy-backed off of the connection, and simply twisted it on there without soldering, so that I didn't have to cut any factory wires, and in case I wanted to go back to stock, even though this harness is only used with the OEM navigation.
Let me know if anyone has any other specific questions on this step...
All the gear:
For the camera installation alone, it took about 2.5 hours all said and done. I closely followed the directions in the sticky: https://mitsubishiforum.com/forum/sh...ad.php?t=18705
Cut for new slot for camera on right side of rear license plate trim:
Notes: The precut mounting location for the OEM camera on the left side was already cut out at the factory on my car, and it was too large for the bracket that came with the camera I bought. So I made a new one on the right side. It's slightly angled to compensate for the curvature of the rear of the car.
Test fit of rear camera:
Camera fully mounted to trim panel:
Notes: The two small screws on either side of the camera are connected to nuts that go through the mounting bracket, which is hidden underneath the trim panel.
1/2" Hole Drilled in rear hatch to pass camera wires through (will be hidden underneath trim)
Notes: I sanded a bit around the edge so that it wasn't sharp enough to cut through the camera wires. I then painted the edge with touch-up paint to prevent rust.
Power for camera tapped into passenger reverse light wires:
Notes: I actually soldered these connections in the rear of the car. I then taped up the entire thing together to prevent any stress on the wires. You can barely tell that it isn't a stock connection.
Final product for aftermarket rear camera mount:
You can barely tell its there when standing more than 5 feet from the vehicle. It looks almost completely stock or better IMO.
Wiring done on the bench, using soldered connections.
Here you can see all of the harnesses laid out. There were four in all: the Kenwood radio harness which attached to the harnesses for the Metra Mito-2 harness in two parts and the steering wheel control harness. I basically just read through each product's installation guide and connected all of the wires that were mentioned.
The one connection that I had to make on the car was to the reverse wire to activate the back up camera. Basically, when I opened up the dash, there were two harnesses going to the factory CD changer head unit, and a third harness that was just taped up. That third harness is for a factory navigation and it contains the reverse wire which is WHITE. You can see my connection to it in the pic below:
I juist piggy-backed off of the connection, and simply twisted it on there without soldering, so that I didn't have to cut any factory wires, and in case I wanted to go back to stock, even though this harness is only used with the OEM navigation.
Let me know if anyone has any other specific questions on this step...

Junior Member
Joined: Aug 2010
Posts: 5
Have You finally managed to get the steering wheel harness to work properly? I am thinking of getting this baby:
http://homeavdirect.co.uk/alpine-ixa...-media-station
and the only thing holding me back so far is the steering wheel issue.
/Dominik
http://homeavdirect.co.uk/alpine-ixa...-media-station
and the only thing holding me back so far is the steering wheel issue.
/Dominik
Thread Starter
|
Member
Joined: Feb 2011
Posts: 72
Thanks for the support!
I have a couple of things to try with the steering wheel controls that occurred to me today. I will give them a shot when I get home from work. Otherwise, the Metra tech support said that it might be a defective unit, since he checked the firmware version and it is up to date. If what I try later doesn't work, then I'll return it to Amazon, and get a new one. If the replacement still doesn't work, then I'll return that and get the PAC SWI-JACK. Either way, I am definitely not giving up on the steering wheel controls.
I have a couple of things to try with the steering wheel controls that occurred to me today. I will give them a shot when I get home from work. Otherwise, the Metra tech support said that it might be a defective unit, since he checked the firmware version and it is up to date. If what I try later doesn't work, then I'll return it to Amazon, and get a new one. If the replacement still doesn't work, then I'll return that and get the PAC SWI-JACK. Either way, I am definitely not giving up on the steering wheel controls.