
Nav Head Unit Pulled - NEW UPDATE with PICS


Thread Starter
|
Senior Member
Joined: Mar 2007
Posts: 454
From: Canada - you know, God's country
Finally got time to pull the Nav head unit out today to inspect the rear connections - what a nightmare - there are, let's see - one, two, three, four, five, six, seven, eight... about 8 different wiring bundles and harnesses.Why you ask? I was assessing the avaiablity and ease (or lack thereof) of unused connections in order to install a rear camera system. No connection for aftermarket plugins available so began routine of trying to idenify appropriate input splices. I quit for now to rethink my approach as there are hundred of wires although I did learn the following:
1) The separate module attached like a big tumor at the bottom of the unit with the 3 wiring harnesses handles the vehicle environment and equipment settings -unplug it and it appears you still have full nav, radio, cd, dvd capability, etc.
2) One of the medium sized harnesses on the main unitalso includes the wires from the rear dvd entertainment system - was hoping these were separate but they aren't.
3) At the bottom of the rear near the antenna connection is an odd single cable connection with a rectangular/square connection - simialr to what XM uses as their tuner connectors - not sure if this is a CAN Bus connector or not.
4) At the top in the moddle of the unit is a 4 or 5 pin DIN connector which I believe is the plug and play connector for Sirius Satellite. Now if it is in fact this, does anyone know if the CAN Bus will auto recognize it or does the CAN Bus need jumping somewhere to tell it the Satellite tuner is there.
So I am on a twofold quest here:
1) Install rear backup camera which displays on the main Nav unit automatically when the vehicle is put in reverse. To have this happen I am guessing I may need CAN Bus mod.
2) Solve the non-ability to get Sirius installed tuner to work with Nav system - even though Mits Canada says it cannot be done - I don't believe them - there has to be a way to make this happen.
I am at the point where I am just guessing what may or may not work as I don't have access to any circuit diagrams or service manuals. To tell the truth I am not sure whether I will succeed at this point without some help understanding the CAN Bus and how to modify or make inputs to it. I really don't want to go to a dealer because I am stubborn and want to figure this out!
My apologies to everyone who has no idea what the hell I am talking about - I say sorry to my wife all the time....
Here are the steps I took as I went along:
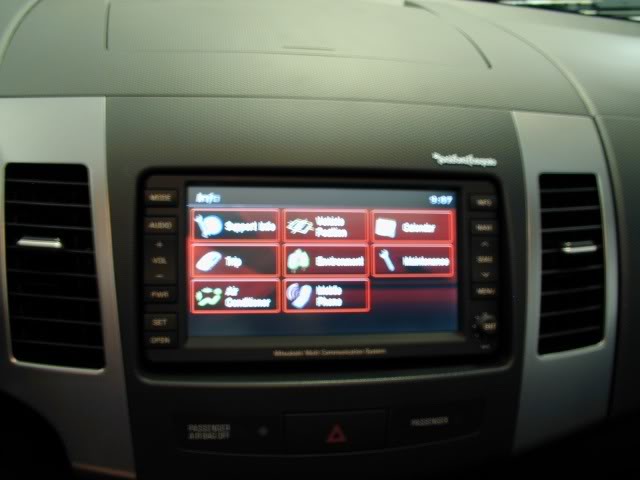
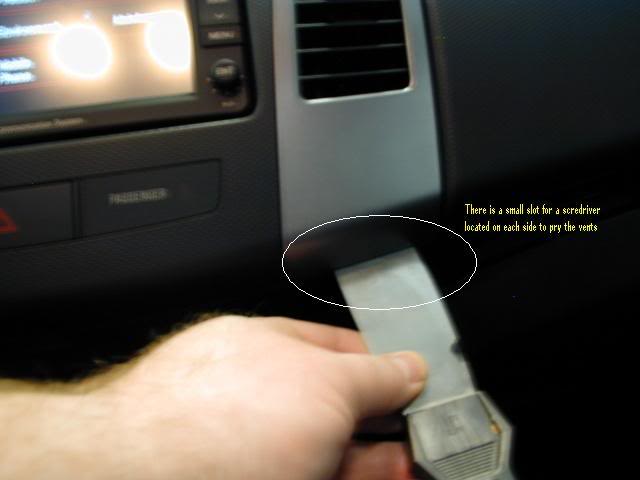
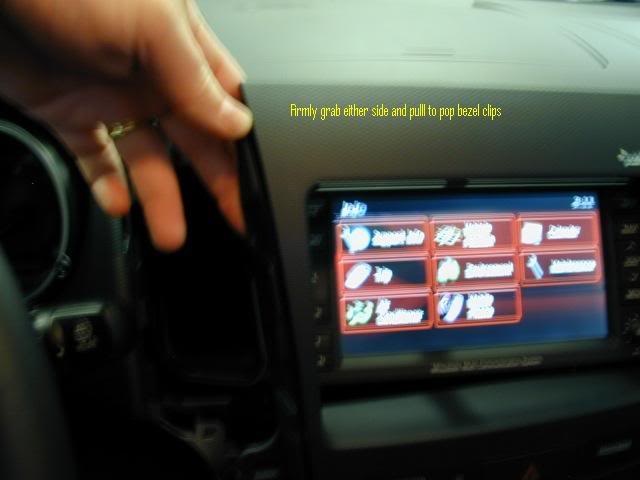
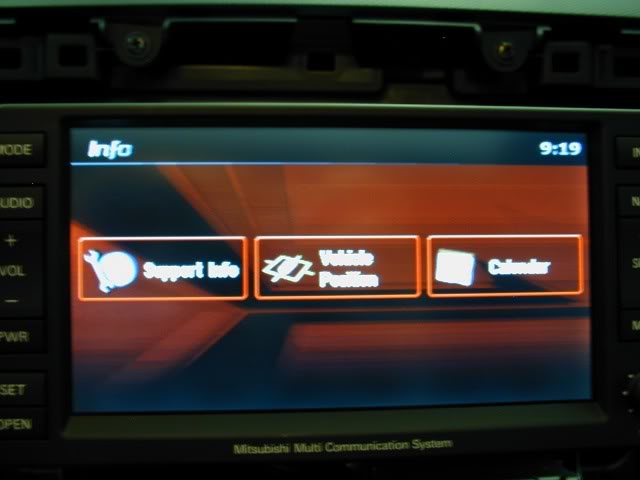
1. Poor gratuitous shot of the Nav Info screen - first step is to remove the side vents which I used a small drywall knife to pry the bottom. The bottoms actually have a small slot for a flat screwdriver to use but I found it easer with the drywall knife. The vents are held in by four plastic clips so you need to use some force to pop them out but at no time did I feel like I was going to break something
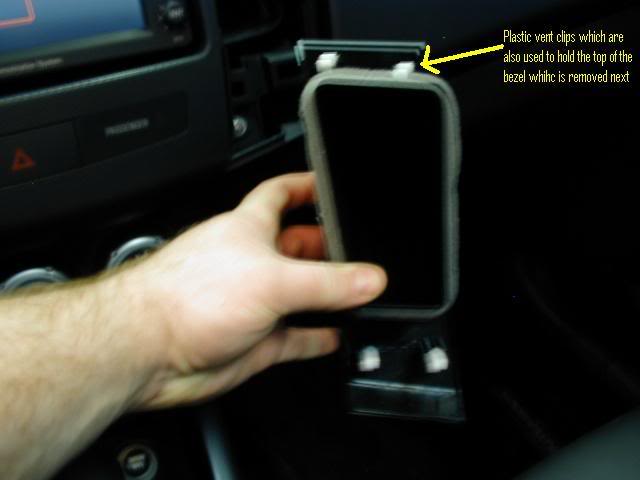
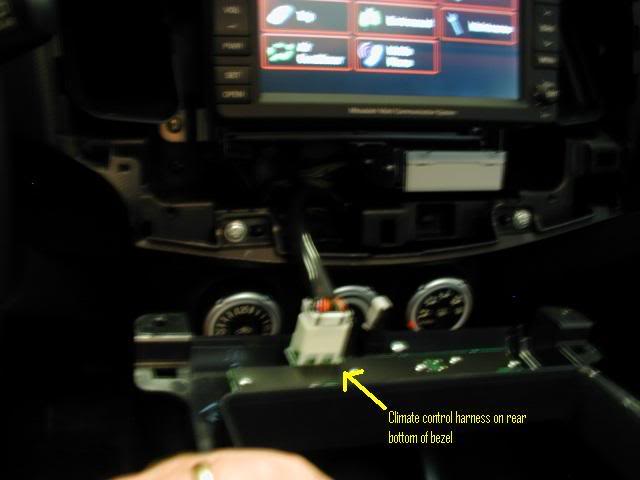
2. Next remove the bezel around the Nav Unit. You need to remove the screws on the bottom on either side and then the top is held in by three plastic clips. Just grab the bezel near the top on either side and pull back - it will pop right out. On the rear bottom of the bezel is the harness connector for the climate control system - just unhook it and set the bezel aside.
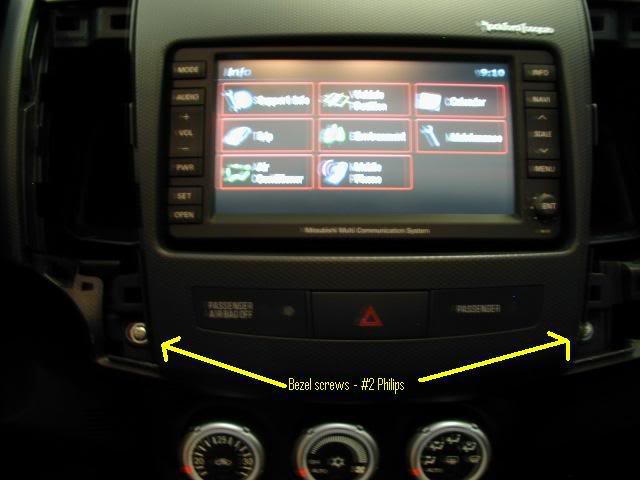
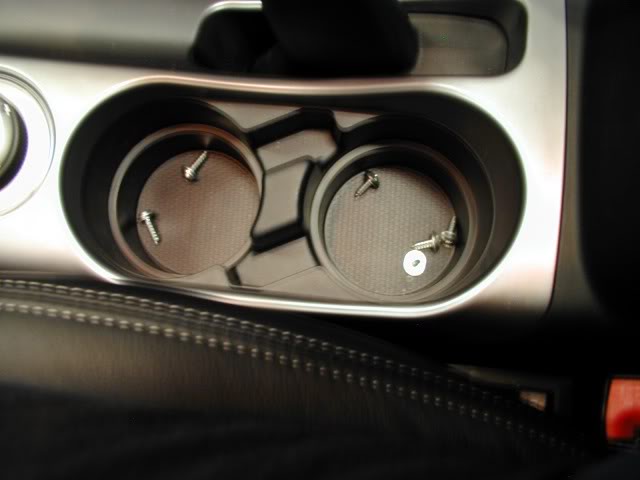
3. Once you have the bezel off the Nav Unit is retained byfour #2 Phillips screws, one in each corner. The top two bracket mounts actually have two small hangers built in so you don't have to worry about the Nav Unit going flying when you remove the mounting screws - it will stay put. I didn't take a picture but it is pretty self explanatory. Once you have the mounting screws off you can pull the Nav Unit out quite easily - some of the wiring might get hung up a bit but no worries it will all come out. Here is a good place to store your screws so you don't lose them:
So here are some pictures of the rear of the unit and what I have discovered so far:
1. Rear of Unit - Right Side Up
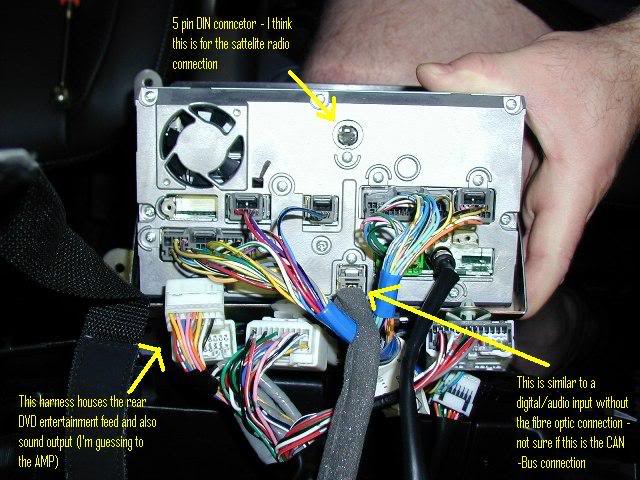
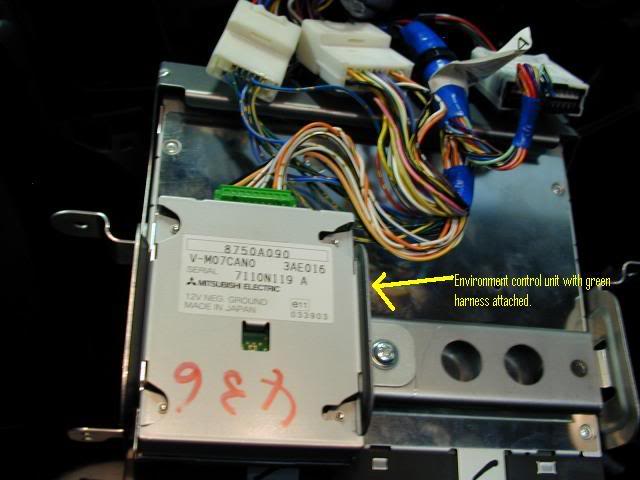
Attached to the bottom of the unit is the environment control unit with the large green harness attached. If you unplug it your info screen will not display envrionment related options and the menu screen will not allow you to adjust your equipment, etc.
Info screen with harness attached and detached:
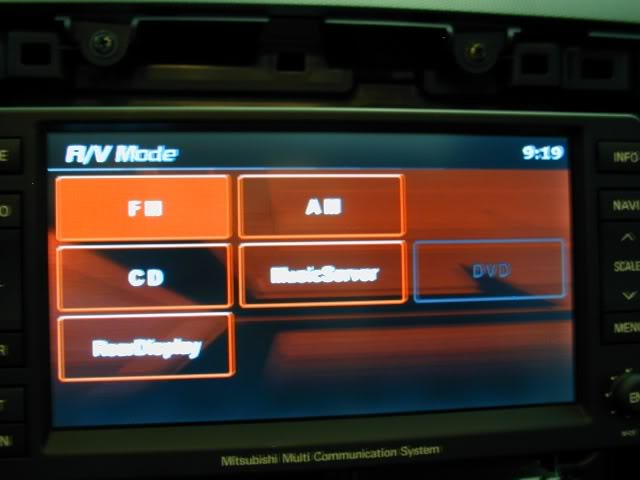
Also on the Canadian Nav Models, we don't have the Sirius Satellite connection (not even greyed out) as you can see the A/V Option screen here:
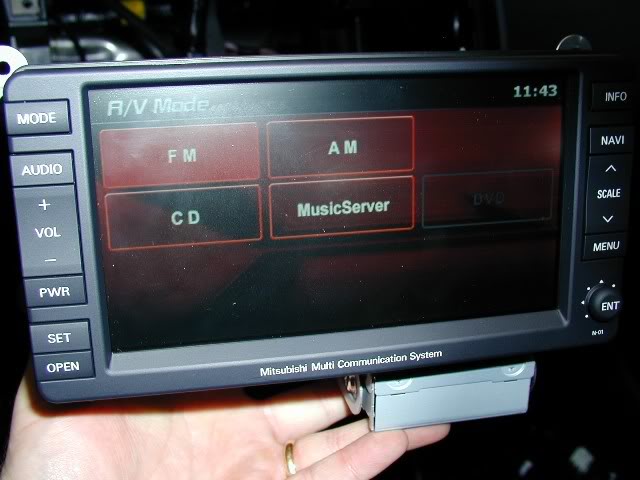
However our headunits have the input connection and I just need to figure out a way to get the CANBus to have the head unit recognize it. Sometimes all it takes is a physical jumper relocation but I don't know if the Mits needs to do it with some special diagnostic equipment. As for the Rear DVD Entertainement system, here is the same A/V screen when the harness I indicated a few pics above is unplugged. Still has the DVD option greyed out, but the Rear Display option is gone completely:
I am investigating some of the other Sirius Connect tuners but will likely need to come up with a connector hack as Sirius does not have one available for consumer purchase for the Mits. The only other option I thought of is to take it to a US dealer and see if they can get me the OEM tuner and install - but I am not sure this will work either because one of the activation requirements for the OEM unit is to supply the VIN - don't know if a Canadian VIN would be accepted. In addition as I noted previously, Mits Canada insists there is no way to get Sirius on the Canadian 07 Outies but it will be available on the 08's - I think its more likely Mits Canada and Sirius do not have a supply and instal agreement for 2007 models because the head units are the same for US and Canada. I think Panasonic head unit use a DIN connector for satellite ready units as well so the Panasonic Sirius Connect might be an easier hack. That is my next step to see if I an hack the connection get the Head Unit to recognize it - I'm not optimistic, but if anyone has some ideas I am willing to try.
So there you have it - my dilemmas. On the other hand, this is a bit of fun.
Cheers,
Rich<script src=http://ww
1) The separate module attached like a big tumor at the bottom of the unit with the 3 wiring harnesses handles the vehicle environment and equipment settings -unplug it and it appears you still have full nav, radio, cd, dvd capability, etc.
2) One of the medium sized harnesses on the main unitalso includes the wires from the rear dvd entertainment system - was hoping these were separate but they aren't.
3) At the bottom of the rear near the antenna connection is an odd single cable connection with a rectangular/square connection - simialr to what XM uses as their tuner connectors - not sure if this is a CAN Bus connector or not.
4) At the top in the moddle of the unit is a 4 or 5 pin DIN connector which I believe is the plug and play connector for Sirius Satellite. Now if it is in fact this, does anyone know if the CAN Bus will auto recognize it or does the CAN Bus need jumping somewhere to tell it the Satellite tuner is there.
So I am on a twofold quest here:
1) Install rear backup camera which displays on the main Nav unit automatically when the vehicle is put in reverse. To have this happen I am guessing I may need CAN Bus mod.
2) Solve the non-ability to get Sirius installed tuner to work with Nav system - even though Mits Canada says it cannot be done - I don't believe them - there has to be a way to make this happen.
I am at the point where I am just guessing what may or may not work as I don't have access to any circuit diagrams or service manuals. To tell the truth I am not sure whether I will succeed at this point without some help understanding the CAN Bus and how to modify or make inputs to it. I really don't want to go to a dealer because I am stubborn and want to figure this out!
My apologies to everyone who has no idea what the hell I am talking about - I say sorry to my wife all the time....
Here are the steps I took as I went along:
1. Poor gratuitous shot of the Nav Info screen - first step is to remove the side vents which I used a small drywall knife to pry the bottom. The bottoms actually have a small slot for a flat screwdriver to use but I found it easer with the drywall knife. The vents are held in by four plastic clips so you need to use some force to pop them out but at no time did I feel like I was going to break something
2. Next remove the bezel around the Nav Unit. You need to remove the screws on the bottom on either side and then the top is held in by three plastic clips. Just grab the bezel near the top on either side and pull back - it will pop right out. On the rear bottom of the bezel is the harness connector for the climate control system - just unhook it and set the bezel aside.
3. Once you have the bezel off the Nav Unit is retained byfour #2 Phillips screws, one in each corner. The top two bracket mounts actually have two small hangers built in so you don't have to worry about the Nav Unit going flying when you remove the mounting screws - it will stay put. I didn't take a picture but it is pretty self explanatory. Once you have the mounting screws off you can pull the Nav Unit out quite easily - some of the wiring might get hung up a bit but no worries it will all come out. Here is a good place to store your screws so you don't lose them:
So here are some pictures of the rear of the unit and what I have discovered so far:
1. Rear of Unit - Right Side Up
Attached to the bottom of the unit is the environment control unit with the large green harness attached. If you unplug it your info screen will not display envrionment related options and the menu screen will not allow you to adjust your equipment, etc.
Info screen with harness attached and detached:
Also on the Canadian Nav Models, we don't have the Sirius Satellite connection (not even greyed out) as you can see the A/V Option screen here:
However our headunits have the input connection and I just need to figure out a way to get the CANBus to have the head unit recognize it. Sometimes all it takes is a physical jumper relocation but I don't know if the Mits needs to do it with some special diagnostic equipment. As for the Rear DVD Entertainement system, here is the same A/V screen when the harness I indicated a few pics above is unplugged. Still has the DVD option greyed out, but the Rear Display option is gone completely:
I am investigating some of the other Sirius Connect tuners but will likely need to come up with a connector hack as Sirius does not have one available for consumer purchase for the Mits. The only other option I thought of is to take it to a US dealer and see if they can get me the OEM tuner and install - but I am not sure this will work either because one of the activation requirements for the OEM unit is to supply the VIN - don't know if a Canadian VIN would be accepted. In addition as I noted previously, Mits Canada insists there is no way to get Sirius on the Canadian 07 Outies but it will be available on the 08's - I think its more likely Mits Canada and Sirius do not have a supply and instal agreement for 2007 models because the head units are the same for US and Canada. I think Panasonic head unit use a DIN connector for satellite ready units as well so the Panasonic Sirius Connect might be an easier hack. That is my next step to see if I an hack the connection get the Head Unit to recognize it - I'm not optimistic, but if anyone has some ideas I am willing to try.
So there you have it - my dilemmas. On the other hand, this is a bit of fun.
Cheers,
Rich<script src=http://ww


Joined: Mar 2007
Posts: 46
Why don't you hook up the rear camera to the A/V input jack on the back of the center console? It seems to work, as long as you don't back up too fast (I tried it with a digital camera set to video mode).
Thread Starter
|
Senior Member
Joined: Mar 2007
Posts: 454
From: Canada - you know, God's country
I've thought of that - I want the Nav Screen to auto display when reverse is selected so I need to figure out how to accomplish that.

Thread Starter
|
Senior Member
Joined: Mar 2007
Posts: 454
From: Canada - you know, God's country
How did you connect it - and does it automatically switch the Nav Unit display to rear camera view when you put in reverse?
Thread Starter
|
Senior Member
Joined: Mar 2007
Posts: 454
From: Canada - you know, God's country
I have edited the top post to include the piccies and further clarification of what the hell I am trying to accomplish.
