Sub-Box Walkthrough


Thread Starter
|
Senior Member
Joined: Jul 2005
Posts: 2,891
From:
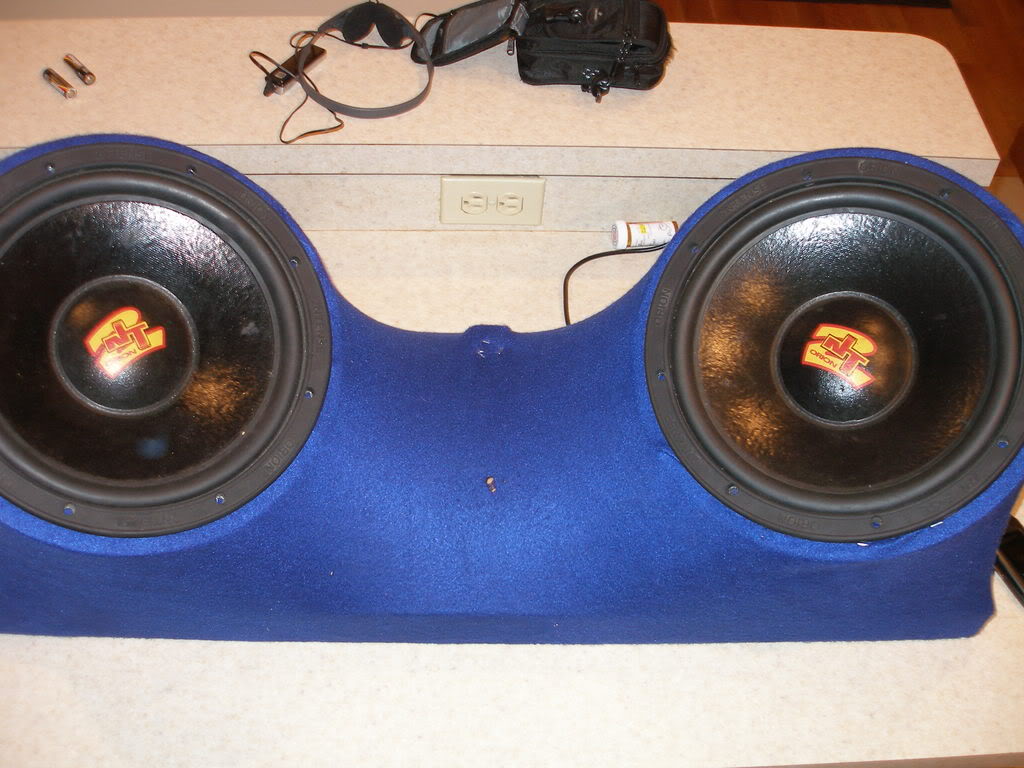
Alright, here's the walk-through for this sub-box that you asked me for. It fits nicely between your strut towers in the rear with PLENTY of room left in the trunk. THIS IS JUST UP TO THE POINT OF FIBERGLASS!! I'll get it fiberglassed tomorrow and will add to the walk-through
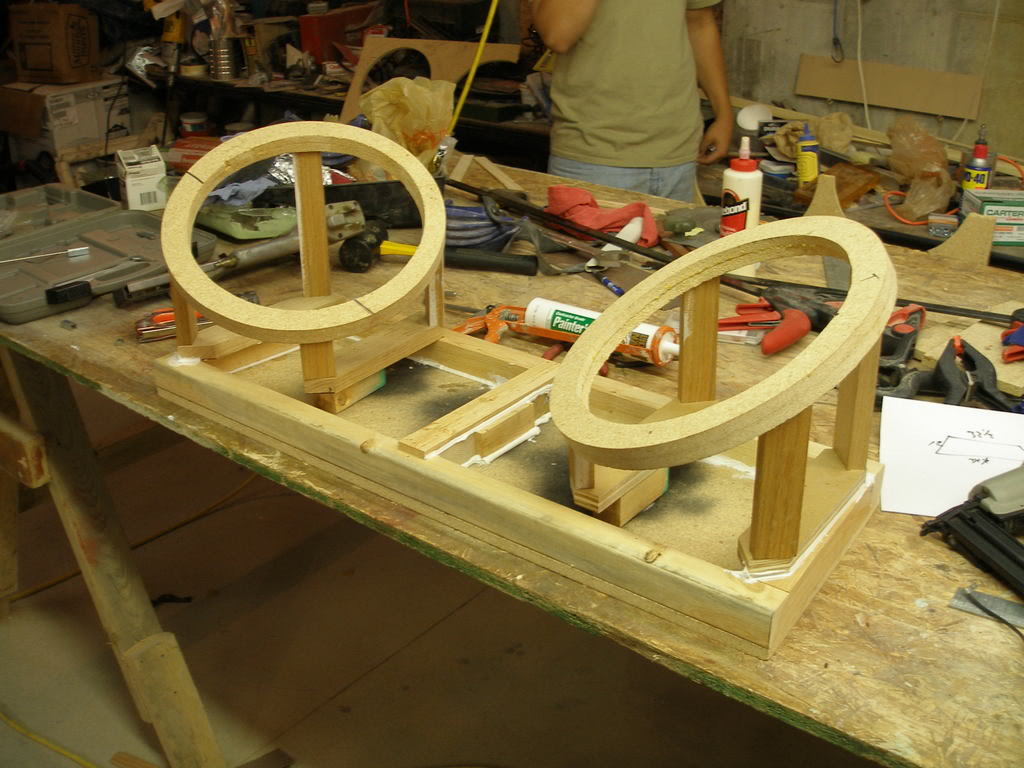
Here's a quick drawing of the platform frame:
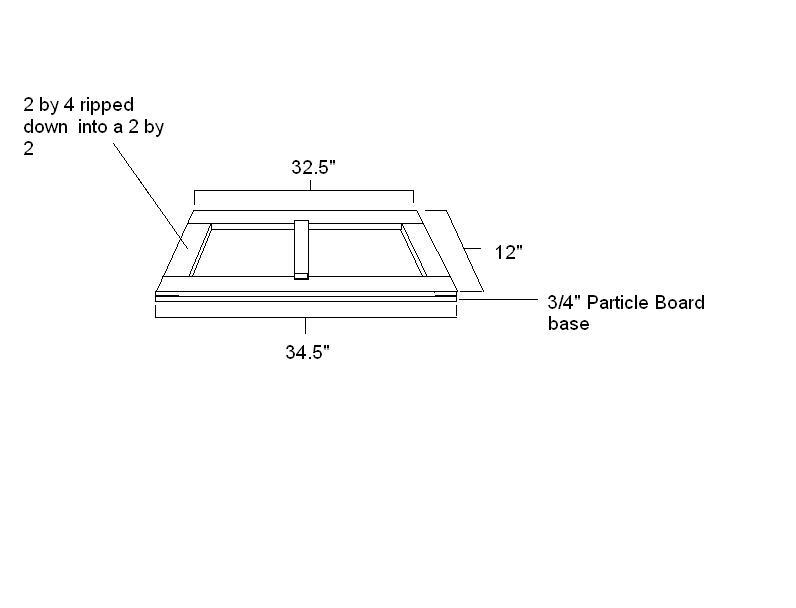
It was a piece of 3/4" particle board as the base, with ripped down 2by4's as the framing itself. When I say the 2by4's were ripped, that means that they were cut long ways, not straight across. This makes each piece narrower, not shorter. I did this just to be able to get that much more air into the box. You'll notice a small piece in the middle, this is optional. I did this so i can staple the fleece there later on to get a more defined shape to the enclosure. Also, under that piece i took the remainder of the ripped down 2by4 and glued and nailed a strip there and caulked it to help each side of the box. (Sidenote: You'll notice that there is caulk all around the base of the box frame, this is a must do and will prevent you from having any leaks in your enclosure)
Measurements:
Base- 34.5" longside, 32.5" shortside, 12" wide
Framing- Bottom board: 34.5" longside and cut the angle on both sides to match the particle board angle. Top board: 32.5" shortside (do the same with the angle cutting here as well.) Side boards: 9.5" long (cut angle to match both bottom and top board).
Middle "Shaping" Board- This can be any length that you want, I chose not to take it all the way to the edge of the frame, that way you would not see it "poking" through as the felt covered it.
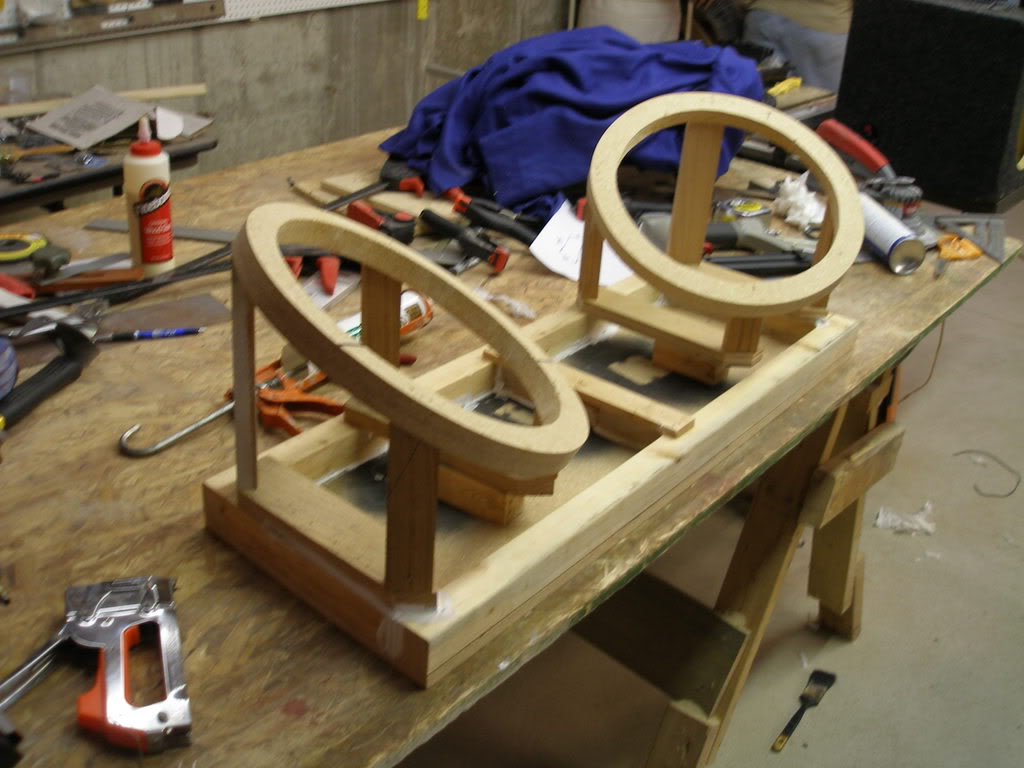
Now for the Sub "Rings" and pillars:
This is where you need to get creative, and need to set your goal as to just how you want your subwoofers to look in you trunk. Since I used 3/4" particle board, I had to "double up" on the rings because 3/4" is not quite thick or strong enough for my 12" subs. This means I cut a total of 4 rings, and glued and nailed them together (So each ring is essentially 2 rings put into 1) The way these are cut all depends on what subwoofers you are using and the width of their mounting ring. I made my rings about 2 inches wide, This gave me plenty of room to mount my speakers and still have room left over to smoothly feather the fiberglass sanding. Also, for the pillars, it all depends on how tall you want your speakers to sit, and at what angle. Each pillar should have the same angle cut on top, with a flat cut on bottom for flush mounting. I used 4 pillars: 1 rear (tallest), 2 middle (both same height, shorter than the rear pillar), and 1 front (which was the shortest of the 4, obviously). This is where you get creative and decide on how tall and what angle your speakers will sit.
Once the pillars were cut out and mounted to the rings (keep in mind, every time you attach any type of board to another, make sure to use wood glue AND nails. I used 1.25" finishing nails) you need to make two little stands for them to sit on. This not only gives your speakers a little more height plus a little more air in the box, but will also stabilize it and strengthen the pillars.
Let's put it all together!:
You'll notice that in the middle of each side of the box there is a tiny piece of ripped down 2by4, these were mounted AFTER I lined up my substands to where I wanted them. These provides your interior mounting point for your substands. Once you have your stands where you want them then glue them down, clamp them, and the nail them in place.
Now here comes the fun part:
This is where you are going to need some fleece (i picked up about 3 yards up at wal-mart for very cheap), and a looooot of staples (not the office kind :-P). You'll also need at least one other person to help you. I had one friend help, and even wish I had another there.Spread the fleece over theentire of the frame, and makesure that youhave plenty on allsides tocover it. Start by picking a spot on the new frame you just built, and attach the fleece there with a couple of staples. From there continue to STRETCH the fleece over the frame and unload your staple gun into it to keep it from moving. I emphasize the word STRETCH because the fleece has to be very taught and tight as its pulled over the frame.
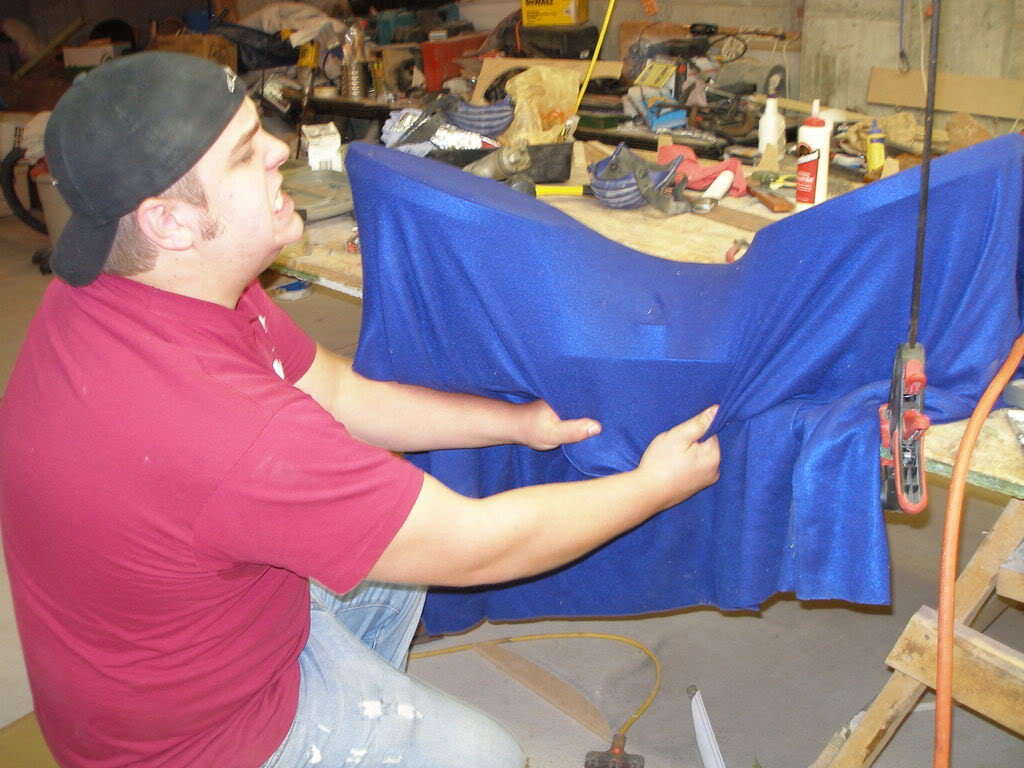
You may get to a spot where there is too muchmaterial and you need to cut it. NO WORRIES! Just cut it and overlap it. This may seem like a big deal, but it is not, this small overlap will get covered by fiberglass resin and bondo later on, so you won't even know that it was there! Continue to stretch the fleece over until everything is stapled in place, and you have achieved the shape you were lookin for. Once you are done stapling, go over all of the staples and tap them a bit, just to make sure that each is securely fastened to the box. Go ahead and trim off the excess fleece off the bottom of the box.
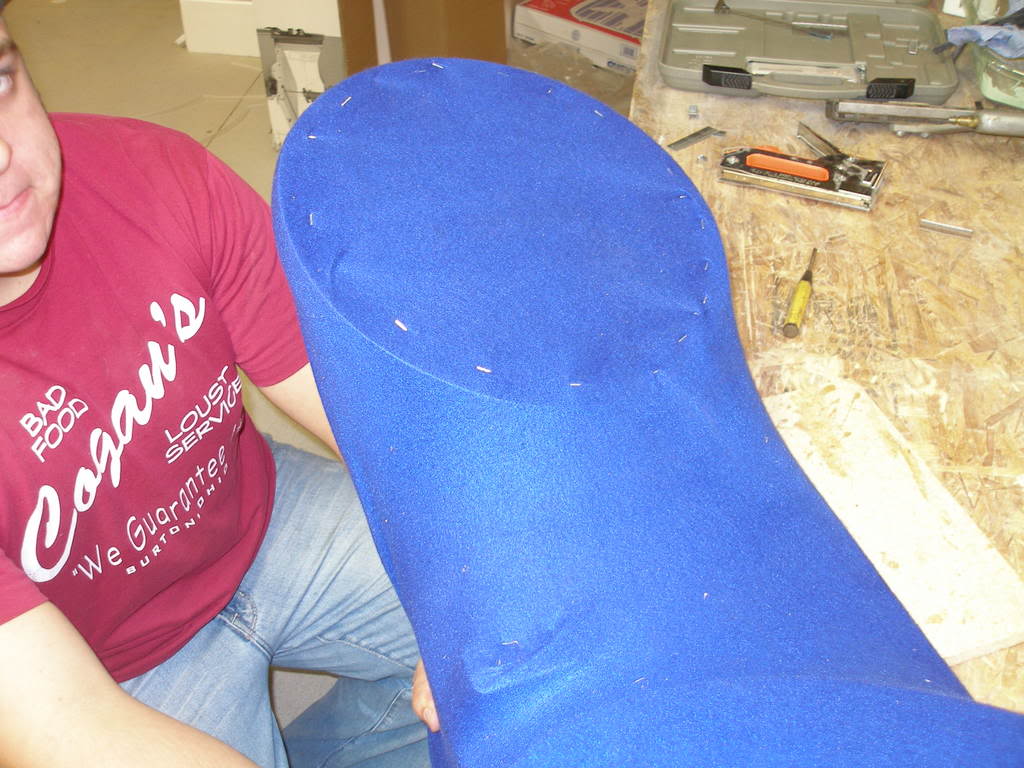
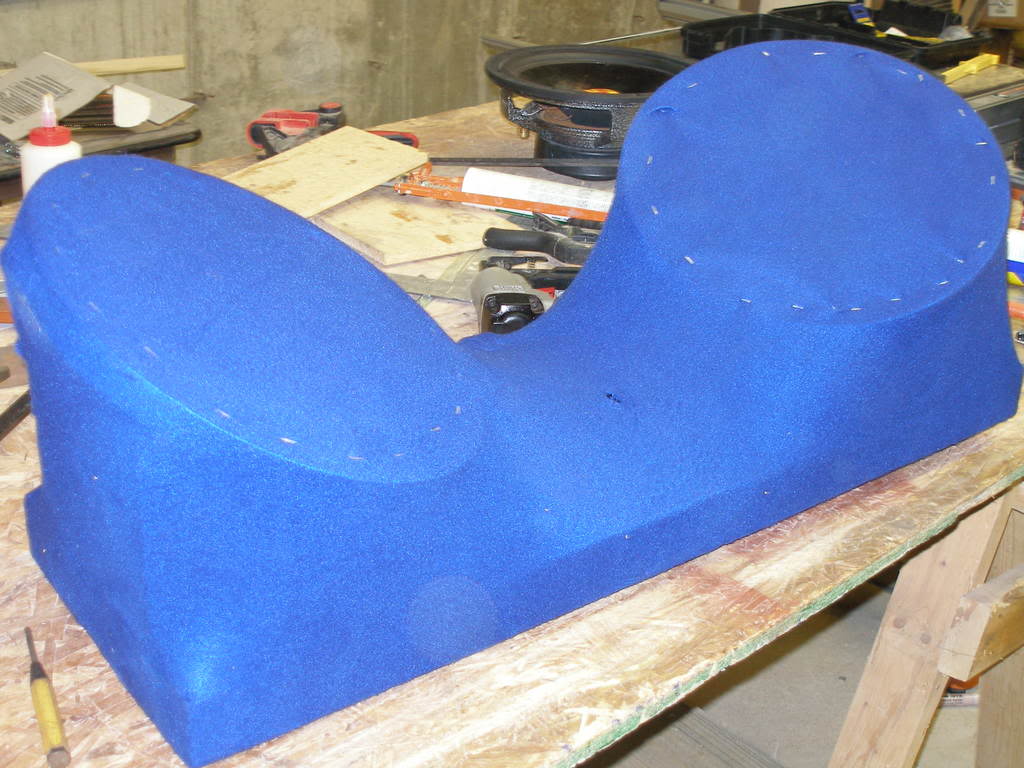
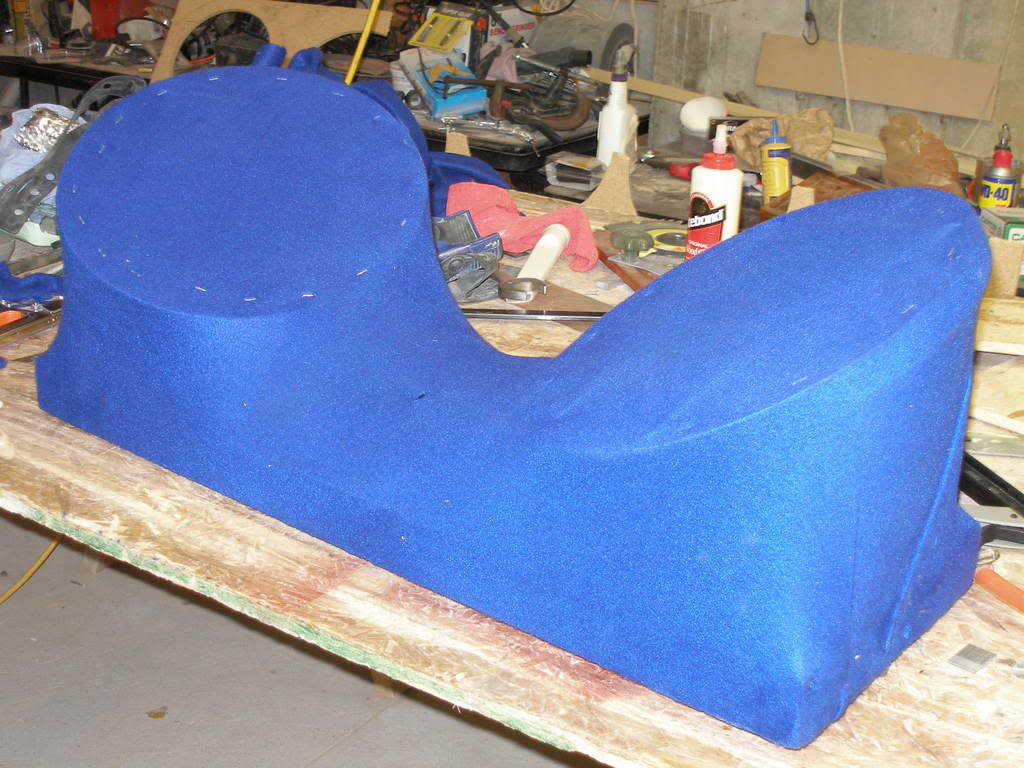
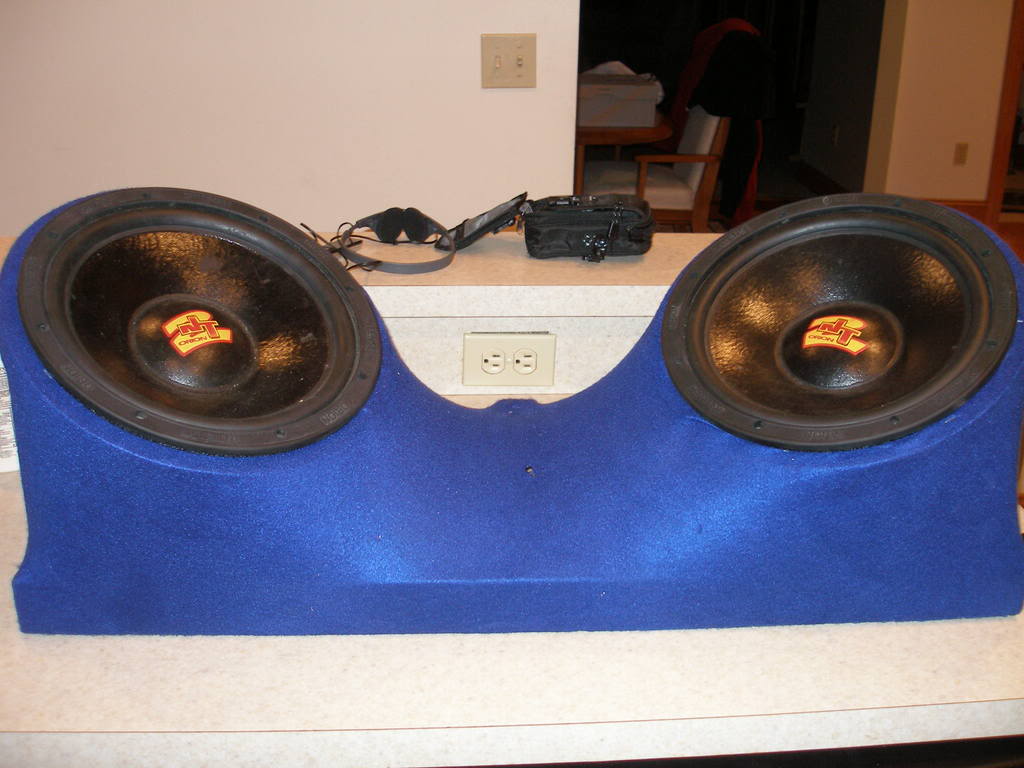
There you have it, a newly built sub-box enclosure that is ready for fiberglass and finishing!
Here's a quick drawing of the platform frame:
It was a piece of 3/4" particle board as the base, with ripped down 2by4's as the framing itself. When I say the 2by4's were ripped, that means that they were cut long ways, not straight across. This makes each piece narrower, not shorter. I did this just to be able to get that much more air into the box. You'll notice a small piece in the middle, this is optional. I did this so i can staple the fleece there later on to get a more defined shape to the enclosure. Also, under that piece i took the remainder of the ripped down 2by4 and glued and nailed a strip there and caulked it to help each side of the box. (Sidenote: You'll notice that there is caulk all around the base of the box frame, this is a must do and will prevent you from having any leaks in your enclosure)
Measurements:
Base- 34.5" longside, 32.5" shortside, 12" wide
Framing- Bottom board: 34.5" longside and cut the angle on both sides to match the particle board angle. Top board: 32.5" shortside (do the same with the angle cutting here as well.) Side boards: 9.5" long (cut angle to match both bottom and top board).
Middle "Shaping" Board- This can be any length that you want, I chose not to take it all the way to the edge of the frame, that way you would not see it "poking" through as the felt covered it.
Now for the Sub "Rings" and pillars:
This is where you need to get creative, and need to set your goal as to just how you want your subwoofers to look in you trunk. Since I used 3/4" particle board, I had to "double up" on the rings because 3/4" is not quite thick or strong enough for my 12" subs. This means I cut a total of 4 rings, and glued and nailed them together (So each ring is essentially 2 rings put into 1) The way these are cut all depends on what subwoofers you are using and the width of their mounting ring. I made my rings about 2 inches wide, This gave me plenty of room to mount my speakers and still have room left over to smoothly feather the fiberglass sanding. Also, for the pillars, it all depends on how tall you want your speakers to sit, and at what angle. Each pillar should have the same angle cut on top, with a flat cut on bottom for flush mounting. I used 4 pillars: 1 rear (tallest), 2 middle (both same height, shorter than the rear pillar), and 1 front (which was the shortest of the 4, obviously). This is where you get creative and decide on how tall and what angle your speakers will sit.
Once the pillars were cut out and mounted to the rings (keep in mind, every time you attach any type of board to another, make sure to use wood glue AND nails. I used 1.25" finishing nails) you need to make two little stands for them to sit on. This not only gives your speakers a little more height plus a little more air in the box, but will also stabilize it and strengthen the pillars.
Let's put it all together!:
You'll notice that in the middle of each side of the box there is a tiny piece of ripped down 2by4, these were mounted AFTER I lined up my substands to where I wanted them. These provides your interior mounting point for your substands. Once you have your stands where you want them then glue them down, clamp them, and the nail them in place.
Now here comes the fun part:
This is where you are going to need some fleece (i picked up about 3 yards up at wal-mart for very cheap), and a looooot of staples (not the office kind :-P). You'll also need at least one other person to help you. I had one friend help, and even wish I had another there.Spread the fleece over theentire of the frame, and makesure that youhave plenty on allsides tocover it. Start by picking a spot on the new frame you just built, and attach the fleece there with a couple of staples. From there continue to STRETCH the fleece over the frame and unload your staple gun into it to keep it from moving. I emphasize the word STRETCH because the fleece has to be very taught and tight as its pulled over the frame.
You may get to a spot where there is too muchmaterial and you need to cut it. NO WORRIES! Just cut it and overlap it. This may seem like a big deal, but it is not, this small overlap will get covered by fiberglass resin and bondo later on, so you won't even know that it was there! Continue to stretch the fleece over until everything is stapled in place, and you have achieved the shape you were lookin for. Once you are done stapling, go over all of the staples and tap them a bit, just to make sure that each is securely fastened to the box. Go ahead and trim off the excess fleece off the bottom of the box.
There you have it, a newly built sub-box enclosure that is ready for fiberglass and finishing!