
Information about the maintenance of the Outlander CVT (2014-2016)


Thread Starter
|
Junior Member
Joined: Sep 2016
Posts: 10
From: Quebec city
I own a 2014 Outlander ES (2WD, 2.4L + CVT), it's now 3 years old and I have ~ 90,000 km on the counter.
I experienced two times this summer the "flashing D" situation, basically my CVT was overheating and that got me to research what kind of maintenance is required on those units.
The first time it overheated I was towing an empty trailer (~ 500 lbs, the car is rated for 1250 lbs) and going uphill in mountainous terrain. The second time was during a spirited drive in mountainous terrain, just my wife and I in the car, no cargo.
When it happens the power drops significantly, basically the car goes into limp mode and you need to park the car, pop open the hood and let the car idle so the CVT fluid has a chance to cool down a bit (it is warmep up / cooled down by the engine coolant, see below).
In the regular Mitsubishi maintenance schedule, there is nothing with regard to the automatic / CVT transmission (only inspection of the fluid for manual transmission every 32,000 km)
In the severe Mitsubishi maintenance schedule, the automatic transmission fluid is changed every 48,000 km.
My dealership says they change the CVT fluid every 96,000 km, and once your fluid overheats, it loses its properties and should be changed.
Some basic info :
The 2014 and 2015 Outlander are equipped with a JATCO JF011E CVT transmission, part # F1CJA (2WD) or W1CJA (4WD).
The 2016 Outlander are now equipped with the latest generation of CVT transmission from JATCO (CVT8), part # is F1CJC (2WD) and W1CJC (4WD).
The basic procedure to replace the fluid is a simple drain and fill (through the drain plug and the filler tube) two times (per the service manual), or more if the CVT fluid still comes out dirty (5.5 L per drain over a total of 7.1 L), the drain bolt torque is 34 N.m.
The final fluid level adjustment should be performed with the fluid temperature between 70�C and 80�C (use CVTz50 for that, see below), not higher than the top of the HOT mark at 70 �C and not below the bottom of the HOT mark at 80 �C (refer to the service manual).
If you want to make a more thorough job, you can drop the CVT oil pan, there are two magnets in there and it would be a good idea to clean up the metal shavings (that's what I had done this time). Furthermore there is a metallic filter in the pan (with a metallic screen) that can be cleaned or replaced depending on the condition. (part # 2824A007, google it to see what it looks like).
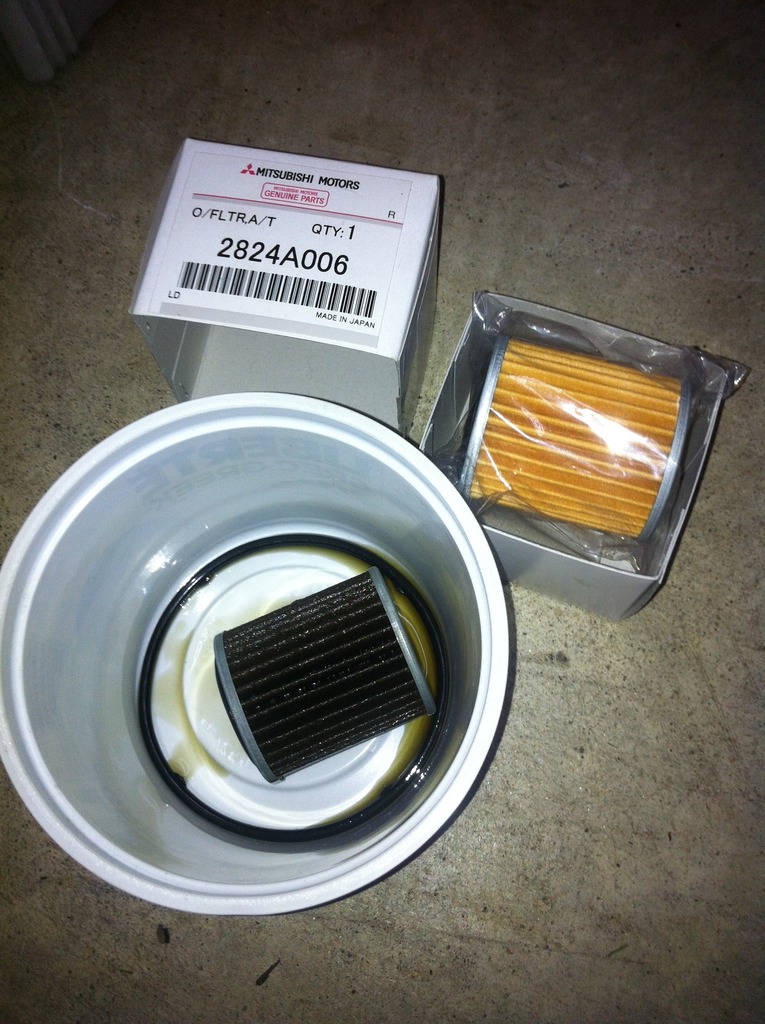
And finally there is a paper filter in the warmer/cooler assembly where the engine coolant flows that can be replaced (part # 2824A006 and o-ring # 2920A096). The service manual calls for a replacement from "down below", by removing the two plastic covers and work you way up the CVT. It might be quicker but I was not convinced it was the best way to perform the job, with the oil falling on you as soon as you remove the last bolt holding the unit. So here is the procedure to service the CVT paper filter from the top of the engine :
Start to removing the air intake assembly :
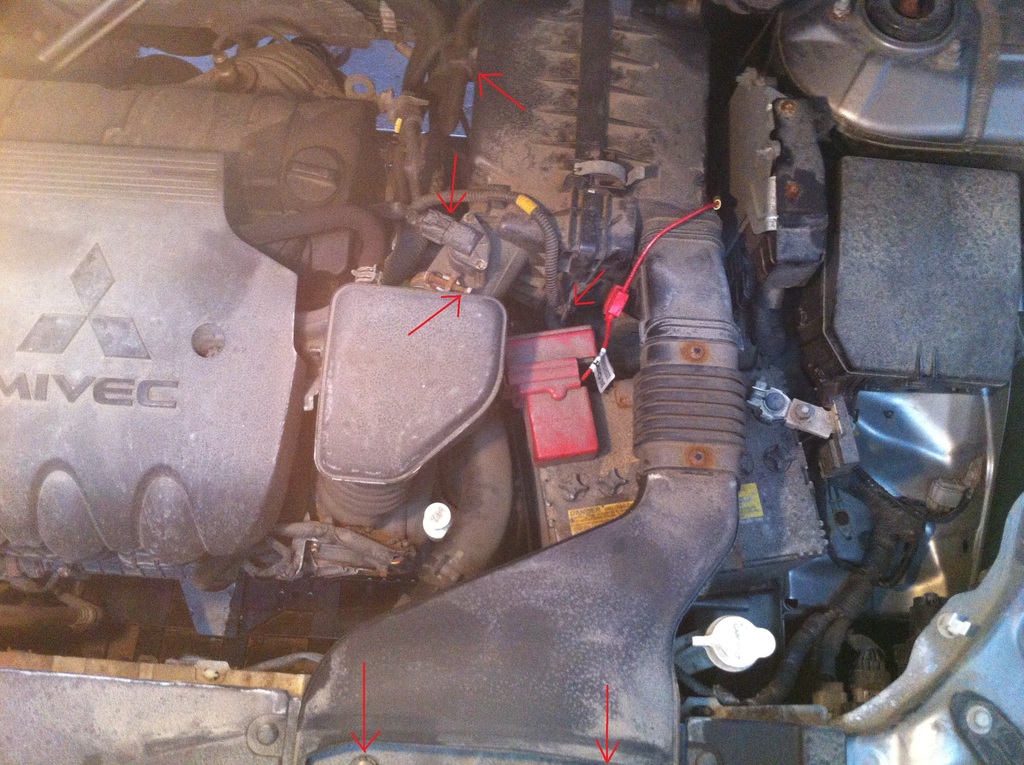
- There are two plastic clips to remove
- You need to disconnect the MAF
- You need to pop out the plastic clip that hold the MAF electrical cable to the air box
- You need to unscrew the collar connecting the air box to the engine intake
- You need to pop out from the air box the pipe at the top of the picture
- You can unscrew the only screw holding the air box
- You can remove what is on the negative terminal of the battery as we'll need to remove it next
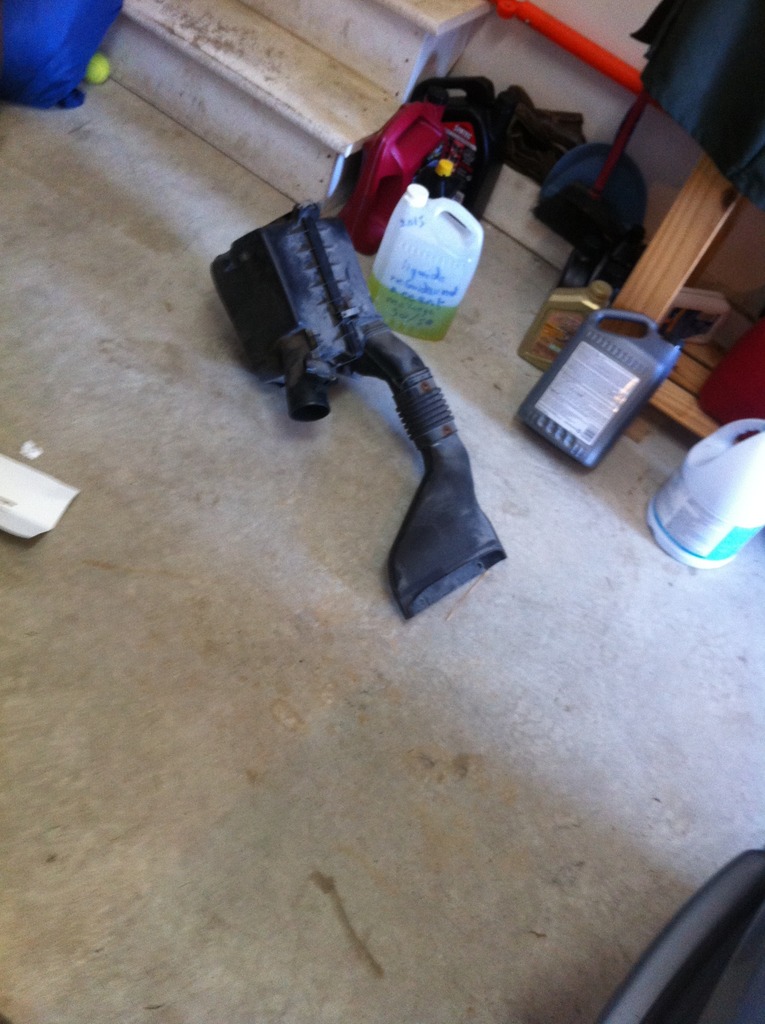
- Remove the complete air intake assembly
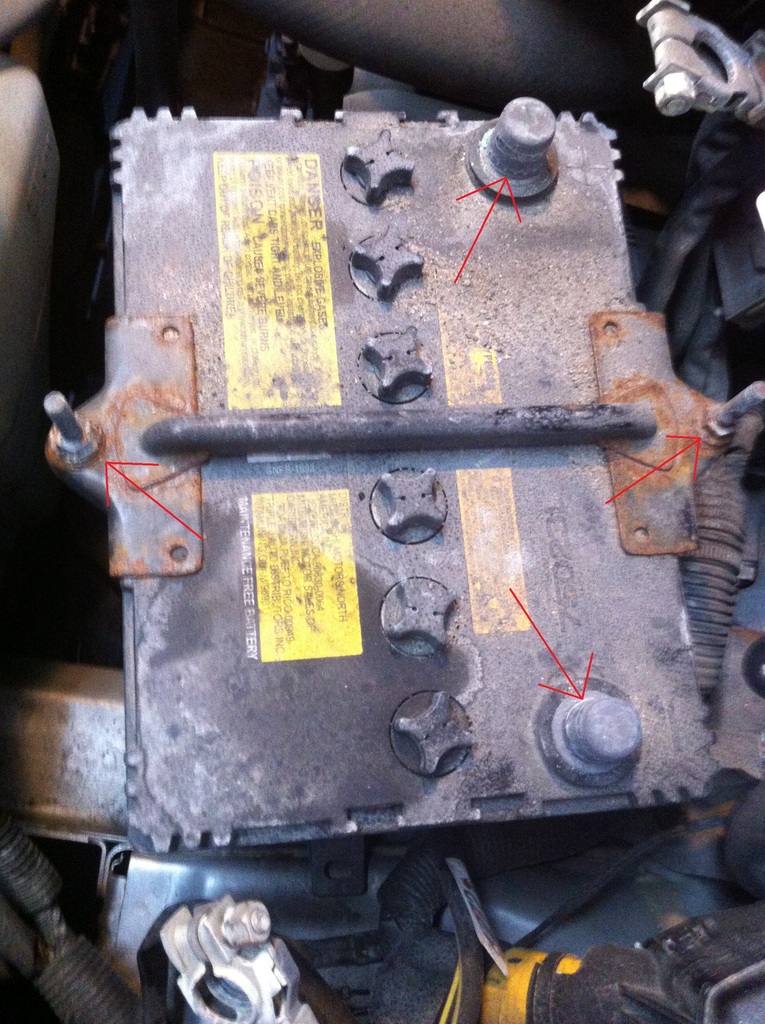
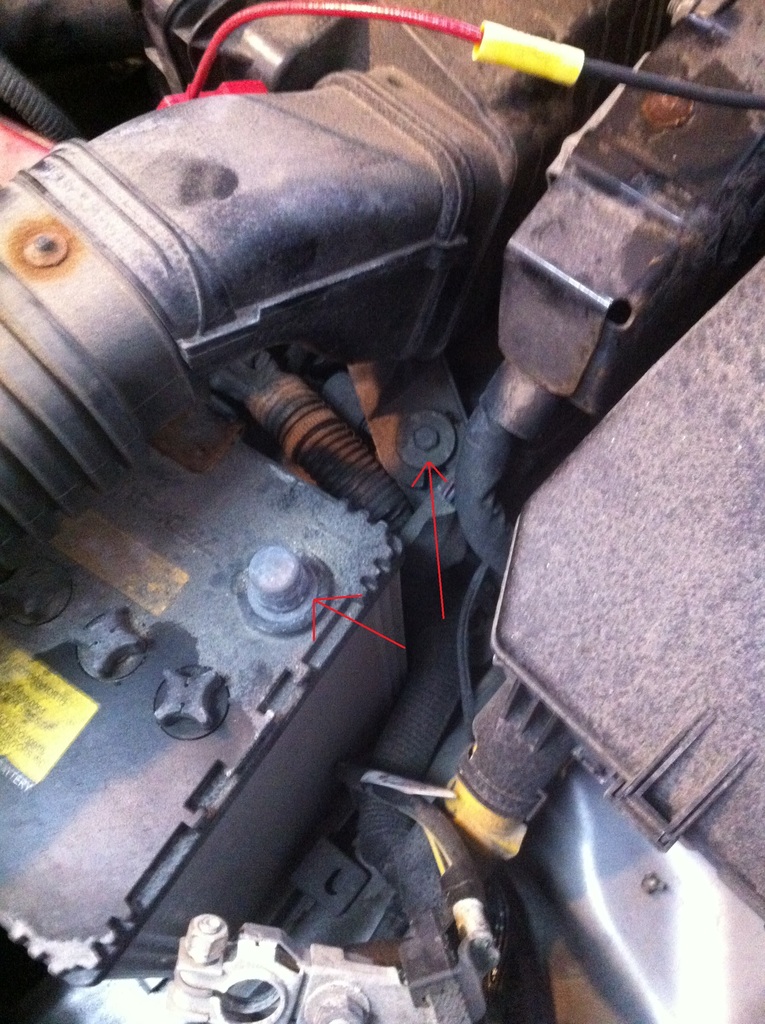
- Remove what is on the positive terminal of the battery
- Remove the bar holding the battery
- Remove the battery (you can take the opportunity to clean it up and top it off with demineralized water)
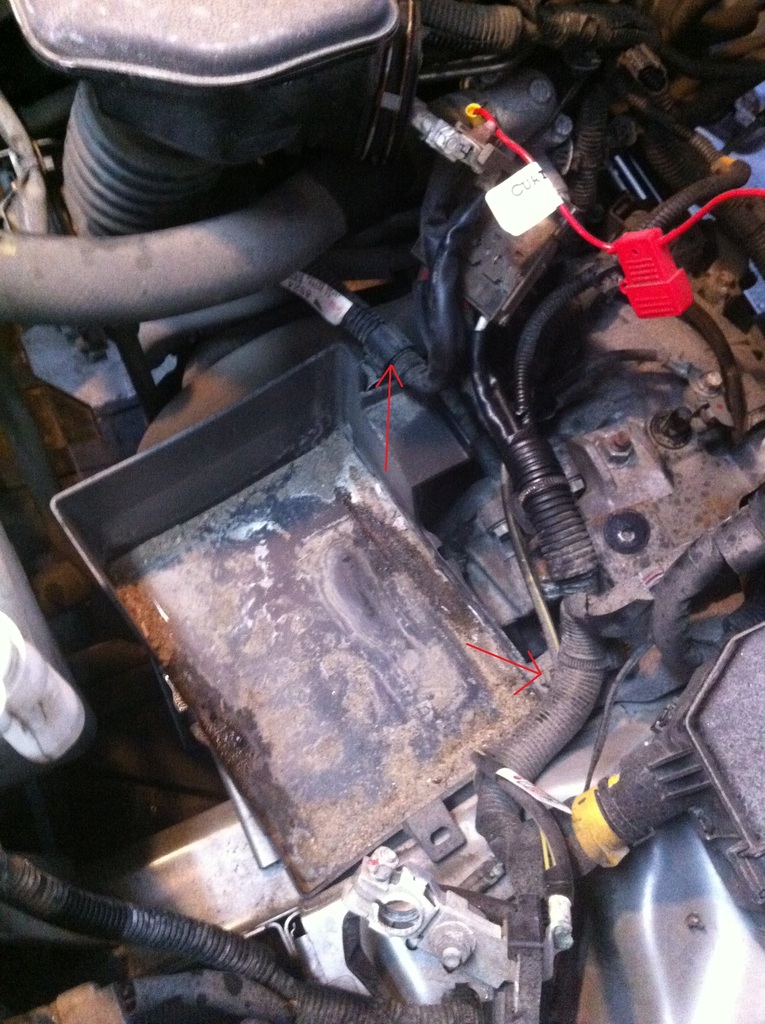
- The negative cable assembly is attached to the battery tray, pop out the plastic clip holding it

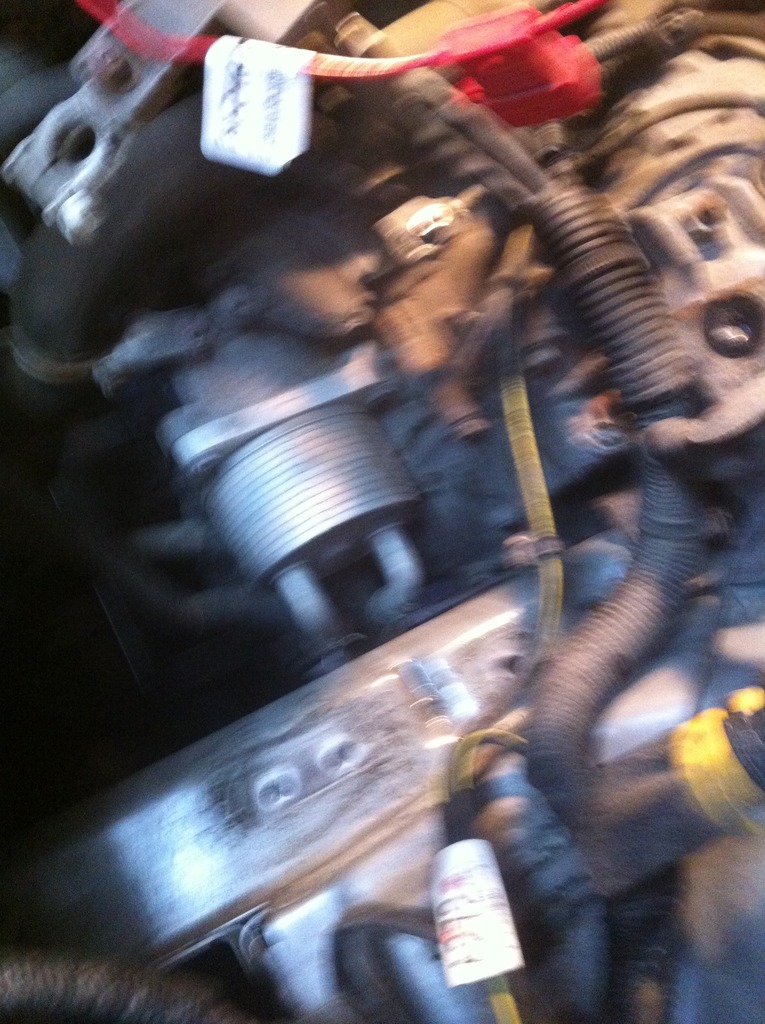
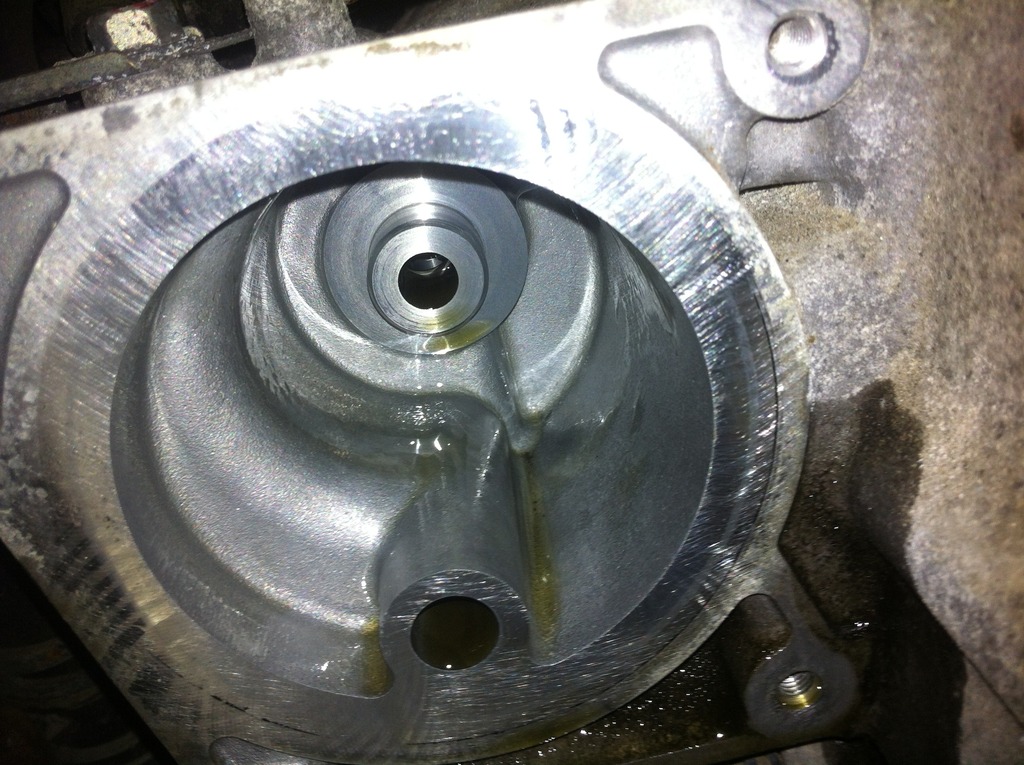
- Once the battery tray is removed you can see the CVT warmer/cooler unit between the brackets holding the battery on the frame
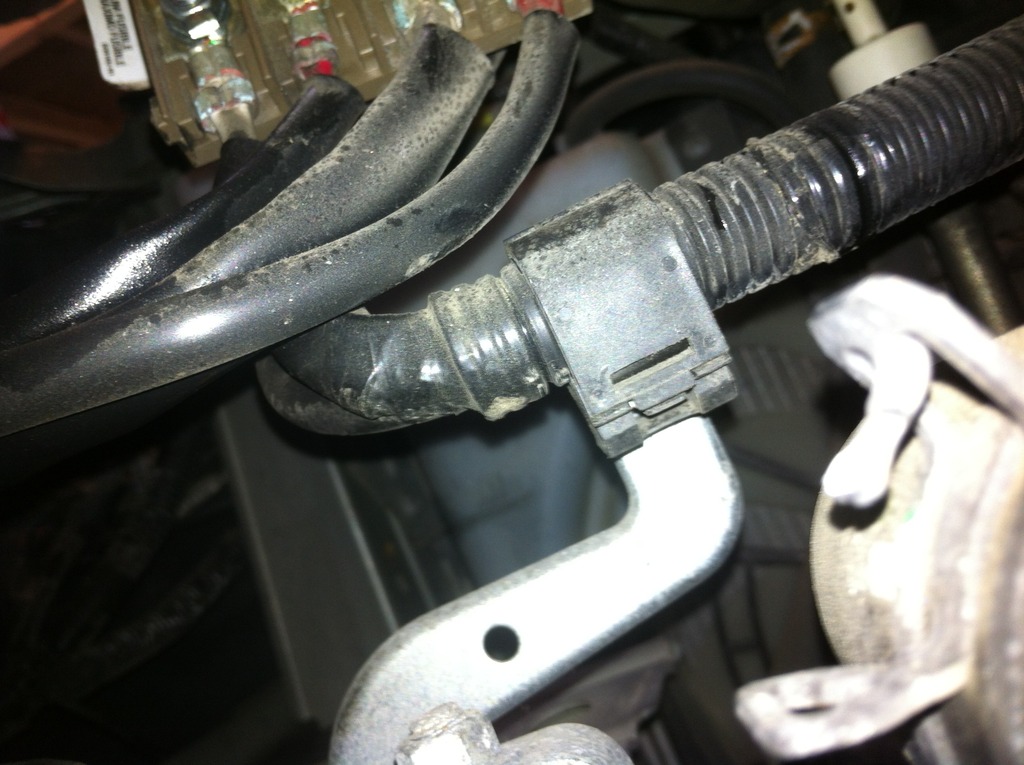
- You need to unclip this cable assembly which lies on one of the battery bracket
- Remove the first battery bracket
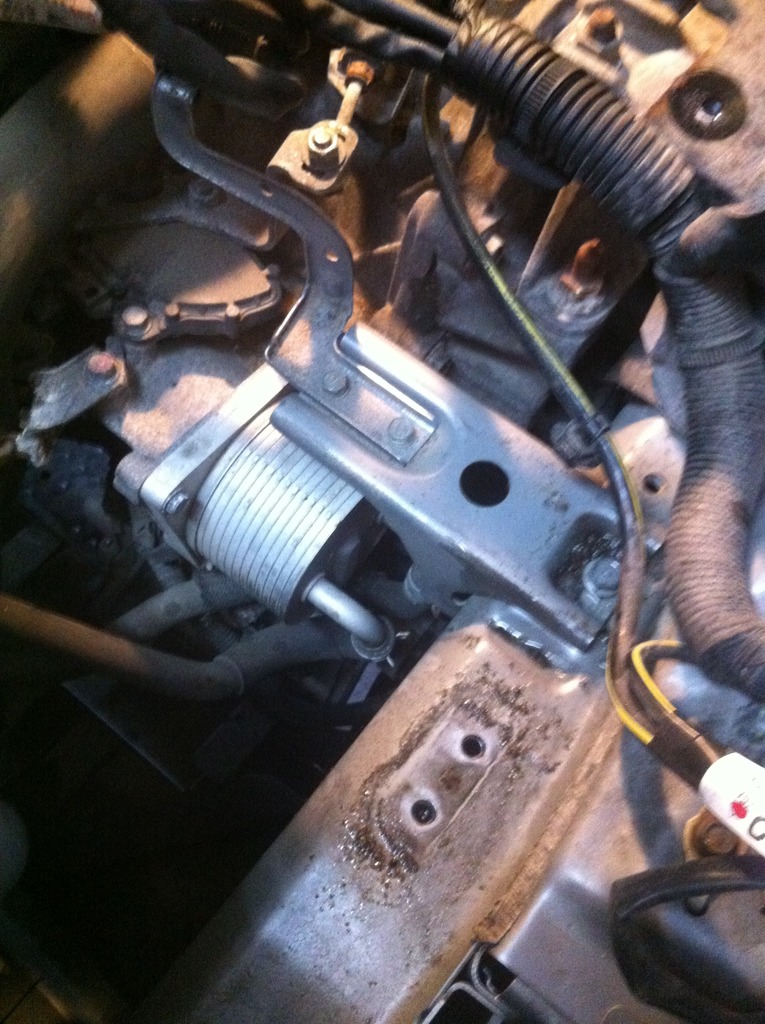
- Remove the second battery bracket
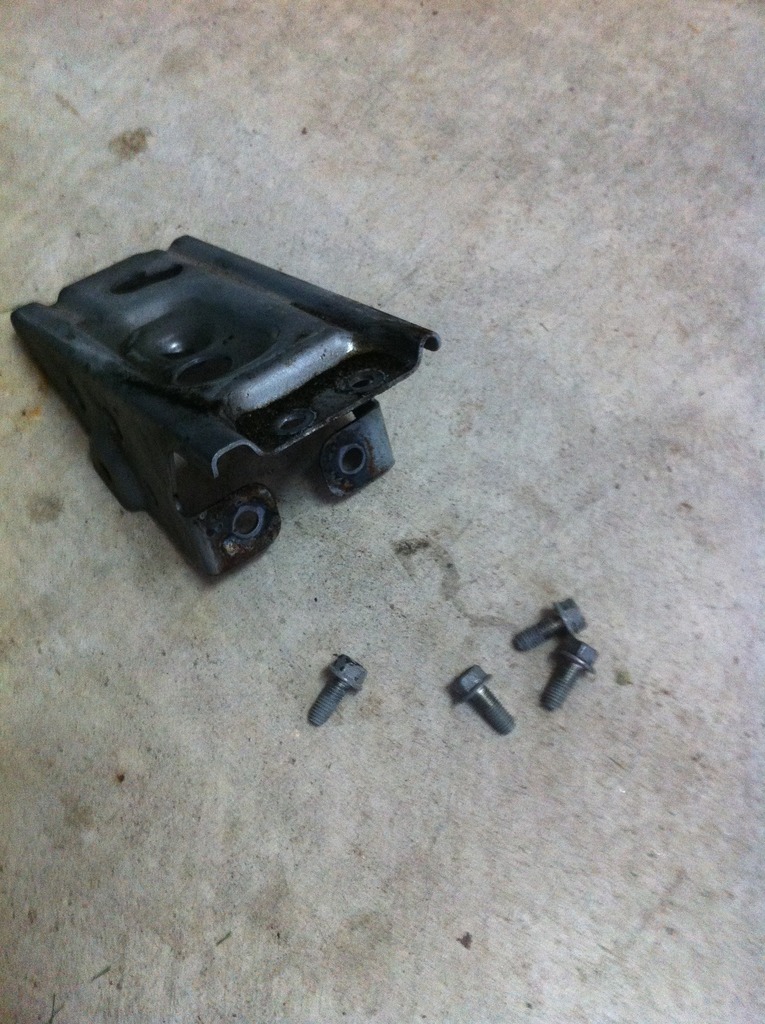
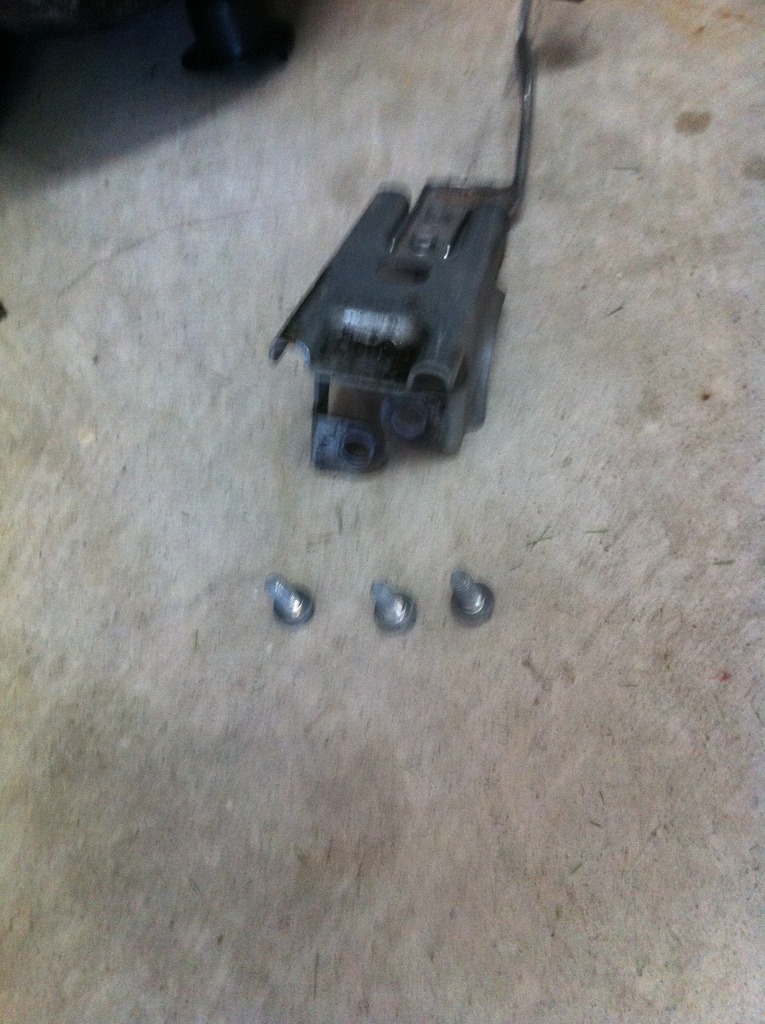
- There it is !, there are 4 bolts holding this unit, be prepared as there is a bit of CVT fluid that will flow once it is removed.
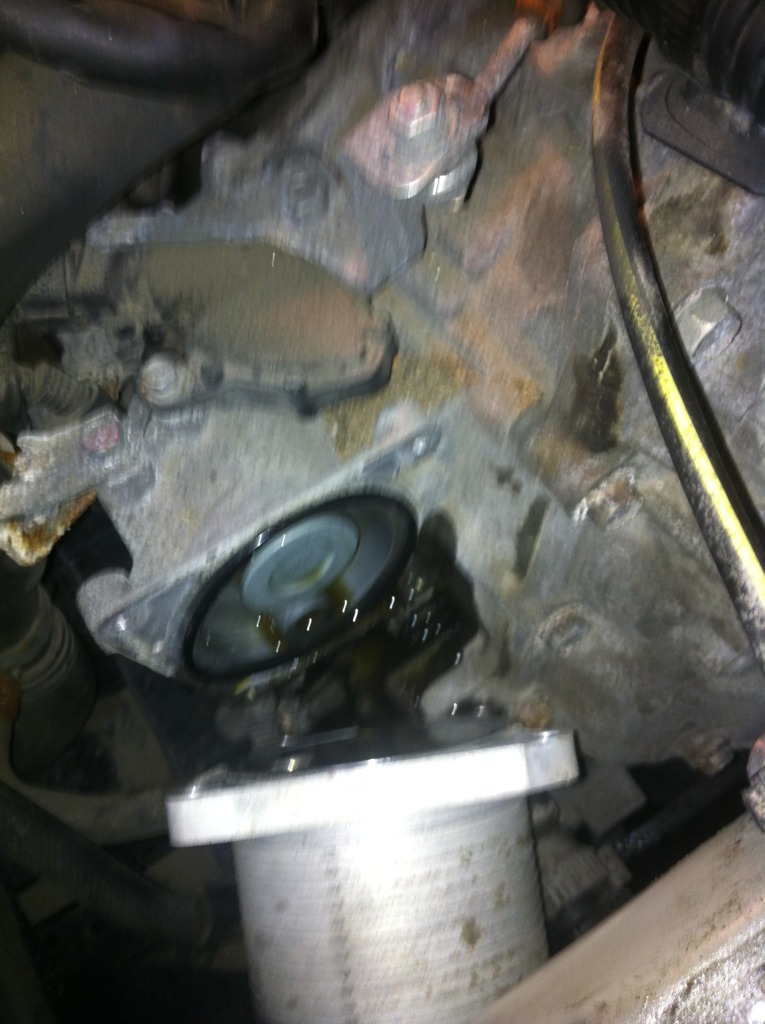
- The filter is in there, just pull on it to remove and pop in the new one.
- Don't forget to oil up the o-ring before assembling the unit back up (I didn't change the o-ring this time as none of the three dealerships around had it in stock).
- The warmer/cooler unit bolts require a torque of 5.1 N.m (per the service manual), this is really low and I didn't have an appropriate torque wrench for this, next time I will.
- Follow the reverse procedure to finish up the work.
- You may need to readjust the CVT fluid level after this.
- My dealership didn't even know about this paper filter, they usually just drain and fill and they do it only once.
----------------------------------
Some info about the deterioration parameter :
The temperature of the CVT fluid is continuously monitored. When it is below 50�C it is considered in the "warming-up phase", once it is between 50�C and 90�C, it is considered in its normal state. Each minute the CVT is operated with a fluid temperature between 90�C and 100�C, a deterioration counter is incremented by 1.
When the fluid temperature is between 100�C and 110�C, the increment is 2.
When the fluid temperature is between 110�C and 120�C, the increment is 4.
When the fluid temperature is between 120�C and 140�C, the increment is 6.
When the fluid temperature is above 140�C, the increment is 8.
source: https://www.drive2.com/l/6974861/
I don't know the threshold of the overtemp condition (150�C, 160�C ?), next time it happens I'll try to record it.
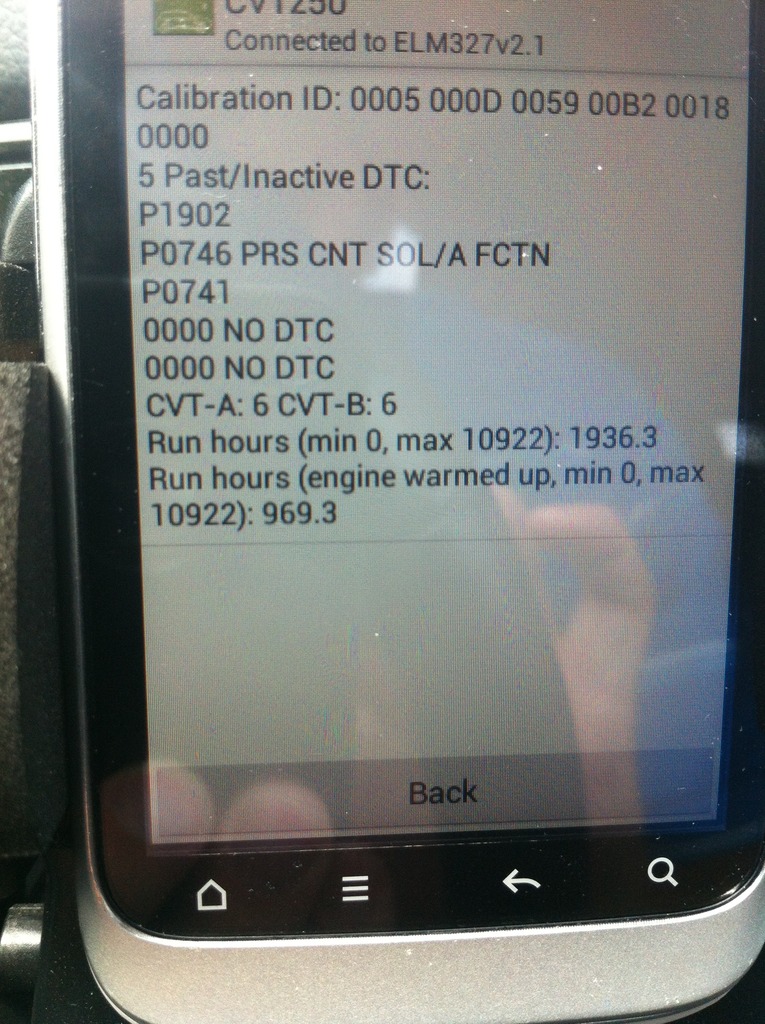
The maximum deterioration level is supposed to be at 210,000, at which point a "check engine" or some sort of warning should happen. That translates to 437.5h of operation with a CVT fluid temperature above 140�C, at an average speed of ~ 55 km/h that's 24,000 km. With a fluid temperature above 100�C, that's 1750h of operation or ~ 96,000 km.
At the time of my maintenance (~ 90,000 km) my deterioration level was at 32,000 (2,000h of operating time, 1,000h in the warm-up phase and 1,000h in a "hot" state).
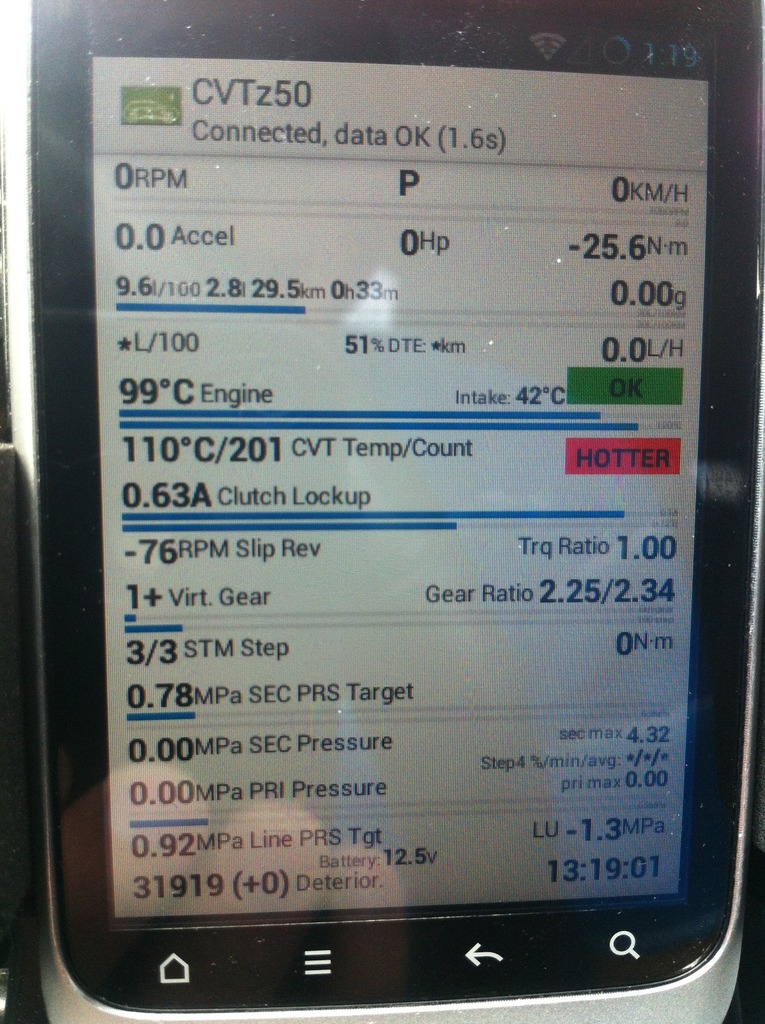
To monitor the temperature of the CVT fluid and reset the deterioration parameter once you have performed your maintenance you need :
- an ELM327 OBD device (bluetooth or WIFI)
- an android phone / tablet
- CVTz50, an android app which was originally developped for Nissan vehicles but now support our Mitsubishi Outlander (since August 2016 I think). It's very well done and works flawlessly.
-----
Alternative CVT fluid:
Mitsubishi recommends to use only the Mitsubishi CVTF-J4 fluid. That being said there are multiples CVT fluids out that claim to be CVTF-J4 compatible:
- Amsoil synthetic CVT
- Valvoline CVT fluid
- Lubeguard CVT fluid
- Redline non-slip CVT
- Motul multi CVTF
- Castrol transmax CVT
- Amalie universal synthetic CVT
- Ravenol CVTF NS3/J4 fluid
- BG CVT fluid NS-3 green
- Transguard CVT-99
- Motomaster CVT transmission fluid
I haven’t tested any of them, I stuck to the Mitsubishi 31 $ a pint stuff….this time.
I experienced two times this summer the "flashing D" situation, basically my CVT was overheating and that got me to research what kind of maintenance is required on those units.
The first time it overheated I was towing an empty trailer (~ 500 lbs, the car is rated for 1250 lbs) and going uphill in mountainous terrain. The second time was during a spirited drive in mountainous terrain, just my wife and I in the car, no cargo.
When it happens the power drops significantly, basically the car goes into limp mode and you need to park the car, pop open the hood and let the car idle so the CVT fluid has a chance to cool down a bit (it is warmep up / cooled down by the engine coolant, see below).
In the regular Mitsubishi maintenance schedule, there is nothing with regard to the automatic / CVT transmission (only inspection of the fluid for manual transmission every 32,000 km)
In the severe Mitsubishi maintenance schedule, the automatic transmission fluid is changed every 48,000 km.
My dealership says they change the CVT fluid every 96,000 km, and once your fluid overheats, it loses its properties and should be changed.
Some basic info :
The 2014 and 2015 Outlander are equipped with a JATCO JF011E CVT transmission, part # F1CJA (2WD) or W1CJA (4WD).
The 2016 Outlander are now equipped with the latest generation of CVT transmission from JATCO (CVT8), part # is F1CJC (2WD) and W1CJC (4WD).
The basic procedure to replace the fluid is a simple drain and fill (through the drain plug and the filler tube) two times (per the service manual), or more if the CVT fluid still comes out dirty (5.5 L per drain over a total of 7.1 L), the drain bolt torque is 34 N.m.
The final fluid level adjustment should be performed with the fluid temperature between 70�C and 80�C (use CVTz50 for that, see below), not higher than the top of the HOT mark at 70 �C and not below the bottom of the HOT mark at 80 �C (refer to the service manual).
If you want to make a more thorough job, you can drop the CVT oil pan, there are two magnets in there and it would be a good idea to clean up the metal shavings (that's what I had done this time). Furthermore there is a metallic filter in the pan (with a metallic screen) that can be cleaned or replaced depending on the condition. (part # 2824A007, google it to see what it looks like).
And finally there is a paper filter in the warmer/cooler assembly where the engine coolant flows that can be replaced (part # 2824A006 and o-ring # 2920A096). The service manual calls for a replacement from "down below", by removing the two plastic covers and work you way up the CVT. It might be quicker but I was not convinced it was the best way to perform the job, with the oil falling on you as soon as you remove the last bolt holding the unit. So here is the procedure to service the CVT paper filter from the top of the engine :
Start to removing the air intake assembly :
- There are two plastic clips to remove
- You need to disconnect the MAF
- You need to pop out the plastic clip that hold the MAF electrical cable to the air box
- You need to unscrew the collar connecting the air box to the engine intake
- You need to pop out from the air box the pipe at the top of the picture
- You can unscrew the only screw holding the air box
- You can remove what is on the negative terminal of the battery as we'll need to remove it next
- Remove the complete air intake assembly
- Remove what is on the positive terminal of the battery
- Remove the bar holding the battery
- Remove the battery (you can take the opportunity to clean it up and top it off with demineralized water)
- The negative cable assembly is attached to the battery tray, pop out the plastic clip holding it
- Once the battery tray is removed you can see the CVT warmer/cooler unit between the brackets holding the battery on the frame
- You need to unclip this cable assembly which lies on one of the battery bracket
- Remove the first battery bracket
- Remove the second battery bracket
- There it is !, there are 4 bolts holding this unit, be prepared as there is a bit of CVT fluid that will flow once it is removed.
- The filter is in there, just pull on it to remove and pop in the new one.
- Don't forget to oil up the o-ring before assembling the unit back up (I didn't change the o-ring this time as none of the three dealerships around had it in stock).
- The warmer/cooler unit bolts require a torque of 5.1 N.m (per the service manual), this is really low and I didn't have an appropriate torque wrench for this, next time I will.
- Follow the reverse procedure to finish up the work.
- You may need to readjust the CVT fluid level after this.
- My dealership didn't even know about this paper filter, they usually just drain and fill and they do it only once.
----------------------------------
Some info about the deterioration parameter :
The temperature of the CVT fluid is continuously monitored. When it is below 50�C it is considered in the "warming-up phase", once it is between 50�C and 90�C, it is considered in its normal state. Each minute the CVT is operated with a fluid temperature between 90�C and 100�C, a deterioration counter is incremented by 1.
When the fluid temperature is between 100�C and 110�C, the increment is 2.
When the fluid temperature is between 110�C and 120�C, the increment is 4.
When the fluid temperature is between 120�C and 140�C, the increment is 6.
When the fluid temperature is above 140�C, the increment is 8.
source: https://www.drive2.com/l/6974861/
I don't know the threshold of the overtemp condition (150�C, 160�C ?), next time it happens I'll try to record it.
The maximum deterioration level is supposed to be at 210,000, at which point a "check engine" or some sort of warning should happen. That translates to 437.5h of operation with a CVT fluid temperature above 140�C, at an average speed of ~ 55 km/h that's 24,000 km. With a fluid temperature above 100�C, that's 1750h of operation or ~ 96,000 km.
At the time of my maintenance (~ 90,000 km) my deterioration level was at 32,000 (2,000h of operating time, 1,000h in the warm-up phase and 1,000h in a "hot" state).
To monitor the temperature of the CVT fluid and reset the deterioration parameter once you have performed your maintenance you need :
- an ELM327 OBD device (bluetooth or WIFI)
- an android phone / tablet
- CVTz50, an android app which was originally developped for Nissan vehicles but now support our Mitsubishi Outlander (since August 2016 I think). It's very well done and works flawlessly.
-----
Alternative CVT fluid:
Mitsubishi recommends to use only the Mitsubishi CVTF-J4 fluid. That being said there are multiples CVT fluids out that claim to be CVTF-J4 compatible:
- Amsoil synthetic CVT
- Valvoline CVT fluid
- Lubeguard CVT fluid
- Redline non-slip CVT
- Motul multi CVTF
- Castrol transmax CVT
- Amalie universal synthetic CVT
- Ravenol CVTF NS3/J4 fluid
- BG CVT fluid NS-3 green
- Transguard CVT-99
- Motomaster CVT transmission fluid
I haven’t tested any of them, I stuck to the Mitsubishi 31 $ a pint stuff….this time.
Last edited by desbiensl; Sep 6, 2016 at 11:27 PM.


Junior Member
Joined: Dec 2016
Posts: 1
From: Montreal, Qc
I want to say thank you for this great write-up. I owned a Nissan Altima 2010 that uses the Jatco JF011 transmission. I bought the apps CVTZ50 for Android and can say it works very well. As mentioned it is more than a transmission application since it can show monitors status, scan and clear codes on the engine, do a power balance test, engine brake adjustment, adjust rpm to name a few.
The information you gave on fluid deterioration is very interesting. It is the only forum where I found it. Also the filter under the heat exchanger is a well kept secret at least on Nissan forums. Up to now Nissan replaced the valve body on my transmission (at 29K km). The car would restart in high gear after long highway drives. The stepper motor controlling the scoops opening was at fault. This problem is reported in the first few years of production. They cleaned sump and strainer and added 6 litres of fresh fluid when they replaced the valve body. I planned to replace the heat exchanger filter at least once.
In their procedure after emptying the sump Nissan uses the return line from the radiator cooling unit to complete the oil change until it runs clear in a container. They suggest 100k km for light service and sooner otherwise.
I�ll keep an eye on what you have to say in the future. Up to now, you guys and some Russian posts on the subject have been right on the money on how to maintain these units.
Best regards,


Member
Joined: Apr 2017
Posts: 43
I just now found your instructions on the Outlander cvt.My wife has a 2012 Outlander Sport with 4 wheel drive.The car has 65K on original fluid.I'm considering doing the job myself and was unaware of the paper filter.I was told by my dealership it was a drain and fill.Obviously they don't know about it either.Can you show where the drain plug is located?
Thanks for a great posting!!
Thanks for a great posting!!
Thread Starter
|
Junior Member
Joined: Sep 2016
Posts: 10
From: Quebec city
Hi,
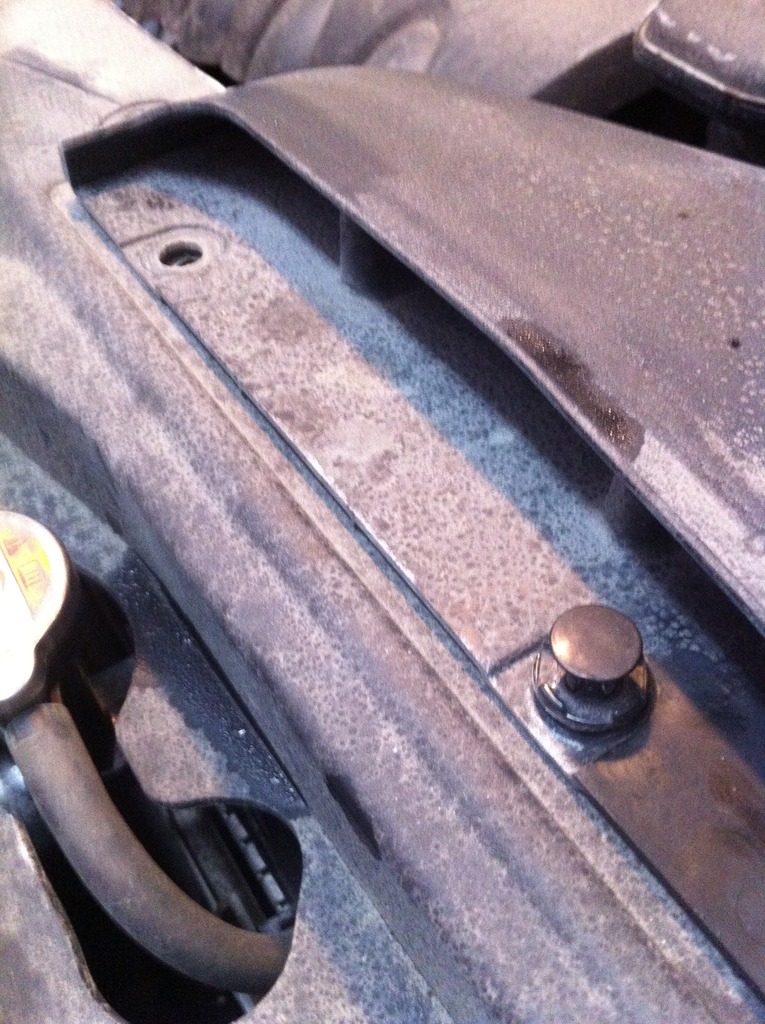
The drain plug fot the CVT transmission in on the pan completely at the bottom:

It is recommended to change the drain plug gasket. Filling up is done through the oil level gauge tube. The torque on the drain plug should be 34 N.m (on the newer models), check the service manual of your particular model to be sure as well as the fluid capacity / draining amount (since you cannot remove all the fluid).
Levels needs to be checked with fluid at 70-80�C, I would highly advise to use the CVTz50 Android software to measure the temperature.
Again, I would advise to take the time to read carefully the service manual on the CVT maintenance before proceeding.
If you want to go the extra step you can remove the transmission oil pan as well and clean the metal shavings you will find around the magnet in the pan.
good luck !
The drain plug fot the CVT transmission in on the pan completely at the bottom:
It is recommended to change the drain plug gasket. Filling up is done through the oil level gauge tube. The torque on the drain plug should be 34 N.m (on the newer models), check the service manual of your particular model to be sure as well as the fluid capacity / draining amount (since you cannot remove all the fluid).
Levels needs to be checked with fluid at 70-80�C, I would highly advise to use the CVTz50 Android software to measure the temperature.
Again, I would advise to take the time to read carefully the service manual on the CVT maintenance before proceeding.
If you want to go the extra step you can remove the transmission oil pan as well and clean the metal shavings you will find around the magnet in the pan.
good luck !
Member
Joined: Apr 2017
Posts: 43
So what's the point of checking the fluid temp? does it expand or something?Why can't I just measure what I get out and replace it?I was thinking of pumping it out without removing the drain plug.If I got six quarts doing this I'd be happy.
I called local dealer and they want $370 for drain and fill.They said they would only get about 4 quarts and the filter was "internal" and "unacessable".
Obviously you proved thats not true.Thanks for the diagram
I called local dealer and they want $370 for drain and fill.They said they would only get about 4 quarts and the filter was "internal" and "unacessable".
Obviously you proved thats not true.Thanks for the diagram
Thread Starter
|
Junior Member
Joined: Sep 2016
Posts: 10
From: Quebec city
Yep the fluid does expand with temperature, that's why you have a cold and a hot zone on the dipping gauge.
But you're right, if you measure what you drain you won't be too far off. Pumping it out through the filling tube ?, I don't know, may be, tell us how it went !, anyway if it doesn't work just remove the drain plug, it is no big deal.
The dealer may be talking about the metallic mesh that serve as a filter just behind the pan, it is not usually changed but if you go the extra step of removing the pan you're almost there, your call!
But at 65k mi it might be overkill you it can wait for the next maintenance.
So what's the point of checking the fluid temp? does it expand or something?Why can't I just measure what I get out and replace it?I was thinking of pumping it out without removing the drain plug.If I got six quarts doing this I'd be happy.
I called local dealer and they want $370 for drain and fill.They said they would only get about 4 quarts and the filter was "internal" and "unacessable".
Obviously you proved thats not true.Thanks for the diagram
I called local dealer and they want $370 for drain and fill.They said they would only get about 4 quarts and the filter was "internal" and "unacessable".
Obviously you proved thats not true.Thanks for the diagram