Nav Head Unit Pulled - NEW UPDATE with PICS


#122
 04-17-2007, 12:27 AM

Come on guys this is ending up like a honda forum with 14 year old kid fights. Kiss and make up now.[sm=kissykissy.gif]
I remember way back when, when this trend was about pulling a head unit
I remember way back when, when this trend was about pulling a head unit
#123
04-17-2007, 09:59 AM

well... as long is its ocean front, and has a bridge on it, count me in...
BTW.... I HAVE GOOD NEWS...
I GOT LAID LAST NIGHT...
dont know what got into the wife, and we prolly shouldnt have since we are still about a month out from having the baby, but against doctors orders...
wow, I had forgotten just how great that felt!!!
ahhhhhhhhhh, to be a man again.
LOL
BTW.... I HAVE GOOD NEWS...
I GOT LAID LAST NIGHT...
dont know what got into the wife, and we prolly shouldnt have since we are still about a month out from having the baby, but against doctors orders...
wow, I had forgotten just how great that felt!!!
ahhhhhhhhhh, to be a man again.
LOL
#125
04-17-2007, 10:07 PM
you wife seemed to enjoy it though [sm=owned.gif]
[sm=icon_cheers.gif]
[sm=icon_cheers.gif]
#128
04-19-2007, 06:54 PM

Join Date: Mar 2007
Location: Canada - you know, God's country
Posts: 454
Today Scott Bessel and I got on the phone and brainstormed the rear camera - SUCCESS!! Scott's going to give a full writeup of his install once completed but here are the Head Unit connection requirements:
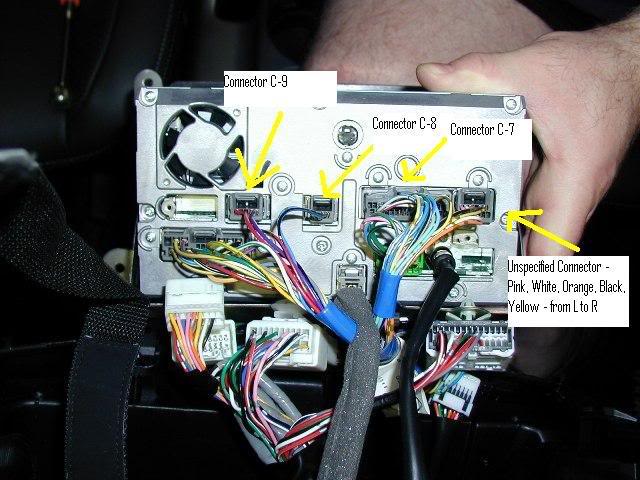
First there is a "unspecified connector" on the rear of the head unit. It is on the top right in the following picture with 5 wires going in, from left to right, pink, white, orange, black, yellow. This "unspecified connector" is nowhere in the Mits service manual and in fact does not go anywhere! It terminates at intermediary connector C-19. However, after testing the head unit pins, the orange pin has 75 ohm impedance and is video in. Black is ground.
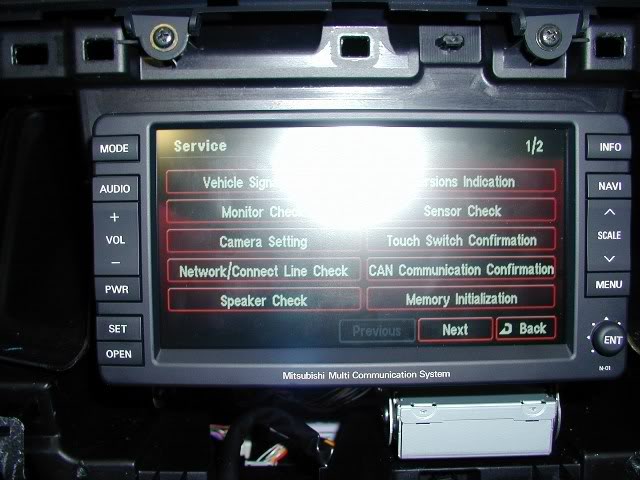
Scott figured out by grounding the yellow wire, it would allow the Nav unit to recognize a "Camera" connection.

Once grounded, go into the Service Menu and voila - the Camera Settings option is now available:
Select "Camera Setting" and it gives you a green grid which superimposes over the backup cam picture allowing you to calibrate precisely where your vehicle is in relation to the camera picture.
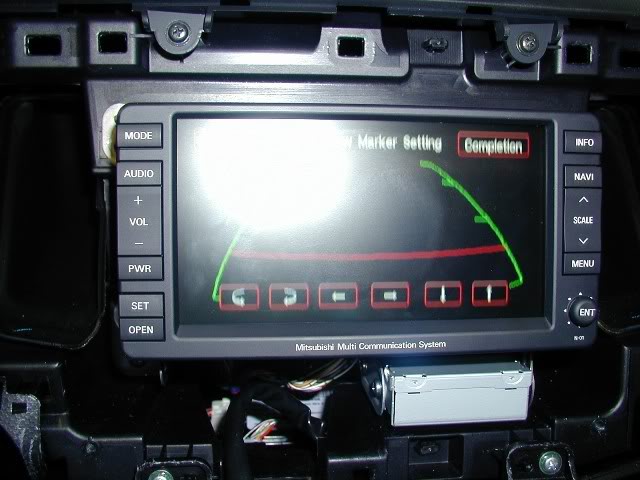
The really cool thing is once you put the car in reverse, it automatically switches to the backup camera view. Awesome!
(I actually don't have my camera yet as I tested with the handheld videogame Ms. Pacman via composite video- now everytime I put it in reverse, Ms. Pacman comes up on my screen!).
BTW - the orange wire is video in so connect that to your camera.
First there is a "unspecified connector" on the rear of the head unit. It is on the top right in the following picture with 5 wires going in, from left to right, pink, white, orange, black, yellow. This "unspecified connector" is nowhere in the Mits service manual and in fact does not go anywhere! It terminates at intermediary connector C-19. However, after testing the head unit pins, the orange pin has 75 ohm impedance and is video in. Black is ground.
Scott figured out by grounding the yellow wire, it would allow the Nav unit to recognize a "Camera" connection.
Once grounded, go into the Service Menu and voila - the Camera Settings option is now available:
Select "Camera Setting" and it gives you a green grid which superimposes over the backup cam picture allowing you to calibrate precisely where your vehicle is in relation to the camera picture.
The really cool thing is once you put the car in reverse, it automatically switches to the backup camera view. Awesome!
(I actually don't have my camera yet as I tested with the handheld videogame Ms. Pacman via composite video- now everytime I put it in reverse, Ms. Pacman comes up on my screen!).
BTW - the orange wire is video in so connect that to your camera.
#129
04-19-2007, 06:59 PM

Damn! You and Scott are studs, rdenis! Great job on figuring this out. Now the only problem we have left is getting an easy way to run wire to the trunk, unless that orange wire already goes to there.....
#130
04-19-2007, 07:03 PM
Join Date: Mar 2007
Location: Canada - you know, God's country
Posts: 454
Nope it doesn't go there - as I noted, it terminates at C-19 which is one of the white harnesses that kind of hangs off the Head Unit chassis. You're going to have to wire it either along the headliner or floor.