
SMALL UPGRADES


Junior Member
Joined: Jun 2009
Posts: 12
From: Warsaw, Poland
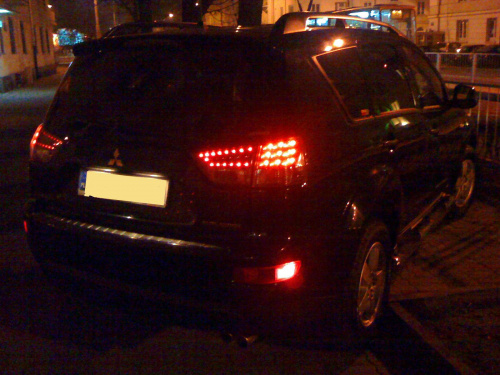
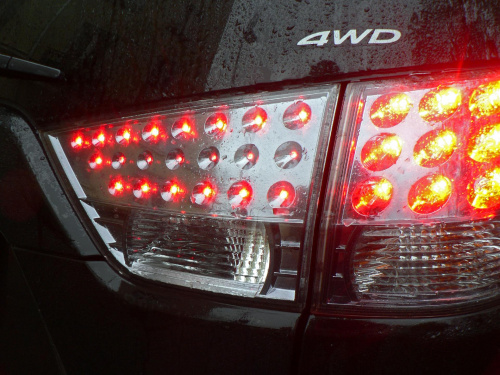
So, I did these LED back lights with a second pair of lamps.
Right now, after three months of joy test rides, I can say they work and look just great. This could be a factory option...
I am doing a second pair of these lamps from my standard spare one's, so I will be able to provide some photos from the process.
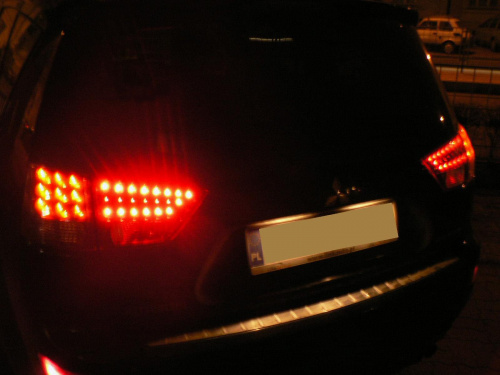
To get this 2-mode effect of a Led rim, or shark eyes on daily lights and full blink on stop, I had to dismantle lamps somehow and put the Leds in, wire it up and connect to the car's circuits.
Right now, the lights have more mean look, I think...
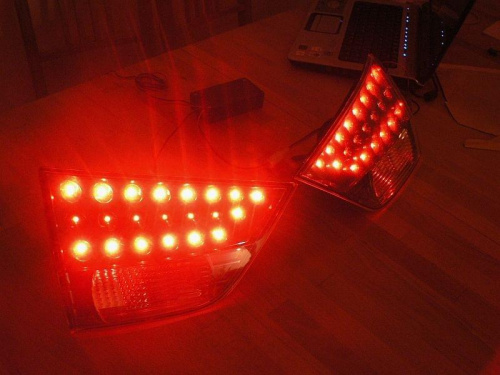
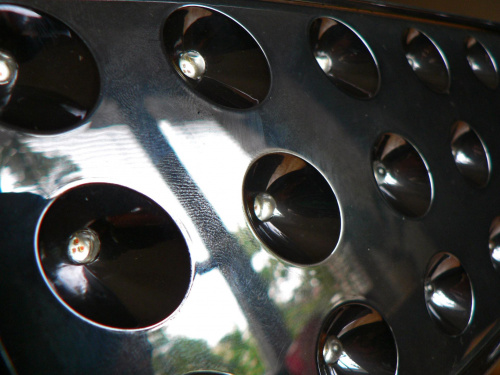
Ok, to do this I have used original standard lamps, 42(2x21) 3-chip red SuperFlux LED diodes (zoomed, they look like little mitsu symbols and are very powerfull 60mA), some clip-wires and a controller.
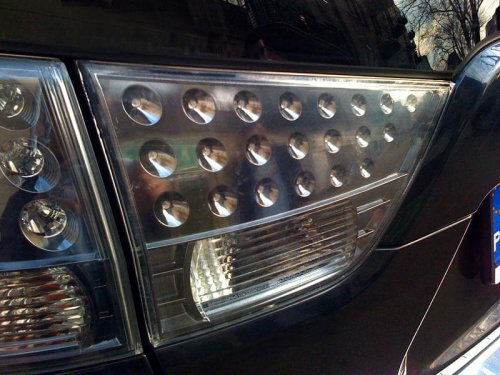
First step was to dismantle the Lamps, which requires cutting them from the back side and taking the plastic silver plate out. This is the most carefull part, You have to be very cautious doing this, beacous it is very easy to damage the lamps.
Then, I have cut and screw the silver plates gently to fit the Led's.
I wired lamps up(photo soon) and connected to the controller( photo soon), which can regulate the light intensity on each mode on demand, so You can turn leds to look like little sparks or destroy eyes of a person in a car behind Yours, if You wish..
The whole system is plugged into register plate lamp power circuit and uses about 15 Watts of power maximum.
The additional circuit runs from the 3rd Stop light circuit to the controller and gives a signal to change the mode.
What do You think of it? any opinion?
Right now, after three months of joy test rides, I can say they work and look just great. This could be a factory option...
I am doing a second pair of these lamps from my standard spare one's, so I will be able to provide some photos from the process.
To get this 2-mode effect of a Led rim, or shark eyes
on daily lights and full blink on stop, I had to dismantle lamps somehow and put the Leds in, wire it up and connect to the car's circuits. Right now, the lights have more mean look, I think...
Ok, to do this I have used original standard lamps, 42(2x21) 3-chip red SuperFlux LED diodes (zoomed, they look like little mitsu symbols and are very powerfull 60mA), some clip-wires and a controller.
First step was to dismantle the Lamps, which requires cutting them from the back side and taking the plastic silver plate out. This is the most carefull part, You have to be very cautious doing this, beacous it is very easy to damage the lamps.
Then, I have cut and screw the silver plates gently to fit the Led's.
I wired lamps up(photo soon) and connected to the controller( photo soon), which can regulate the light intensity on each mode on demand, so You can turn leds to look like little sparks or destroy eyes of a person in a car behind Yours, if You wish..
The whole system is plugged into register plate lamp power circuit and uses about 15 Watts of power maximum.
The additional circuit runs from the 3rd Stop light circuit to the controller and gives a signal to change the mode.
What do You think of it? any opinion?
Last edited by PabloEscobar_5; Jun 27, 2009 at 07:41 PM.

Senior Member
Joined: Aug 2007
Posts: 947
From: M�xico
Great Pablo, please, posted the writing about installation process, module control manufacture, and pics; I'm waiting by this modifications, so your directions will be helpful for my...
And thanks for share it!
And thanks for share it!

Junior Member
Joined: Jun 2007
Posts: 22
So, I did these LED back lights with a second pair of lamps.
Right now, after three months of joy test rides, I can say they work and look just great. This could be a factory option...
I am doing a second pair of these lamps from my standard spare one's, so I will be able to provide some photos from the process.
To get this 2-mode effect of a Led rim, or shark eyes on daily lights and full blink on stop, I had to dismantle lamps somehow and put the Leds in, wire it up and connect to the car's circuits.
Right now, the lights have more mean look, I think...
Ok, to do this I have used original standard lamps, 42(2x21) 3-chip red SuperFlux LED diodes (zoomed, they look like little mitsu symbols and are very powerfull 60mA), some clip-wires and a controller.
First step was to dismantle the Lamps, which requires cutting them from the back side and taking the plastic silver plate out. This is the most carefull part, You have to be very cautious doing this, beacous it is very easy to damage the lamps.
Then, I have cut and screw the silver plates gently to fit the Led's.
I wired lamps up(photo soon) and connected to the controller( photo soon), which can regulate the light intensity on each mode on demand, so You can turn leds to look like little sparks or destroy eyes of a person in a car behind Yours, if You wish..
The whole system is plugged into register plate lamp power circuit and uses about 15 Watts of power maximum.
The additional circuit runs from the 3rd Stop light circuit to the controller and gives a signal to change the mode.
What do You think of it? any opinion?
Right now, after three months of joy test rides, I can say they work and look just great. This could be a factory option...
I am doing a second pair of these lamps from my standard spare one's, so I will be able to provide some photos from the process.
To get this 2-mode effect of a Led rim, or shark eyes
on daily lights and full blink on stop, I had to dismantle lamps somehow and put the Leds in, wire it up and connect to the car's circuits. Right now, the lights have more mean look, I think...
Ok, to do this I have used original standard lamps, 42(2x21) 3-chip red SuperFlux LED diodes (zoomed, they look like little mitsu symbols and are very powerfull 60mA), some clip-wires and a controller.
First step was to dismantle the Lamps, which requires cutting them from the back side and taking the plastic silver plate out. This is the most carefull part, You have to be very cautious doing this, beacous it is very easy to damage the lamps.
Then, I have cut and screw the silver plates gently to fit the Led's.
I wired lamps up(photo soon) and connected to the controller( photo soon), which can regulate the light intensity on each mode on demand, so You can turn leds to look like little sparks or destroy eyes of a person in a car behind Yours, if You wish..
The whole system is plugged into register plate lamp power circuit and uses about 15 Watts of power maximum.
The additional circuit runs from the 3rd Stop light circuit to the controller and gives a signal to change the mode.
What do You think of it? any opinion?
Junior Member
Joined: Jun 2009
Posts: 12
From: Warsaw, Poland
Hello guys,
I just came back from holidays and tomorrow I go for next two weeks of holidays..
I'm glad You like this project and i will answer all Your questions in about two weeks.
I have already made three complets of these LED lights for my friends and You may see them on the roads, and I'm considering starting some bigger manufacture, so this back lights will be available from me worldwide..this still depends on my motivation
I thought about some options and this is what came to my mind:
I will give all the details for free, so you can make this on Your own,
or I can manufacture and send separate or a complet of:
Led diodes, Tuned LED lamps, controller and wires.
Cheers
Paul

