
Detailed Rear Camera Installation


Junior Member
Joined: Sep 2009
Posts: 18
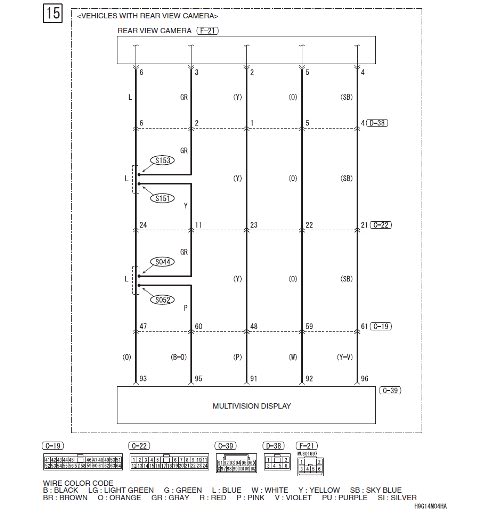
The D-38 connector is under the passenger seat.
It's a 12-pin connector
The hardness Parts # MZ607384EZ connect directly on the rear of MMCS, it does not use this connector.
It's a 12-pin connector
The hardness Parts # MZ607384EZ connect directly on the rear of MMCS, it does not use this connector.
Last edited by Ian; Sep 13, 2009 at 04:38 PM.

Senior Member
Joined: Aug 2007
Posts: 947
From: M�xico
Sorry, my mistake. According to the mitsupartsman's diagram, F-21 is the other end, that according to which mentions mitsupartsman in post 108, will have to be in back door. My Outie doesn't have this prewiring, at this point I don't can to see by F-21 connector, but I have the 'F' diagrams, I will check it.
Last edited by jsrd; Sep 14, 2009 at 08:15 AM.


Senior Member
Joined: Nov 2008
Posts: 281
From: South Florida
I was Googling for
MZ607384EX rear camera harness
MZ380461EX rear camera kit
and came across this website with nice diagrams:
http://forums.evolutionm.net/evo-x-h...nse-plate.html
MZ607384EX rear camera harness
MZ380461EX rear camera kit
and came across this website with nice diagrams:
http://forums.evolutionm.net/evo-x-h...nse-plate.html

Junior Member
Joined: Oct 2008
Posts: 19
Many thanks to everyone on this forum for their excellent posts. Using them, I installed a backup camera on our Outty, and while the vehicle was pulled apart, I installed the OEM hitch wiring harness, as well as a Curt hitch. I thought it would be usefull for you to see the results of the specific camera I used when you make your purchase.
I went with a CCD camera from ebay for $69.95 with free shipping from Duncans Online. It took about two weeks to get here coming from Hong Kong, but camera is quite nice. It has 110 degrees of view and IR assist.
http://cgi.ebay.com/ebaymotors/Backu...ltDomainQ5f100
After following the direction on the first page of the post, I just used a wood hole saw bit in the drill to make the hole in the metal. That was simple enough.
I positioned it so that it overlapped the radius in the metal slightly so that it wouldn't have to cut into the visible surface of the trim piece. To accommodate that, I ground down the included adapter rings to match the surface of the metal.
Using a couple O-rings, I secured it in place with the included nut rings. Rather than splice the main harness on the nav unit for power, I just tapped into the reverse light for camera power. I didn't even splice the vehicle wire, I just squeezed the addition wire into the factory connector, and taped it very well.
For signal wire, I just used home in-wall speaker wire that I had laying around. I chose not to compromise the airbags, so I chose to run the wire along the floor. This was aided slighlty by the fact that I also installed the hitch wiring harness at the same time, so I had that little cubbie on the wheel well popped out. That, and having the jack area open allowed good access to the hole back side. Below the doors I just tucked it into the trim pieces.
At the front end, I run the wire behind the glove box, and up to the nav unit. Info on how to deal with the nav unit is on page 8 of the post. Because I already had power from the reverse light, I only needed to splice the wires of the camera connector, and avoid that big mess of the main harness.
All went quite well, and it worked on the first try. The camera quality is just fine, I'm sure that cheap nav screen is the limiting factor. You can see from the photos the angle of vision. The driveway slopes downward slightly, so you are seeing a little more than you would on a flat surface. In reality it's probably about 15-20' of vision.
It would be nice to have a little more, but as you can see, it is already cropped by the bumper below and the trim piece above. This could be greater if I were to extend the camera out further by putting the spacer sleeve on the outside rather than the inside, but then it would be a very noticeable from behind.
Also notice the red battery jumper i placed behind the vehicle. you can just see a corner of it on the screen. It is about 11 inches from the bumper. You wouldn't be able to see much more than that, because the bumper would be in way.
So all-in-all, I am very happy with it.


